Your phone Back of the phone: 2.0Mpix camera but can be interpolated to high resolution 1600*1200 Side volume key Headphone jack Power key Charger/Micro USB port Touch screen Micro-SD card Home Menu Back Search Philips continuously strives to improve its products. Due to software upgrading, some contents in this user guide may be different from your product. Philips reserves the rights to revise this user guide or withdraw it at any time without prior notice. Please take your product as standard.
Status Bar Home screen You may activate functions of this device by operations on the touch screen. There are five main screens, which could be switched by sliding to the left or the right. Tap [Home Key] in any interface to go back to the main screen. Tap an application icon on the main screen to start that application. Tap Apps Panel to find all applications.
Keys Learn about the main keys: Home -Return to the home key screen. -Press and hold to open the list of recent Key Definition Power Function -Press to turn on/off the key screen display. applications. Back key screen or exit. -Press and hold to access -Hide the onscreen the Phone options, keyboard while it’s choose Silent, Airplane mode, Power off or Mobile Data. Menu -Open options menu key available on the current screen. -Hide the onscreen options menu while it's opened.
Shortcuts Notification Panel Learn about the shortcuts: When you get a new notification, you can open the Notifications panel to see what event notification or Shortcuts Definition Messaging Function -Quick access to messaging. Phone -Quick access to dial phone. Contacts Apps Panel new information you have received. The Notifications panel lets you quickly switch between recently-opened apps. To open the Notifications panel, press and hold the status bar, then slide your finger downward.
Status Icon Icons N SMS or MMS. New Function W WLAN is activated. Y Your phone will not ring when receiving a call. Y Your phone will vibrrate when receiving a call. T bars indicate thee battery level. The C Connect to PC. Flight mode activated d. B Bluetooth is activated d. Y Your phone is conneected to a T alarm clock is acctivated. The GSM/WCDAM netw work. The more bars are shown the better b the T headset is pluggeed into the phone. The reception is. Call in progress. Call on hold.
Table of contents Search settings ............................................... 19 GETTING STARTED ................................. 6 Web browser ................................................ 19 Assembling and Charge ................................. 6 INTERNET CONNECTIONS ................. 20 Insert a Micro SD card (Memory card) ..... 8 Bluetooth ........................................................ 20 Personalize your phone ............................... 10 WLAN ........................
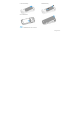
Getting started Congratulations on your purchase and welcome to Philips! To get the most of your product and enjoy all Philips Assembling and Charge Learn about installing SIM card and charging the battery for the first use. Insert SIM card has to offer, register your product at: www.philips.com/mobilephones Follow the steps below to insert your SIM card. Remember to turn off your mobile phone before More details about your product please access: removing the back cover. www.philips.com/support 1.
2. Take out the battery. 4. Install the battery. 3. Insert the SIM card. 5. Replace the back cover. Note: • SIM1 is for WCDMA/GSM card. SIM2 is for GSM card.
Charge thee battery A new battery is partially charged d. The battery icon over time. • If a battery is being used for the first time t or the battery has not been used for f a prolonged period, it i may take longer time to recharge. in the upper-right corner shows the battery level of charging stattus. Insert a Micro M SD card (Memory ( card) Insert a meemory card Insert into thhe slot with the side of o the golden contacts facinng up; push in the dirrection as indicated in the picturee.
Remove the memory card Before removing a memory card, first unmount it for > Settings > Storage > Unmount SD card. 2. Press down the card holder and push out the memory card. • Before formatting the memory card, remember to make backup copies of all important data stored on your device. The manufacturer’s warranty does not cover loss of data resulting from user actions.
4. Delete the widgets and icons: Press and hold the Note: • Before turning on USB storage, make sure you have mounted the memory card to your phone. Personalize your phone Make the phone look and sound just the way you want it to. Personalize it with a different wallpaper, skin, ringtone, and notification sound for events such as incoming text, email, and calendar reminders. 1. Change the wallpaper: Tap >Wallpaper to choose the one you want. 2.
Basic function Tips • When a call is in progress, use the buttons onscreen to mute Calls Make a call from Dialer 1. Tap in the main screen to enter dialer interface. or unmute the microphone or to turn the speakerphone on or off. • When a call is in progress, you can tap Hold and then tap Add call to add a new call, the first call will be hold automatically. Use Speed dial 2. Input the phone number you want to dial in the interface, tap to make a call.
1. In the idle mode, tap Messagin ng>New Tips • The number 1 key is generally reservved for your voicemail. Press and hold this key to call voicemail and retrieve your voicemail messsages. Call a phonne number in a texxt message or email message.. 2. Edit or add d the receiver from Contacts C . 3. Edit the teext message in the teext box. 4. Tap > >Attach to add Pictuures/Videos/Audio/ 1. Tap and hold the phone number within the VCard/Slid deshow if you want to o sent an MMS e to have menu options.
Message setting options 2. Tap Manual setup to select the type of account. You can set storage, SMS signature etc. by tapping 3. Finish details like server. Messaging > >Settings. 4. Tap Next to complete the setup. Note: Email • When you are finished setting up the email account, the You may receive and send emails via Email. • Consult your mail service provider for the mail server email messages are downloaded to your device. Set up Email 1. In the applications menu, tap Email. 2.
address. If necessary, tap >Add Cc/Bcc to input other recipient’s email address for cc or bcc. 4. Tap Subject and input the subject. 5. Tap Compose Mail and input the text. 6. Tap > Add attachment to insert the file as needed. 7. Tap Send to send the email. Receive emails 1. In the applications menu, tap Email. 2. Tap > Refresh. 3. The device will connect to the server and download emails. All emails received will be saved in the Inbox. Basic function 14 4. Tap the email to read. 5.
Multimedia and camcorder mode. Camera 4. Tap to start taking photos in camera mode. Learn about camera function. Let you take photos as 5. Tap to start recording videos in camcorder desired by using your phone. mode. Gallery 6. After taking photos/recording videos, select Gallery to view. Switch button Shutter button Camera settings Before taking photos/recording videos, customize your camera settings in Settings menu. Settings menu Take a photo/Record a video 1.
4. Tap 5. Tap and scroll the bar to Zoom. to Select camera (front or back new playlist. 3. In now playing screen, tap >Use as ringtone, you can set the current music as ringtone. camera). Function Music Definition Play and resume playback. You can play your favorite music through music player. Pause playback. Note: • Please install the memory card with music saved before playing music. Select previous track. Play Music Select next track. 1. In the application menu, tap Music.
Activate Shuffle mode, play current Function Definition in randomly Tap to add a new frequency. Select to enter into playlist. Tap to search the radio frequency automatically. Tips Press to turn on/off Radio. • When listening to music, adjust the volume to a moderate level. Continuous exposure to high volume may impair your hearing. Tap to view all presets list. FM Player To listen to the FM Player, you must connect headset, which serves as the radio antenna.
Download applications from Android Market 2) Select the item you want to delete. Based on the Android platform, your device’s 3) Select Uninstall > OK. functionality can be extended by installing additional applications. Android Market provides you an easy and quick way to shop for games and mobile applications. 1. Install an application 1) In Idle mode, open the application list and select Market. 2) Select Accept when the terms and conditions appear.
Search and Web Going to a webpage You can search for information on the phone and on 1. Tap Browser to enter the wap, then tap URL the Web by using Google Search. field on top of the screen to input the web address. Search settings 2. Tap 1. Tap > >Search settings. 2. Tap Google search to set whether to show web suggestions or not. 3. Tap Searchable items to select items you want included when doing a search. 4. Tap Clear shortcuts to clear shortcuts to recently chosen search suggestions.
Internet connections Receive data via Bluetooth Bluetooth 1. Turn on the Bluetooth function, then tap Settings> The device supports wireless Bluetooth connection settings >Discoverable to make device found. to create wireless connections between the device and the Bluetooth earphone, hands free Wireless & networks>Bluetooth 2. Tap Scan for devices. vehicle-mounted phone equipment, computer or 3. Select a device, enter a pair password and select other devices for data exchange.
2. Tap > >Share>Bluetooth. WLAN search and connection 3. Select a paired Bluetooth device on the list, and then the file will be sent directly. 1. In the applications menu, tap Settings> Wireless WLAN 2. Tap WLAN to turn on and search. If WLAN is on, You may connect to Wi-Fi for wireless internet and download. Connect to WLAN 1. In the applications menu, tap Settings> Wireless & networks. 2. Tap WLAN to select or clear WLAN check box. & networks> WLAN settings. tap >Scan.
Settings incoming ringtone. Sound setting 1. In the applications menu, tap Volume Settings>Sound >Phone ringtone. 2. Scroll the ringtone list up and down, tap the 1. In the applications menu, tap Settings> ringtone name to listen; select one and tap OK to Sound >Volume. save. 2. Scroll the incoming volume indicator to adjust, Screen settings select and tap OK to save. Set wallpaper 3. In the main screen, press the volume on the side to adjust the current volume. Press the volume down 1.
Live wallpaper time before the screen automatically locks. You may set the screen with live wallpaper. 1. In the applications menu, tap Settings>Display>Screen timeout. 1. In the main screen, tap and hold to open the menu options. 2. Tap Wallpaper and select from Live wallpapers. 3. Select the wallpaper you like and tap Set 2. Select and tap the screen timeout time to finish the settings. Security setting Factory data reset wallpaper. 1. In the applications menu, tap Settings> Privacy.
Safety & Precaution Precaution Keep your phone away from small children Keep your phone and all accessories out of the reach of small children. Small parts may cause choking or serious injury if swallowed. Radio Waves Your phone transmits/receives radio waves in the GSM frequency (850/900/1800/1900MHz) and WCDMA frequency (850/1900MHz). Check with the vehicle manufacturer that electronic equipment used in your vehicle will not be affected by radio energy.
behind a window or a windscreen), the temperature of your phone's casing might increase. Be very careful in this case when picking up your phone and also avoid using it with an ambient temperature over 40° C. Protect batteries from damage You should only use Philips Authentic Accessories, as the use of any other accessories may damage your phone and may be dangerous, and will make all guarantees for your Philips phone null and void. The use of an unspecified type of battery may also cause an explosion.
When this crossed-out wheeled bin symbol is attached to a product it means the product is covered by the European Directive 2002/96/EC • Switch off your phone if you suspect that interference is taking place. Please inform yourself about the local separate collection system for electrical and electronic products. Hearing aids Please act according to your local rules and do not dispose of your old products with your normal household waste.
Troubleshooting The phone does not switch on Remove/reinstall the battery. Then charge the phone until the battery icon stops scrolling. Unplug the charger and try to switch the mobile on. shadow (in a tunnel or between tall buildings) or you are outside the network coverage area. Try from another place to reconnect to the network (Especially when abroad), check that the antenna is in place if your mobile has an external antenna, or contact your network operator for assistance/information.
You can’t send text messages Some networks don’t allow message exchanges with other networks. First check that you have entered the number of your SMS centre, or contact your operator for detailed information on this subject. You can’t receive and/or store JPEG pictures A picture may not be accepted by your mobile phone if it is too large, if its name is too long, or if it doesn’t have the correct file format. problem persists, your SIM card may be damaged. Contact your operator.
performance. A car kit is available to provide you with an external antenna and enables you to make and receive phone calls without handling the handset. Sweden and licensed to Philips. Philips Note: • Check with the local authorities whether or not you are allowed to use the phone while driving. Your phone is not charging PHILIPS and PHILIPS’ Shield Emblem are registered trademarks of Koninklijke Philips Electronics N.V. manufactured by Shenzhen Sang Fei Consumer Communications Co., Ltd.
The exposure recommendations for mobile phones use a measurement unit known as the Specific Absorption Rate (SAR). The SAR limit recommended by the ICNIRP for the mobile phones used by the general public is 2.0W/kg averaged over ten grams of tissue and, is 1.6W/kg averaged over one gram of tissue by IEEE STD 1528 for the head. Tests for SAR have been conducted using recommended operating positions with the mobile phone transmitting at its highest certified power level in all tested frequency bands.
are designed to provide reasonable protection against harmful interference in a residential installation. This equipment generates uses and can radiate radio frequency energy and, if not installed and used in accordance with the instructions, may cause harmful interference to radio communications. However, there is no guarantee that interference will not occur in a particular installation.
original limited warranty period or ninety (90) days from the date of repair or replacement whichever is longer. Repair or replacement of Product, at Philips’ option is your exclusive remedy. g) Product returned without valid proof of purchase or which proof of purchase has been altered or is illegible. 4. 5.
CANNOT BE EXCLUDED OR MODIFIED BY AGREEMENT, PHILIPS PROVIDES NO OTHER WARRANTY WHETHER EXPRESS OR IMPLIED (WHETHER BY STATUTE, UNDER THE OPERATION OF LAW OR OTHERWISE) AND SPECIALLY DISCLAIMS ANY WARRANTY OF SATISFACTORY QUALITY MERCHANTABILITY OR FITNESS FOR A PARTICULAR PURPOSE. PHILIPS’ TOTAL LIABILITY FOR DAMAGES RELATING TO OR ARISING OUT OF THE PURCHASE OR USE OF THE PRODUCT, REGARDLESS OF THE TYPE OR CAUSE OF SUCH DAMAGE OR THE FORM OR CHARACTERISATION OF THE CLAIM ASSERTED (E.G.
Philips GSM 850/900/1800/1900, WCDMA 850/1900 TAC number: 8618 8401 to which this declaration relates, is in conformity with the following Standards: SAFETY: EN 60950-1:2006/A12:2011 The Conformity assessment procedure referred to in Article 10 and detailed in Annex III or IV of Directive 1999/5/EC has been followed with the involvement of the following Notified Body(ies): British Approvals Board for Telecommunications TUV SUD Group Balfour House Churdhfield Road-walton-on-Thames Surrey KT12 2TD United Kin