Please read and understand this manual before attempting installation of the product. X Series User Guide November, 2015 V2.0 Statement If the user manual doesn’t help you to solve the problem, please call our technology center for technical support.
用户手册 Notice 1. Installation Environment Keep away from the places for high-temperature, heat source and direct sunlight; Keep away from water and if wet, power off immediately. Avoid using in the damp environment; the reference range for operation humidity is below 85%RH.
用户手册 1 Index Product Introduction .................................................................................................................... 1 2 1.1. Product Overview ............................................................................................................ 1 1.2 .Product Exposition .............................................................................................................. 1 Device Connection..................................................................
用户手册 5.1.5.1. 5.1.5.2. IO Detect ................................................................................................... 20 Motion Detection ..................................................................................... 20 5.1.5.3. 5.1.5.4. 5.1.5.5. Audio Detection ....................................................................................... 21 Linkage alarm setting ............................................................................. 21 Protected duration setting ..
用户手册 1 Product Introduction 1.1. Product Overview Thank you for choosing X series high definition SmartP2P IP Camera, the IP Camera combines a high definition digital video camera with network connectivity and a powerful web server to bring high definition video to your desktop from anywhere on your local network or over the Internet. It includes indoor HD PTZ camera, indoor HD cube camera, outdoor HD waterproof camera etc. It is very suitable for home, shops, offices and so on.
用户手册 the infrared light in, which make the picture more true; Lens: Due to focus length of lens is different, so vision angle of lens is different. Please twist the lens for best effect if the video is fuzzy;(each lens of camera is focused well before deliverying, we advise not to adjust the lens ) PTZ: Control PTZ remotely, view video from several vision angle.
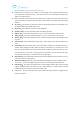
用户手册 2 Device Connection 2.1. Connection Diagram Figure1 Power on the camera by attaching the power adapter, and then connect the camera and router by network cable, so you can visit the camera via computer in LAN and view camera video as <<3. View video by browser>> You can also connect camera and router by Wi-Fi, you need to configure Wi-Fi of the camera as<<2.2 Wi-Fi Setting>>. 2.2. Wi-Fi Setting You can setting up the Wi-Fi as the following three way. 2.2.1.
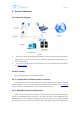
用户手册 always on. Notice: Due to some router do not support WPS/QSS function, so you can not use the configuration way. Figure2 2.2.3. Mobile Phone Setting please make sure the smartphone is connected WiFi ,Install the iSmartViewPro App in android phone or iPhone at first, open the App, access to More interface, select “One key configure Wi-Fi” and fill in Wi-Fi password, and then click configure to finish the setting as Figure3.
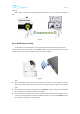
用户手册 3 View Video by Browser 3.1. Select View Mode in web Double click to Open the “SearchPro” in the attached CD and click Search as Figure 4. Select the founded device and double click it to open browser automatically, enter user name and password at popup dialog to login camera webpage as Figure5. Tips: default username/password:admin/123456, please modify the password for safety.
用户手册 Google browser version: 42 version or below. Firefox browser version:43 version or below Support IE browser IE 8,IE 9,IE 10,IE 11. Figure6 View Video- Mode 2:Flash Player View Mode(Adobe Flash Player plug-in) If the browser was not installed Flash Player plug-in, there will be tips for downloading and installation. If select Mode 2,It doesn’t support multi-view, multi-area motion detection functions, etc. Support Microsoft Edge browser. 3.2.
用户手册 Stop video Multiview Play video Listen Show/Hide control panel Cruise Horizontally Cruise Vertically Talk Snapshot Record 1920x1080/1280x720 Stop Cruise Centre Zoom in/out 640x360 320x180 Return to Homepage Note: 1. You can view one or four video in a screen, need to set up the cameras in 5.1.1.5 multiple setting. 2. You can click to zoom in and out the video, 1x, 2x, 3x, 4x optional. 3.
用户手册 4 Query and Playback SD Record by Browser 4.1. Playback Video Click Playback Video to access to SD record playback interface, click record date which you want to query ,click Search to list recording file, select one to playback it, also can click download button to download the file as Figure 9. Figure 9 5 Device Configuration and Local Setting 5.1. Device Configuration 5.1.1. System 5.1.1.1.
用户手册 Figure10 5.1.1.2. Time Setting You can do time setting,active “Synchronize with PC”etc.as Figure11. When IP Camera is connected internet,it will auto adjust NTP server time. After IP Camera is startup,it will auto adjust the time according to NTP server’s all addresses;after that, it will auto adjust NTP server time per 30 minutes. Figure11 5.1.1.3.
用户手册 2. Back to the place which is setted before camera restart: when you call preset NO.9, the camera will be back to the place where power off or restart after finishing self-checking. Figure12 5.1.1.4. Others Setting You can turn off Status LED(Red) and Wi-Fi LED(Blue) of the camera in others setting as Figure13. Figure13 5.1.1.5.
用户手册 Figure14 5.1.1.6. System Maintenance The system maintenance includes System setting and Restart timing setting. You can set up reboot, backup setting, restore backup setting, upgrade camera and timing reboot etc as Figure15.
用户手册 5.1.1.7. Device information You can modify device name and check system firmware version, system firmware time and Web UI firmware here as Figure16. Figure16 5.1.2. Network 5.1.2.1. IP Address Setting You can modify IP address of the camera here, there is no default IP address, it is DHCP.as Figure17. Figure17 5.1.2.2. Port Setting You can change webpage HTTP port here as Figure18.
用户手册 5.1.2.3. Wi-Fi Setting Click Search and enable Wi-Fi, then select the wireless router you want to connect, enter password of the router, click Save to finish the Wi-Fi configuration. Click Test to check if your settings are successful or not as Figure19. Figure19 5.1.2.4. Port Forwarding Access to port forwarding, you can enable UPNP port forwarding and check the status of it as Figure 20. Figure 20 5.1.2.5.
用户手册 3322.org/Dyndns.org/No-ip.com now, the manufacturer provide a free DDNS for every camera.as Figure21. Figure21 5.1.2.6. RTSP Setting You can set up RTSP port, also can off RTSP authentication as Figure 22. Figure22 You can view video by some general RTSP stream media software, for example, VLC. The visit link as below: First stream:rtsp://user:password@IP:rtsp port/live/ch0 Second stream:rtsp://User:password@IP:rtsp port/live/ch1 Third stream:rtsp://user:password@IP:rtsp port/live/ch2 5.1.2.7.
用户手册 5.1.2.8. FTP Setting Access to FTP setting, please fill in relative FTP parameters as the following case to achieve the FTP transfer as Figure24. Figure24 5.1.2.9. SMTP(E-mail)Setting Please fill in relative parameters as the following case to achieve the E-mail transfer, as Figure25.
用户手册 5.1.3. Audio and Video 5.1.3.1. Video Encoding Setting Access to Video Encoding setting, you can set up AC frequency and video stream as Figure26. AC frequency: 50HZ and 60HZ optional; Video stream: Bit rate (256~4096kbps), frame rate (1~30fps), video encoding control etc; Tips: you can set up the video with audio or not. Figure26 5.1.3.2. Volume Setting Access to Volume setting, you can adjust the volume of MIC and speaker as Figure27. Figure27 5.1.3.3.
用户手册 Figure29 5.1.3.4. OSD Setting Access to OSD setting, you can overlay the time and name in Live video as Figure29 Figure29 5.1.3.5. Night vision Settings Access to Night vision Settings, you can set up IR LED and IRCUT as Figure30.
用户手册 Figure30 5.1.4. Security 5.1.4.1 User Setting Access to User management, you can add or edit the user as Figure31. Figure31 Tips: After setting up, click save and refresh button, the entering info will display in the webpage. 5.1.4.2 IP Flitering You can set up the IP filtering to allow or deny some IP address to visit the device as below. As Figure32. In IP Address filter, there are 2 settings: blacklist and whitelist. Whitelist: it allows the specified IP address to access the camera.
用户手册 Figure32 5.1.4.3 Mask Area “View Video-Mode 1”: the user can hide the specified area not to be monitored, Max.support 4 areas tobe hiden.As Figure33. “View View-Mode 2”: It doesn’t support privacy setting .
用户手册 Figure33 5.1.5. Alarm 5.1.5.1. IO Detect Access to IO detector, can enable detect function and set up input signal type as Figure34. Figure34 5.1.5.2. Motion Detection “View Video-Mode 1”:Access to motion detection, you can set up Max 4 detection area, also can set up the sensitivity for every area as Figure35.
用户手册 “View Video-Mode 2”:User only can set one area for motion detection,and input sensitivity,as Figure36. Figure36 Notice: the higher the sensitivity,the greater the number. 5.1.5.3. Audio Detection Access to audio detection, you can enable audio detection and set up sensitivity of it as Figure36. Figure36 5.1.5.4.
用户手册 Figure37. Tips: The usage for combination of alarm trigger in alarm trigger type: For example, you enable the audio detection and motion detection, so the camera is enabled combination of alarm trigger, it will perform the action in alarm action setting when the audio detect and motion detection detect any change. 5.1.5.5. Protected duration setting After setting up alarm detect type and alarm trigger linkage, you need to set up protected duration.
用户手册 5.1.6. Storage 5.1.6.1. SD/TF Management Access to SD/TF management, you can check and download recording and snapshot file in SD/TF card, and check SD/TF card remaining capacity, format SD/TF as Figure39. Figure39 5.1.6.2. SD/TF Capture setting(Timing Snapshot) Access to SD/TF capture, you can enable timing snapshot and set up snapshot time interval and snapshot duration; time format is 7 days, 24 hours per day, 15 minutes per a block as Figure 40. Figure 40 5.1.6.3.
用户手册 for every file; time format is as 7 days, 24 hours a day, 15 minutes per a block as Figure 41. Tips: it will overwrite SD/TF recording file automatically by default, also overwrite previous recording file when the SD/TF space is full. Figure 41 5.1.7. Log Access to Log menu, you can check the user operation log as Figure42.
用户手册 5.2. Local Setting Access to local configuration, you can set up recording path, snapshot path and recording duration as Figure43. Tips: You must use administrator to run the browse, then recording path and snapshot path can be save successfully at above IE9; the default recording path is D:\HYRec. You can enable to show motion detection frame when viewing video.
用户手册 This device complies with Part 15 of the FCC Rules. Operation is subject to the following two conditions: (1) this device may not cause harmful interference, and (2) this device must accept any interference received, including interference that may cause undesired operation. This device and its antenna(s) must not be co-located or operating in conjunction with any other antenna transmitter.