Dear users, the configuration for this camera is professional, so please read the user manual carefully before using the camera. IP Camera (629W) User manual 2014-03 V5.
Statement If the user manual can not help you to solve the problem, please call our technology center for solutions. We will update the content for the new functions without notice. Notice 1、 Installation Environment , Keep away from the places for high-temperature, heat source and direct sunlight; , Keep away from water and when it gets wet, cut off the power immediately. , Avoid using at damp environment; the reference range for operation humidity is below 85%RH.
Index 1. 2. PRODUCT INTRODUCTION ...................................................................................................... 3 1.1. PRODUCT SUMMARY ................................................................................................................. 3 1.2. PACKAGE FOR TYPICAL PRODUCTION ........................................................................................ 3 OPERATION OF USING IE BROWSER ..........................................................................
1. Product introduction 1.1. Product summary Thank you for choosing our company’s M series IP camera, which has several models, including indoor HD PTZ camera, indoor HD cube camera, outdoor HD waterproof camera etc. It is very suitable for family, shops, office building and so on. Main features for M series: ♦ Support 3 kinds of H.
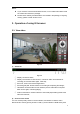
Notice: ♦ ♦ If you choose IP camera with wireless function, so it includes wifi module inside the camera and antenna in package. Please check carefully if all listed items are included in the package, if anything missing, please contact vendor in time. 2. Operation of using IE browser 2.1.
stream in mobile phone. You can view the video by four, nine pictures in same screen, but need to set the camera in 3.6.6 multiple setting. 3) PTZ control If the camera supports PTZ function, you can click up, down, left, right arrow to control the camera moving, click button to center and stop the camera. When you set camera to a preset position, and then click ‘ changed to other direction, click , after the camera is can move the camera to the position you have set.
Figure 10 JPEG stream is for some views by non windows platform, for example, click ‘mobile view’ in first page, it will transmit JPEG stream actually. 2.2.2. Audio parameters Figure 11 The camera supports G.711 and G.726 audio encoding format. The sound of the G.711 is better, but it occupies more bandwidth. If you click “On” of the audio capture, so it will transmit audio in corresponding video stream. Please open the audio here, should you hear the sound when clicking audio play button in figure 9. 2.
2.3. Web setting 2.3.1. Basic web setting Figure 13 The cameras support RTSP protocol, if select “on” of “RTSP authority verification”, you need to enter user name and password when invoke video by RTSP protocol. 2.3.2. WIFI setting Please refer to chapter 2.2. 2.3.3. WAN access setting In chapter 2.3, you have known how to do port forwarding. After the success of the port forwarding, you can also visit camera by DDNS.
Figure 15 Notice: Using the third party DDNS, if the http port is not 80, the port number should be adding to the domain name with colon. Example: http://mydomain.dyndns.org:81. 2.3.4. ONVIF setting Figure 16 The camera supports ONVIF protocol, so it can be interconnected with other factory camera with ONVIF. Tips: The device supports ONVIF 2.0.1 at present. 2.4. Alarm setting 2.4.1. External Alarm Input Figure 17 The camera should have external alarm input port for enable this functions.
2.4.2. Motion Detection Setting Figure 18 Please click “apply” after the settings are done, and motion detection takes effect. The higher value, the higher sensitivity. The camera will trigger corresponding alarm when any change occurs in the detection area. 2.4.3. Alarm mode setting After camera detects any change, it will alarm as several mode, example of figure 18.
2.4.4. Alarm time setting Figure 20 The device will trigger the alarm only during the scheduled time period, you can select the scheduled time according to your request. Example of figure 20, set armed time from Mon 8:30 to 9:00, you only need to click the corresponding time block to set them, the time block will become green when you selected. Note: Please make sure your system time is correct before you set the alarm time period. Please refer to chapter 3.6.2 to set system time. 2.5. Advance setting 2.
2.5.2. Auto Capture Setting Figure 22 Tick “Save Images to the TF/SD card”, the snap pictures will be stored into SD card during the setting time. 2.5.3. Timer recording Figure 23 Example of figure 23, set recording time from Mon 8:30 to 9:00. Tips: Please insert TF/SD card when the device power off, to avoid damage the TF/SD card or not to read it from the device.
2.5.4. E-mail Setting Figure 24 The SMTP server name: It is mailbox server, for example of SOHU mailbox, it is “smtp.sohu.com”. Please fill all blanks which we filled above in figure 24 as example. Otherwise, the settings will fail. Please click “Test” to test if the E-mail setting is successful. 2.5.5. FTP setting Figure 25 Before to use FTP function, please get the following ready.
2.5.6. Multiple settings Figure 26 Please set multiple devices here first to view 4 or 9 split screen at chapter 3.1 browse interface. 2.6. System setting 2.6.1. Device information Figure 27 SD status shows the free capacity if SD card is installed. Notice: the device supports max 32G SD card. Please format the SD card to FAT32 before use the card on camera. Please check if the SD Card matches the camera or not before purchasing the SD Card.
2.6.2. Date and time setting Figure 28 Example of figure 28, please select the time zone at first and then select a NTP server and obtain time from network time server. 2.6.3. Initialize setting Figure 29 If you click “Confirm” of Backup setting data, the camera will create a file, you can store it to your computer, and you can directly call this file to restore the settings. The function helps to manage the cameras and no need to do all the settings again.
3. Visiting device by other software 3.1. Other web browser In the Windows OS, for using browser with IE kernel, user must download the ActiveX. While for Safari and Firefox browsers, please Download “QuickTime” plug-in and install it to access the IP camera. After installation, please run the QuickTime program to access the QuickTime Preferences dialog box from Edit Menu, example as figure 31. Click “Advanced”, select “custom.” in the Transport Setup. It pops up the Streaming Transport dialog box.
3.3. PC Client software IPCMonitor is a free software offered by factory, several devices on LAN and WAN can be browsed at the same time. The software also support real time recording, schedule recording, alarm, snap, and so on. The interface is as Figure 32. Figure 32 For more information, pls. refer the <> in CD. 3.4. Other common software As the device supports RTSP protocol, you can use VLC player to play IP Camera video. It is compatible with VLC 1.1.12 version or above.
FCC Caution: Any changes or modifications not expressly approved by the party responsible for compliance could void the user's authority to operate this equipment. This device complies with Part 15 of the FCC Rules. Operation is subject to the following two conditions: (1) This device may not cause harmful interference, and (2) this device must accept any interference received, including interference that may cause undesired operation.