
User's Manual

10
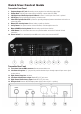
PEM-1000R Receiver
1. Using the battery and the battery automatically management system
The receiver requires two pieces of normal or rechargeable AA-Batteries (25). Insert the batteries into the
Battery Compartment (25). Observe the correct polarity and close the Battery Door (26). The normal AA
battery can run more than 8 hours. When the battery voltage is less than 1.9V the power management system
will power off the unit automatically to protect the batteries from leakage.
(Notes: The normal batteries must be with good quality and without leakage. The rechargeable battery must be
the Ni-H battery without memory effect but large capacity.)
2. Earphone connection
Connect the stereo monitoring earphones jack into the receiver.
Plug in the stereo monitoring earphone jack to the 1/4” stereo Earphone Jack (18), or can also connect any
normal earphone or put the output terminals to be connected with other audio equipments’ audio signal input.
(Please note: The earphone output jack is stereo output, please pay attention to the fact that the connecting
plug must be stereo plug, if it is the mono jack, it will be possible to get short-circuit on the output and then
damage one side of the earphone output.)
(Note: Wipe the earphones and rubber mounts with an antiseptic before and after each use to avoid infection.
Stop using the earphones if they are causing discomfort or infection.)
3. Power on the unit and volume control
Rotate the power and Volume Knob (17) on the top of the receiver clockwise to power on the unit, meanwhile
the LCD Display (21) is showing out the working frequencies and battery status. After the unit is on,
continuously rotate the volume knob in clockwise direction to get the volume louder and turn counter clockwise
to reduce the volume.
(Please note: When the battery is weak or too little remaining, the unit can’t be powered on, it is a must to
change new batteries or to check if the batteries are well installed with right polarity.)
4. Sound mode switch
Stereo-Mono Switch (23) can be used to choose if the current earphone should be stereo output or mono output,
when the stereo is chosen, it must work with the transmitter and the transmitter should be tuned to be stereo too.
(Please note: When the stereo output mode is chosen, the sound performance is good while the S/ N ratio is not
good as when choosing mixed sound in mono mode output).
5. Sound Limit mode switch
The Limit Switch (24) is used to keep the headphone output to a limited level.
6. RF signal LED Indicator
When the RF LED Indicator (20) has been lit up, it means there has gotten transmitter’s signal. If the
interference signals at the same frequency, it will also light up. To eliminate the interference please switch to
the non-interference frequency.
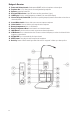
7. Frequency setup for either from the Transmitter-Receiver or Receiver-Transmitter
For Transmitter-Receiver: Open the Battery Compartment (26) of the receiver, get the Infrared Receiving
IR (22) to be seen, and should be pointing to the transmitter Infrared Transmission Window (5), press the
SYNC Button (9) on the transmitter until the receiver has gotten the same frequency as the transmitter. Now
the system has been set up successfully set up. Close the receiver’s battery compartment. If you have more than
one receiver, use this procedure to sync the additional receiver.
7
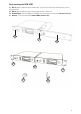
Rack-mounting the PEM-1000T
32. RKT-11: Optional rackmount kit for rackmounting a single unit. Includes front antenna mount, jack and
connecting cable.
33. RKT-21: Optional rackmount kit for rackmounting two units side-by-side.
34. AC/DC Adapter: DC-12V/1000mA (110-240VAC, auto select), plugs into transmitter DC Input Jack (16)
35. Antenna: screws onto transmitter Antenna BNC connector (11)
32
32
32
33
33
33
34
35