
User's Manual


6
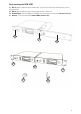
Bodypack Receiver
17. Power and Volume Control: Combo power ON/OFF switch and earphones volume adjust
18. Earphone Out: 1/8” (3.5mm) jack for connecting monitoring earphones
19. Antenna: permanently attached
20. RF Signal LED Indicator: Lights RED when receiving transmitter’s signal
21. LCD Display: Displays selected frequency and battery life status (0 Bar=Empty)
22. Infrared Receptor/Sender LED: Synchronizes operating frequency between transmitter and receiver as
selected by either
23. Stereo/Mono Switch: Selects either stereo or mono output to earphones
24. Limiter Switch: Select to limit the audio output level to earphones
25. Battery Compartment: Holds 2 x AA Betteries
26. Battery Compartment Door: Covers batteries and selection buttons
27. LOCK Button: Locks the receiver controls to prevent accidental adjustment
28. SYNC Button: Press to download receiver’s Autoscan selected frequency to receiver via infrared link for
frequency synchronization
29. AUTOSCAN: Press to automatically find open channel
30. MUTE Button: For muting the audio output to the headphone
31 . Belt Clip: Rotates 180
o
for attaching to belt with receiver’s top panel in either up or down position
11
For syncing Receiver-Selected Frequency to Transmitter: Press the receiver Auto-Scan Button (29) to locate
an open frequency/channel. Point the Receiver Infrared IR receptor/Sensor(22) at the transmitter Infrared
Transmission Window (5) and press the SYNC Button (28) on the receiver until the transmitter’s LCD
Screen (4) displays the same frequency as the receiver’s LCD Screen (21).
8. The receiver’s LCD display can be locked with the LOCK Button (27) to prevent accidental
adjustment, or to unlock it to make an adjustment later. The “LOCK” icon will be displayed
on the LCD screen in lock mode only. Push the Lock button to unlock.
9. The headphone audio can muted temporarily by pressing the MUTE Button (30). Press
again to un-mute. The “MUTE” icon will be displayed on the LCD screen in mute mode
only.
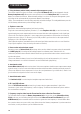
10. Wearing the Bodypack Receiver.
The Belt Clip (31) rotates 180˚ for attaching to belt with receiver’s top panel in either up or
down position as pictured below.