
User's Manual


12
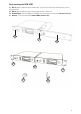
Multiple System Operation
Selecting a Channel/ Multiple System Operation
Both the PEM-1000T transmitter and PEM-1000R receiver offer a choice of 100 channels in the UHF band. Select
an open frequency, that doesn’t interfere with any other PEM-1000 or UHF wireless Mic system you are also
using, by pushing the SET Up Button (7) and Manual Up (6) or Manual Down (8) buttons on the front panel of the
PEM-1000T until the channel you want is displayed on the LCD Display (4). You will also need to select the same
channel for the transmitter (see Transmitter Operation instructions above). If different mixes are required for the
different performers, additional PEM-1000T transmitters and receivers set to other channels must also be used,
and each transmitter must be fed a different mix from the console as desired. Depending on the band(s) you are
using and open channel availability within the band(s), up to 8 PEM-1000 systems on different frequencies can
be operated simultaneously to provide multiple discrete mixes to the performers.
[Note: After selecting a frequency on the transmitter, you must also check with the receiver to ensure that the
chosen channel is open (i.e., no other transmissions from other sources, such as UHF TV channels in your area,
operating at the same frequency). Turn off the PEM-1000T transmitter, and monitor the signal from the PEM-
1000R (see PEM-1000R instructions page). It should be silent. For optimum operation and range, if you receive
any transmissions or static you must choose another channel that is clear.]
[Note: If, after you complete the set-up, you experience interference or unsatisfactory audio performance, change
the channel until the problem goes away. In the extremely rare circumstance that such a problem persists, turn
off all UHF wireless Mic being used or move their receivers physically away from the PEM-1000T transmitter.
In some instances, UHF wireless Mic and the PEM-1000 system can interact if they are too close in frequency.
Contact the NADY SYSTEMS Service Department for further information if necessary (see SERVICE)]
Multiple Monitor Mixes
Any number of PEM-1000R receivers can be used with a single PEM-1000T transmitter set to the same channel.
Although there are individual controls on each receiver allowing different levels of volume, each receiver will
receive the same transmitted monitor mix (see Selecting Stereo or Mono Mode Reception above for exceptions).
If different mixes are required for the different performers, additional PEM-1000T transmitters and receivers
set to other channels must also be used, and each transmitter must be fed a different mix from the console as
desired.
(Note: Never set more than ONE transmitter to the same operating frequency.)
Testing Receiver Range
Wearing your receiver and earphones, walk around the stage area and listen for audio quality. Depending
on room size, obstructions, amount of reflective metal surfaces, and other conditions that may affect RF
transmission, it is normal that the audio may disappear or “drop out” in certain locations. Such zones, otherwise
known as “null spots” are very small and fixed in location if you are within 100 feet of the transmitter and will
become larger as you approach the ultimate range of your system in that location (up to 500 feet, Depending on
site conditions). Generally, it is possible to eliminate such “null spots” by moving your PEM-1000T transmitter
as little as 12-18 inches in any direction. If that is not convenient (e.g., because the PEM-1000T is rackmounted),
you can also use an optional remote antenna. Contact the NADY SYSTEMS Service Department for information
about remote antennas for the PEM-1000T. After you move the transmitter or relocate a remote antenna, range
walk the stage and other areas you will use in your performance to again check for consistent reception. You are
now ready to use the PEM-1000 system for wireless personal in-ear monitoring.
(Note: Due to the strong transmission power of the PEM-1000T, you may experience compromised audio or static
if the PEM-1000R is too close to the antenna of the PEM-1000T transmitter. Always operate the receiver at least
6 ft (2 m) away from the transmitter antenna.)
5
Quick User Control Guide
Transmitter Front Panel
1. Earphone Output 1/4” jack: Connecting stereo earphones for monitoring output signal
2. Volume Knob: Adjusting the volume clock-wise (MAX), counter clock-wise (MIN)
3. Left/Right Source Audio Input Level LCD tree: Indicates if audio input source level is optional
4. LCD display: Displaying Channel/Frequency, and other status
5. Infrared Receptor/Sender LED: Synchronizes operatingnfrequency between transmitter and receiver as
selected by either
6. Manual UP selecting button: Manual setting up with up direction
7. Set Up Button: Set up the functions of the transmitter/ scroll through the menu list
8. Manual DOWN selecting button: Manual setting up with down direction
9. SYNC Button: Press this button down can set up the transmitter and receiver’s infrared link and
connection
10. Power Switch: Press momentarily to turn ON and for a few seconds to turn unit OFF
Transmitter Rear Panel
11. Transmitter Antenna BNC connector: Connect antenna before use
12 Left Channel Loop Out: 1/4” jack provides parallel unbalanced pass-through output of input source signal
to other devices
13. Right Channel Loop Out: see above
14. Left Channel Audio Source Input: Combo XLR/1/4” jack, mono
15. Right Channel Audio Source Input: Combo XLR/1/4” jack, mono
16. DC Input Jack: Connects AC/DC adapter power supply (center of jack is + polarity)