
User's Manual

PRODUCT FEATURES
1. Support multiple signal transmissions without interference;
2. Support Digital Mode and Analog Mode
3. Operation distance up to 10 meters;
4. Controller 3D Motion Sensor
5. Controller Rumble
OPERATION INSTRUCTIONS
1. Connect RF receiver with PS3 Game Console & Controller
Plug the receiver into the USB port of the PS3 game console and then
turn on the console, you will find the Red LED on the receiver flashing,
press the CONNECT button on the receiver first and then switch the
controller ON, press the controller SELECT and L3 button together for
three seconds let go, the receiver will then automatically search for the
connecting signal from the wireless game controller. When the controller
connects the receiver the Red LED will stay ON.
After the controller successfully connects to the receiver, press the PS
button to active the controller on PS3 console.
To maintain the connection between the PS console and controller
please leave the Wireless Receiver in the console at all times. Then when
you restart your console and want to re-connect your controller press the
PS button, and this will reactivate the controller.
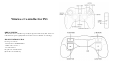
2. Wireless Game Controller Power Control
The power switch of the wireless game controller is situated at the back
right side of the controller. Position the switch to “ON” to switch on the
power and “OFF” to switch off the power.
3. 3D Motion Sensor Function & Rumble
Use the controller 3d motion sensor to control the direction and rumble
(the game should support the Sixaxis & DualShock3 function for this to
work) Please switch on both functions using in “in game options menu”
5. Operation on PS3 console
a. Press the PS button when entering the game, choose the “Assign
Controllers Ports” on the function menu, then press the X button once,
the PS3 will give you a number menu to choose, use the up/down
button on the controller to choose the port, and press X button to
confirm, now the indicator LED on the controller will turn on, it means
the controller already setup successful, then press the X button back
to the game.
b. A list of channels with its corresponding LED indicators is as follows
Channel 1 - LED Indicator 1
Channel 2 - LED Indicator 2
Channel 3 - LED Indicator 3
Channel 4 - LED Indicator 4
Channel 5 - LED Indicator 1 & 4
Channel 6 - LED Indicator 2 & 4
Channel 7 - LED Indicator 3 & 4
PRECAUTIONS AND MAINTENANCE
Please review the following guidelines to ensure optimal performance of
the product.
1. Please make sure there is no extreme pressure put on this product.
2. Don’t dismantle this product without permission.