
User's Manual


10
Access Internet
You can surf on the Internet with your slim MID.
You MID features built-in Wi-Fi technology and 3G card slot so that you can
access the internet via Wi-Fi and 3G network.
First of all, you need to configure a Wi-Fi or 3G network. For the Wi-Fi
configuration procedure to work, you need to be in a Wi-Fi zone that will allow
you to connect to it. Every time Your MID is in range of a network that you have
already configured once, it will attempt to make a connection. For the 3G
network configuration to work, you need to insert a 3G card into the device.
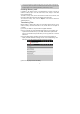
Making WIFI Connection
(1) Go on the Home screen, tap on the Menu icon and then select
“Settings”.
(2) In the “Settings” screen, select “Wireless & Networks”.
(3) If the WiFi is off, tap on the “Wi-Fi” setting to turn it on. Then select “Wi-Fi
settings”. Your MID will scan automatically for available WiFi networks
and display them. The list of available networks shows all the wireless
networks in range of your device.
- The list is constantly refreshed automatically.
- When the WiFi is enabled, Your MID will connect automatically to your
configured networks when they are in range.
- If Your MID finds a network that has never been configured, it will display
a notification icon.
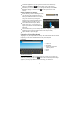
(4) Tap on the network you want to connect to, enter the required network
information (password) and then tap on “Connect”. Your MID will now
attempt to establish a connection to that WiFi hot spot with the network
parameters you entered. If the connection is successful, the message
Connected to XXX will appear under the WIFI setting.
Note:
a) The available network list is constantly refreshed automatically.
b) When the Wi-Fi is enabled, Your MID will connect automatically to your configured
networks when they are in range.
c) If Your MID finds a network that has never been configured, it will display a notification
icon.
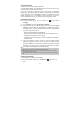
Advanced Connection
To manually scan for available Wi-Fi networks,
(1) In the “Wi-Fi settings” screen, tap on the Menu icon
, and then tap on
“Scan”.