TABLE OF CONTENT PRODUCT OVERVIEW ......................................................................................... 2 KEY FEATURES .................................................................................................. 3 PACKAGE CONTENT ........................................................................................... 3 CHAPTER 1 HOW TO USE THE DIGITAL PEN ........................................................... 3 Installing/Replacing an Ink Refill into the Pen................
Sending Notes..................................................................................................40 Receiving notes over the local network ................................................................42 Convert Note to Text.........................................................................................43 Using the “Note to Text” menu (only available in Windows Vista or 7) .....................43 Using the Vision Objects MyScript® Notes (Optional) ...................................
about the device, please read the included User Manual on the CD provided with the package, so that you are aware of some useful functions that you may not know. Key Features • • • • • • • Capture natural handwritings and drawings while being away from computer. Save captured handwritten notes into built-in flash memory. Upload captured handwritten notes to computer via USB connection. Act as a digital ink pen with hovering and mouse functionality to directly write into Windows Vista and Office 2007.
2. Insert the ink refill into the cross of the extractor with pressure so that the extractor holds the refill firmly. Hold the pen firmly, and apply pressure with the extractor against it. To insert a new refill 1. Slide the new refill into the tip of the pen. 3. Pull the used Refill out. 2. Gently press the new refill until it is lodged securely in place. Installing/Replacing Pen Batteries (1) Remove the battery compartment cover. (2) Install two SR41 batteries, with the positive poles facing up.
This warning is continuously displayed on each new note and the application tray icon in the system tray changes to reflect the current status until the batteries are replaced. Tray icon indiocation, for Pen low battery, in Note Mode Tray icon indiocation, for Pen low battery, in Mouse Mode. Note: Lifetime of the batteries may vary and cannot be guaranteed. Write Correctly When you pick up the pen, find a position that is comfortable for you.
Chapter 2 Base Unit General Overview The Pocket pen tablet is a unique device that captures notes handwritten on plain paper, Stores the notes to memory and uploads them to a PC. The device consists of a Digital Pen and a small receiving unit.
Turn on/off the Unit Press and hold the Top button to turn on or off the unit before you use the base unit in mobile mode. NOTE: The unit will power off automatically after 60 minutes of idle time (no working). Charge the Battery Your Pocket pen tablet includes a rechargeable internal battery. Each time you connect your unit to your PC USB port, the batteries are being charged. Full charge time takes about 3.5 hours.
Power Save mode In order to save power from the rechargeable battery, while in mobile mode, if there is no activity (Meaning: No Pen usage nor key press on base unit), your base unit will automatically shut down in 60 minutes. Your note will be automatically saved. To exit power save mode, simply press ON/OFF button on the unit to turn it on. (Note: This will start a new note file).
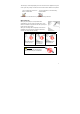
Base Unit Coverage area: The following images illustrate the coverage area of your base unit. Note: a. The paper is an A4 size paper; b. The striped line illustrates the covered area in each of the positions. Base unit located at Base unit located at Base unit located at the the right corner. the top center. left corner. Warning: DO NOT move or overturn the base unit when you are using the base unit. Fix it up onto the edge of the paper with the face up.
Chapter 4 Using the Bluetooth The device has bluetooth which enables you to connect the base unit wirelessly to any mobile device with bluetooth, for example, mobile phone based on Windows / Android operating system. 1. Install the Note Manager application on your mobile device (mobile phone). 2. Press the Bluetooth button on the unit to turn on the bluetooth. 3. Turn on the bluetooth on your mobile device (mobile phone) and pair with the base unit. 4.
‘Start’ menu and type in D:\setup.exe. If your CD drive uses a different letter, type that letter instead of D. (2) Follow the instructions on the screen.
(3) Click “Finish” once the installation is finished. Note: After the installation process, when running the application for the 1st time, a new folder named “Ink Notes” is created in your “My Documents” directory. All your notes will be saved into this directory. In the event that no “My Documents” directory is found, the installation process will create a new “My Documents” folder on your C hard drive. The ‘Ink Notes’ folder will then be created under this directory.
Connect Memory Unit to Computer Use the Mobile Pocket pen tablet’s mini USB connector to plug in the USB cable (included in the package), which connects the unit with the PC when uploading notes. Note: Only use the USB cable supplied with your Mobile Pocket pen tablet package.
Port Auto-Detection Once you launch the application, the Pocket pen tablet software automatically detects your hardware. The application automatically searches all ports in order to detect the hardware. If it is unable to locate the connection, the Hardware Detection dialog box appears. USB Hot-Insertion USB Hot Insertion refers to connecting the USB cable while the application is running.
Changing modes during operation can be done in 2 ways: a. Press the base unit top button (‘Mode’ button) , OR b. Right click the ‘Pocket pen tablet’ tray icon, and change mode, OR c. Clicking on the virtual area using your pen. Note: On each mode change, a Balloon will popup indicating the current mode and the corresponding LED will lit. Uploading Notes (1) Start the Note Manager. (2) In the “File” menu, select “Upload”, or click in the upper toolbar.
selecting “File” --> “Upload” menu within the Note Manager ASK ME – Each time you connect the Mobile Pocket pen tablet base unit, you will be prompt if you want to upload your notes. Viewing Notes You can view your note on the computer screen. (1) Run the Note Manager. (2) Click the “Mobile Notes” folder in the left pane, you should see all note thumbnails. (3) Double click a note thumbnail to view it in full screen. You can click the button to zoom in or out the view.
• To Click an object, point your mouse cursor on that object. Now tip the pen on the paper or click the side button. • To Double-Click an object, point your mouse cursor on that object. Now tip the pen twice on the paper or click the side button twice. • To Right-Click an object, point your mouse cursor on that object. Now press the tip of the pen a bit longer on the paper. A special ‘Right Click’ cursor will appear. Lift the pen from the paper, and the context menu (Right Click menu) appears.
Convert To Text Convert your note to Text using MyScript® Notes. (Only available if the recognition software is installed.) Join Notes Join several notes together. Move to Send To Allows you to move the selected note to another folder Sends any note by email (Jpeg or Data file) or local network Import data file (.
Zoom to Fit Returns the thumbnail view size to the original size (available only when viewing an individual note thumbnail) Reduces the thumbnail view by 50% (available only when viewing an individual note thumbnail) Zoom Out Configuration Menu Detect Hardware Preferences Pen Styles Set Device Orientation Set digital note mode Mouse Properties Help Menu Allows you to detect your unit Allows you to select your personal preference for elements such as; note color, auto-save, windows options and printing o
DELETE – Deletes the selected note/notes EDIT NOTE – Allows you to edit a selected note PRINT -- Prints the selected note/notes SHOW AS STICKY NOTE – Make your Note as Sticky Note SHOW AS PAPER HOLDER – Make your Note as a paper holder SMALL THUMB – Displays small thumbnails in the Note Manager view MEDIUM THUMB - Displays medium sized of thumbnails in the Note Manager view LARGE THUMB - Displays large thumbnails in the Note Manager view NOTE MODE MOUSE MODE – TURNS YOUR PEN INTO A MOUSE ABOUT – Provides yo
NOTE: While writing, make sure not to block the line of sight between the pen and the base unit with your hand. When the line of sight is blocked, the Pocket pen tablet will not function properly. The Notes Toolbar The following table contains all buttons available in the Notes toolbar together with a description of their functions. Button Description EDIT – Opens the Note Editor for editing the note CLEAR – Clears the entire on-screen note.
PRINT – Prints the current note. SEND BY NETWORK – Sends the current note by local network to selected recipients. SEND BY EMAIL - Sends the current note by email to selected recipients as a JPEG attachment. EXPORT TO JPEG- Exports the selected note to a JPEG file. SAVE TO FOLDER – Saves the note to a specified folder and closes the note window. Convert your note to Text using MyScript® Notes. (Only available if the recognition software is installed.
During writing or drawing, you can use the toolbar to edit, cancel, erase, copy or send the notes. When finished, click to exit from the Note Window. Saving Notes Notes can be saved at any time during the note creation process. They are automatically saved to the default and named according to the date they were created. Notes can be renamed at any time once they have been saved. To save a note, (1) In the Note Window Toolbar, click the Save and Close icon note to the default Miscellaneous folder.
Creating a new folder To create a new folder: Creating a new folder can be done in few ways: You can use ‘File’ menu to run the ‘New Folder‘ option (1) Choose the folder you want to create a sub folder for or choose the ‘My Notes’ root folder (2) Use ‘File’ menu to run the ‘New Folder ‘option. (3) Fill the new folder name. You can right click any folder in the Folders Tree (1) Choose the folder you want to create a sub folder for or choose the ‘My Notes’ root folder. (2) Right click this folder.
Renaming Notes Each time you create and save a new note, it is automatically given a name that corresponds to the exact date and time the note was created. You can rename notes at any time to give them names that are more meaningful to you. To rename a note: (1) Right-click the note you want to rename (Or click F2 key, when the note is selected). (2) In the shortcut menu that appears, select Rename. The note name is highlighted. (3) Type the new note name.
Moving Notes You can move a note from the folder it is currently in to any other folder. To move a note to another folder: (1) In the Note Manager, select the note file name or thumbnail. (2) From the File menu, select Move to, –or– right-click the note name or thumbnail and in the shortcut menu, select Move to (3) Select the folder name to which you would like to move the note NOTE: You can also use ‘Drag and Drop’ to move a note.
Note: You can preview multiple notes simultaneously. Select the first note, then on the keyboard press the key and select the other notes. (1) (2) (3) . In the File menu, select Print or click the Print button Select your desired print setting and properties (this can also be done through Print Setup from the File menu. Some default print preferences can also be set through the Configuration menu preferences). Click OK.
(3) Click the ‘Backup’ button, Upon a successful backup, the following message appears: To restore your database: (1) Select ‘File -->Backup/Restore --> Restore Database’ from the Note Manager menu, the following dialog will appear. (2) (3) (4) Choose the location of your database backup] Click the ‘Restore’ button. Upon a successful restore, your database will be restores to a new folder in the Note Manager.
(1) In the Notes Manager Configuration menu, select Preferences. (2) Set your General Preferences as follows: • In the Auto-Save note in box, select the time interval (in minutes) after which the system automatically saves your note. This also activates an auto-recovery feature that recovers any unsaved information in case of system crash or power failure. The only lost inputs are changes made since the last autosave.
• Under Paper Holder opacity, drag the slider to set the desired level of transparency Selecting Pen Style You can change Ink color and width of on-screen pen strokes at any time (The default pen color is black and the default width is 1) To select the pen style: In the Notes Manager Configuration menu, select Pen Styles –or– Right-click the new note and in the shortcut menu that appears, select Pen Styles (1) Click the arrow to the right of the current pen color to open the Pen Color list and select the
(4) If you would like to specify an exact time for the reminder, select the Exactly At checkbox and use the arrows to change the default time or type in the desired time. NOTE: If you do not select an exact time, the reminder will appear when you turn on your computer on the specified day. Setting a Reminder to Snooze When a reminder appears, you can set it to snooze so that it disappears and then pops up again within 5, 10, 15 or 20 minutes (depending on your preference).
(3) (4) (5) (6) in the File menu, select Export to JPEG. The Export dialog box appears. In Save in, select the destination file path In the Save as type list, select JPEG. Under Resolution, select the resolution quality Click Save NOTE: You can export multiple notes simultaneously. On the keyboard, hold down the key and then in the Note Manager, select the notes you want to export.
(3) (4) –or– right-click the note name or thumbnail and, in the shortcut menu, select Copy or Cut. Open the application into which you would like to paste the note. In the open application, locate and select the Paste option. Note: You can also copy a note that you are currently sketching by clicking on the button in the Note Toolbar Creating Sticky Notes You can create sticky notes by doing one of the following: (1) Dragging notes from the Note Manager to your desktop.
NOTES: To view additional sticky note options, (1) Right click on the sticky note. (2) (3) Select ‘HIDE’ to hide a sticky note into the application tray icon You can restore any hidden sticky note by right clicking the application tray icon, and selecting ‘My Sticky Notes’. Then select the note you would like to restore. (4) A Sticky Note can automatically pop up after the application has been closed and re-opened, or after system reset.
Creating Paper holder Notes Paper holder notes can help you in many ways. One common way is if you need to read your note and rewrite it in a text editor. A paper holder note will always be on top, and its transparency can be adjusted You can create paper holder note by doing one of the following: • Select a note in the Note Manager, right click it and select ‘Show as Paper Holder’. • Select a note in the Note Manager, click the ‘Show as Paper Holder’ toolbar button.
You can set the transparency to a Paper Holder. In the Note Manager, use the Configuration menu The Note Editor Notes can be edited at any time, whether you are still writing one, or you want to edit a note you have already saved in the Note Manager. The Note Editor contains menus and a toolbar that give you access to a wide selection of editing functions Note Editor Menus The following table lists all menu commands available in the Note Editor, together with a description.
Note menu Print Prints the selected note Print preview Displays the selected note as it will look when printed Print setup Allows you to select print options Exit & Save/Send Saves the edited note and closes the editing EXIT Without Save/Send Closes the editing application without saving any changes Edit Menu Undo Clears the last stroke made by the digital Pen. Clicking Undo again will clear the stroke made before that, and so forth.
Line Allows you to insert a line of any length Circle Allows you to insert a circle image of any size Rectangle Allows you to insert a rectangle of any size Text Allows you to insert type written text Color Allows you to pre-select or change the color of pen strokes or to highlight strokes or text Line Width 1 Allows you to pre-select or change the thickness of any stroke to width 1 Line Width 2 Allows you to pre-select or change the thickness of any stroke to width 2 Line Width 4 Allows you
FULL SCREEN – Brings the Notes Editor into full screen view NOTE COLOR – Changes the current note color.
ZOOM TO FIT - Returns the note view to the original size ZOOM OUT – Reduces the note view ROTATE RIGHT – Rotates the entire note image 90° to the right ROTATE LEFT – Rotates the entire note image 90° to the left Editing Notes Once a note is open in the Note Editor, you can only edit elements of the note (pen strokes, etc.) after they have been selected. Once you have selected the area you want to edit, you can delete it, change the color and/or width of the pen strokes, etc.
Sending notes by email The Pocket pen tablet uses your default email client to send notes as email.
o In the File menu, select Send To--> Network PC, –or– right-click the note name or thumbnail and, in the shortcut menu that appears, select Send To --> Network PC. o In the Send Note dialog box, a list of all network users that have the Pocket pen tablet application installed and running automatically appears. Select the Name/IP address of the person(s) to whom you would like to send the note –or– click Select All to send the note to everyone on the list.
Convert Note to Text You can convert your handwritten notes to texts in the following two methods. Using the “Note to Text” menu (only available in Windows Vista or 7) (1) Open the Note Manager, select the note that you want to convert. from the top tool bar. The note is then (2) Click the “Note to Text” icon converted to text. Save the converted note as you want. Using the Vision Objects MyScript® Notes (Optional) MyScript® Notes is a well known character recognition engine.
b. For A single/multi page Note from “NoteTaker Manager”, right click the Note in the thumbnails area. c. Right click the Note in the tree area. d. Select a note and select “File --> Convert to Text” menu. e. For sticky Note from ‘NoteTaker Manager’, right click the “Sticky Note” and select “Convert to Text” menu.
(4) Your Note will be exported to MyScript® Notes application. MyScript® Notes will be opened with your Note in the “Conversion” area. Please refer to the MyScript® Notes user guide for more instructions on how to use the MyScript® Notes application. Application Tray Icon Right clicking the application tray icon gives you the ability to perform the following actions: Browse Notes – Open the Note Manger Or Mouse mode – Toggle between the 2 options of your Note Mode Digital Pen.
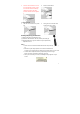
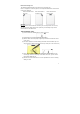
also works well when you are at your desk.. This chapter provides basic instructions how to utilize inking and handwriting utilities in Windows Vista and Office 2007’s applications. For more features and possibilities please refer to Microsoft’s User manual and Help. * Pen-Ink capabilities are NOT available in Windows Vista Basic. Getting started To start inking in windows Vista, just plug-in your Pen-Tablet to any available USB port, place the receiver unit at the top of the page in the middle.
Conversion to text and conversion to email: Use the Lasso to mark the conversion area. Tap Actions and choose Convert Selection to E-mail or Convert Selection to text (if a character recognition application is installed.) Tablet PC Input Panel In Windows Vista, the Tablet PC Input Panel is the standard interface for converting handwriting to text in a Windows-based program. It's the method by which Pen-Tablet users enter text into applications that do not include a custom handwriting interface.
There are three ways to open Input Panel: 1. Tap the Input Panel icon, which appears when you place the pointer in a text entry area, such as the Address bar in a web browser or a text box in a dialog box. 2. Tap the Input Panel tab, which appears by default on the left edge of the screen. When you open Input Panel this way, it floats on top of any open windows. 3. Tap the Tablet PC Input Panel icon on the Windows taskbar. The Input Panel icon does not appear on the taskbar by default.
To make sticky notes open automatically at startup go to Tools, tap Options and then tap Open at Startup. Open Sticky Notes by tapping the Start button, typing Sticky Notes in the search box, and then tapping Sticky Notes in the list of results. Alternatively: Start All Programs Sticky Notes To keep sticky notes always visible on the desktop Tap the Tools menu, points to Options and then type Always on Top.
• • PowerPoint OneNote Writing with a pen is a particularly efficient and natural way to comment on an existing document and to capture rough thoughts that are emerging in real time. Word, PowerPoint and Excel have a Review tab with a Start Inking button that provides an Ink Tools menu. This menu includes tools such as: felt tip pen, ballpoint pen, highlighter, and eraser, as well as options to select the Ink Color.
Selected examples for using digital ink in Office 2007 Applications Signatures, Ink Comments and annotation in Word 2007 Inking Excel 2007 Drawing in Outlook 2007 51
Drawing in on-line messenger For more information about the various available options of using Pen-Tablet, inking and handwriting, please refer to Microsoft manuals and Help service. Chapter 6 Using in Mac OS Installing the Note Manager for Mac software The following procedure guides you through installation of the Note Manager for Mac. 1. Click on the NoteTaker installer icon (NoteTaker. pkg). The NoteTaker Installer opens (a standard Mac installer): Figure 1: NoteTaker Installer 2. Click Continue.
Figure 2 Installer showing the Destination Select stage 3. Click Continue. The Installer advances to the Installation Type stage. In this stage, you confirm that you want to perform a standard installation of the Note Manager software on the hard drive you selected. Notes: Performing a standard installation will install the software directly into your Applications folder on your Mac’s hard drive.
You set these preferences using the NoteTaker Preference Tool. Setting Preferences with the NoteTaker Preference Tool The following procedure describes how to set preferences using the NoteTaker Preference Tool: 1. Click on the NoteTaker Preferences icon.
When you next connect the Pen-Tablet to your Mac, your images will be uploaded according to the preferences you have set. 6. To close the NoteTaker Preferences dialog without saving any changes, click Exit. Pen-Tablet operation with Mac 1. Use the Pen-Tablet to capture and save your notes while you are away from your Mac, in meetings or lectures. 2. Connect the Pen-Tablet to your Mac, to upload the saved notes. The notes are saved in TIFF format.
The Digital Pen can be also used for drawings inside applications such as Adobe Illustrator, Photoshop, etc. Chapter 8 Using the Photo Sketcher The provided CD contains another userful application - Photo Sketcher. You can use it to add annoations on top of any picture. For details about the application, see the Photo Sketcher Software User Guide in the CD.
The pen is in Mouse mode The pen stroke is messy or discontinuous. The mouse is dead The orientation of the pen strokes does not match the actual writing or drawing. The distance between the pen and the base unit is beyond the area of A4 paper The digital pen's battery is too low There is barrier between the pen and the base unit. Your handhold is so close to the pen tip that the transmitting at the pen tip is blocked by your finger. The battery of the pen is too low Your writing is too gentle.
Chapter 10 Technical Specifications Item System Requirement Work Mode LCD Screen Battery Type Battery Life Charge Time Coverage area Capacity Storage Temp* Ambient Temp* Operation Relative Humidity* Storage Relative Humidity* Description 1. Minimum 50MB available hard disk space 2. Minimum 128MB RAM 3. 32 bit color quality 4. Screen resolution of 1024x768 pixels 5. Available USB port 6. Microsoft ® Windows 2000 (SP4), Microsoft ® Windows XP (SP2), Microsoft ® Vista, Windows 7 or later version.