Cloud IP Camera Quick Installation Guide Prompt: Our APP wil be In continuously Update for better users experience. fe ‘actual operation interface may not accordance with this manual, pleads + rate sodding to APP.
FCC statement This device complies with Part 15 of the FGG Rules: Operations subject to the following two conditions: 1. This device may not cause harmful Interference and 2. This device must accept any Interference that Is received, Including any Interfere enc that may cause undesired operation. RF exposure warning: This equipment complies with FCC radiation exposure limits set forth for an uncontrolled environment.
interference to radio communications. However, there is no. guarantees that interference will not occur in a particular installation. If this equipment does cause harmful interference to roadie or television reception, which can ba determined by turning the equipment off and on, the user Is encouraged to try to correct the Interference by one or mots of the following measures: Reorient or relocate the receiving antenna. Increase the separation between the equipment and receiver.
Safety Instruction These instructions are intended to ensure that user can use the product, correctly to avid danger or property lass. Warnings . Proper configuration of all passwords and either security settings is the responsibility of the installer and end-user. In the use of the product, you must ba in strict compliance » with the electrical safety regulations of the nation and region. Pleads refer to technical specifications for detailed Information.
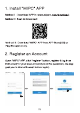
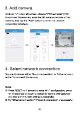
1. Install "MIC" APP Method | : Download APP In: Method I: Scan to Download: Method lil: Download "MIC* APP from APP Storeroom) or Play Polyandrous. 2. Register an Account Open "MIPG® APP, click 'reglster® button, register & log In as instructed{For your account serenity & retrieve password, we suggest you to bind with email before log in).
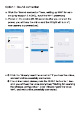
3. Add camera Click an In top left corner, choose "PTZ cameras” { FIX/ Cloud bax/ Panoramic), scan the QR aced an bottom of the camera, and tap the "Add" button to enter the network connection Interface. 4. Select network connection You could choose dither "Sound connection” or "Ethernet connection” to connect the camera. Note: {D Press RESET for 1 second to enter WI-Fi configuration; pass for 10 seconds or longer ta restore to factory trendsetting ‘you hear a chime, then setting successfully).
Option 1: Sound connection a. Click the "Sound connection” Leon, setting up WIFI for camera {only support 2.4GHZ), Input the WI-Fi password; b. Power on the device (30-60 secants after you connect the power, you will hear the chime and the IF light will turn off, now camera Is powered on); ©. Click the "Already heard the voice hint® if you hear the chime, and Walt until successfully connected.
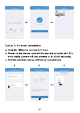
Option 2: Ethernet connection a. Click the "Theme connection” can; b. Power on the device, connect the camera to router with Ethernet cable (camera well be powered on In 30-60 seconds); ©. Add the matched device until set up successfully.
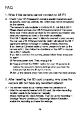
FAQ 1. What If the camera cannot connect to WIFI? A: Check If your WIFI password contains special characters such 8 spaces, commas, periods, eto. which may not be recognized by the camera. The camera ks only available to 2.4GHz WHF, not GHz WI-Fe. Please check and see your WI-Fe frequency band of the router. Keep your mobile phone as close to the camera as possible, and keep your camera as colas to the router as possible. Poor WI-Fi signal may result in failure to connect to your camera.
3. APP can't receive the alarm notification? A: The camera has motion detection and alarm function, but It needs manual setup. Steps: enter the camera “settings”, select “Notifications, enable the mason detection feature and see the tastings. 4, What if | forget my account & password? A: You can find your account & password with the binding email, i will not be found If not binding with email. 5.