Owner’s Manual Warnings Please Read First CAUTION: To reduce the risk of electric shock, do not remove the cover. No user service- able parts inside. Refer to qualified personnel. where they exit from the unit. Outdoor Antenna Grounding–If an outside antenna or cable system is connected to the unit, be sure the antenna or cable system is grounded so as to provide some protection against voltage surges and built-up static charges.
Owner’s Manual Precautions Precautions Verify The Line Voltage Your new Model PT-7000 has been factory configured for 120 (+/- 3%) volt AC lines. Connecting the amplifier to a line voltage other than that for which it is intended can create a safety and fire hazard, and may damage the amplifier. If you have any questions about the voltage requirements for your specific model, or about the line voltage in your area, contact Sherbourn Technologies before plugging the unit into a wall outlet.
Owner’s Manual Table of Contents Table of Contents 2 5 6 6 6 8 9 10 12 12 12 12 12 12 13 13 13 13 13 19 19 19 19 19 20 20 20 20 21 21 21 21 21 21 Please Read First Model PT-7000 Features Unpacking Accessories Model PT-7000 Front Panel Model PT-7000 Rear Panel Front Panel and On Screen Display (OSD) Remote Control Surround Format Information Dolby Digital Dolby Digital Surround EX Dolby Pro Logic II DTS DTS-ES DTS NEO:6 Cirrus Extra Surround Stereo Additional Information Connecting Your Model PT-7000
Owner’s Manual Model PT-7000 Features Model PT-7000 7.1 Channel Preamp/Processor Thank you for purchasing the Sherbourn Model PT-7000 Preamp/ Processor. The PT-7000 combines the best technologies, components, and software with a clean, user-friendly style, impeccable audio performance and leading edge capabilities, making it the perfect foundation for any music or home theater system. In order to receive the maximum enjoyment from your PT-7000, please take a few minutes to read this manual.
Owner’s Manual Model PT-7000 Front Panel Complete Multiroom System When properly connected, a second source may be sent to a remote room, complete with remote volume control, source selection and tuner control. A trigger for the second zone allows a second amplifier to turn on and off independently of the main room. This system may also be used to record an input source that is different from the one being used in the main room.
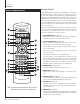
Owner’s Manual Model PT-7000 Front Panel Model PT-7000 Front Panel 10 SOURCE buttons (see page 30) Press these buttons to select an input source. 11 On/Standby/Mute indicator (see page 22, 30) Lights to indicate when the unit is in Standby mode and goes out when the preamp/processor is active. Also blinks to indicate when the main volume is muted. 12 MULTI indicator LED (see page 29, 36) Lights to indicate that the second zone (Zone 2) is active.
Owner’s Manual Model PT-7000 Rear Panel Model PT-7000 Rear Panel Below is a brief explanation of the connections and switches found on the rear panel of the PT-7000 Preamp/Processor. Before connecting any audio or video components to the unit, familiarize yourself with the type and location of connectors available. 1 FM Antenna terminal (see page 20) Use to connect the supplied FM antenna or an external 75 Ω antenna.
Owner’s Manual Front Panel and On Screen Display (OSD) 10 Optical Digital Inputs (see page 19-20) Use these inputs to connect the optical digital audio signal output from such digital devices as CD, DVD or LD players. These inputs are fully assignable. 11 Product Serial Number Write this number in the space provide on page 4 for future reference. 12 Audio Source Input jacks (see page 19-20) Use these inputs for connection to analog audio sources such as a CD player.
Owner’s Manual Remote Control Remote Control Model PT-7000 Remote Control The PT-7000 Universal Learning Remote Control duplicates every function available from front panel of the preamp/processor and more. It is designed to access all the configuration and operation menus of the PT-7000.
Owner’s Manual Remote Control 8 Numeric Keypad buttons (see page 32) Use these buttons for control functions requiring you to enter numbers. For numerals over 10, press the 10+ button for every multiple of ten, followed by a second digit. 9 Theater Compensation button (see page 34) The T.COMP button toggles Theater Compensation processing on and off. 10 Surround/Data Format buttons (see page 31) Press the 2, DTS, CR SURR or STEREO button once to select a surround processing format .
Owner’s Manual Surround Format Information Surround Format Information Dolby Digital The Sherbourn Model PT-7000 employs the latest technology developed in conjunction with Cirrus Logic®, providing one of the most extensive arrays of surround decoding and processing currently available. You can choose from Dolby Pro Logic® II, Dolby Digital® 5.1, Dolby Digital EX®, DTS®, DTS-ES® Discrete, DTS-ES® Matrix, DTS NEO:6® and Cirrus Extra Surround® and Dolby Pro Logic II®.
Owner’s Manual Connecting Your Model PT-7000 compatible with the original DTS process, and will deliver a 5.1 channel output when no center or back surround speakers are available. The Model PT-7000 will automatically sense the availability of either DTS-ES format and automatically switch the processing mode when required. DTS NEO:6 This processing mode can create up to 6 full bandwidth channels from any matrix-encoded 2-channel source.
Owner’s Manual Connecting Audio Equipment to the Model PT-7000 Sherbourn Technologies, Inc.
Owner’s Manual Connecting Video Equipment to the Model PT-7000 Model PT-7000 7.
Owner’s Manual 16
Owner’s Manual Connecting the Model PT-7000 to an External Amplifier in a Second Zone Model PT-7000 7.
����� ������� ����� ������� ����٠�� ���������� ���� ���� ���� ���� ��������������� ����� ����� ��� ������� ������� ������� �������������� ������� ���� � ���������� � ����������� ���������� ��� ��� ����� �������������������������� ����������������������������� �������������������������� ���������������������������� �������������������������� ��������������������������� ������������������������������ ���������������������������� ����������������������������� �������������������� �� �
Owner’s Manual Connecting Your Model PT-7000 Connecting Audio Components DVD Player CD Player Composite Connect the L and R channel outputs on the CD player to the CD IN jacks on the Model PT-7000. S-Video Analog If your CD player has a digital output jack, connect it to one of the coaxial (COAX 1 or 2) or optical (OPT 1-4) input jacks on the preamp/processor, depending on the type of connector used by the CD player.
Owner’s Manual Connecting Your Model PT-7000 Video Recorder A video recording device such as a VCR, PVR (such as a TiVo®, Replay®, UltimateTV®, DishPlayer® or similar device) or DVD recorder can be connected to the Model PT-7000 using the following methods. Connect the composite video output from the recording device to the VCR IN composite video jack on the rear of the preamp/processor.
Owner’s Manual Connecting Your Model PT-7000 AM Antenna Remote Control Connect the AM antenna to the terminals labeled AM and E(arth) on the rear panel of the preamp/processor. Start by pressing the lever on the side of one of the terminals to the right. Next, insert one of the antenna wires into the opening. Finish by returning the lever to the up position, securing the wire. Do the same for the other wire to complete installation.
Owner’s Manual System Setup System Setup 2. Press At this point you should have made all the necessary physical connections between the PT-7000 and your source equipment, amplifiers and speakers. All that remains is to properly configure the system to reflect your specific equipment and room characteristics or to select a Setup menu. Your selection appears on the Front Panel Display and the OSD: SPEAKER CONFIG FRONT :SMALL To turn the Model PT-7000 on: 1.
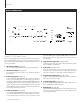
Owner’s Manual System Setup Input Setup and Selection Before calibrating your PT-7000 and adjusting loudspeaker setup and configuration, you should first set up the sources connected to it. You will make your selections using the Input Configuration menu, shown below. Figure 1 NOTE: Always connect and configure the digital input source option if one is available from the specific component, as this will provide maximum performance and best sound quality.
Owner’s Manual System Setup One type of compression is most useful for situations such as late night viewing of programs with a wide dynamic range (like many action movies) that might disturb others in your home. This function can also be used to provide compression for program material that may require enhancement of overall intelligibility (such as some older soundtracks).
Owner’s Manual System Setup Speaker Placement ������������������������������� ������������������������������������������ �������������������������������� ������������������������������ ��������������������������� ���� ������������������ ����������������� ����������������������� �������������������� ������������������� ����������������� ��������������������� ���������� ������ ����� ��������� ����� �������� ���� �������� ���� ���������� ������������� ������������������ ���������������� �������������
Owner’s Manual System Setup The first step in configuring the PT-7000 to operate with your speaker system is to set the type, number and crossover frequencies of your particular loudspeakers. You make these selections using the Speaker Configuration menu shown below. Figure 2 SPEAKER CONFIG > FRONT :SMALL CENTER :SMALL SURR :SMALL SURR REAR :LB/RB SUBWOOFER :ON FRONT XOVER :100Hz CENTER XOVER :100Hz SURR XOVER :100Hz RETURN TO MAIN MENU 4.
Owner’s Manual System Setup Channel Calibration Te next step is to adjust the output level of each channel so that they are properly matched. This must be done to insure a correct presentation of multi-channel sound sources. The adjustment must be as precise as possible, and is almost impossible to accomplish by ear. Therefore, we recommend that you use a Sound Level Meter. This device insures that all loudspeaker levels are precisely matched and set accurately.
Owner’s Manual System Configuration The System Configuration menu is used to enter Speaker Distances (for proper sound delay), set Display parameters, operate the Sleep Timer, and turn Theater Compensation on or off. The Display, Sleep Timer and Theater Compensation settings are covered in the section titled “Operation.” The System Configuration menu is shown below. Rounding up is OK. Distances can be set in the following increments: Feet 0 to 20 feet in 1 foot increments. Meters 0 to 6 meters in 0.
Owner’s Manual 4. Use the < and > buttons to select between On and Off. When this setting is On, Pro Logic II’s Panorama circuits will blend an amount of the front channel information into the side speakers so that the soundfield appears to wrap around the front and sides of the soundstage. Experiment with a variety of program sources to see if this effect is one you prefer. 5 . Press the button to select the Dimension menu. Figure 6 MULTI-ZONE > MULTI-ZONE :OFF INPUT :DVD MUTE :OFF VOLUME : 0dB 6.
Owner’s Manual Operation Operation Now that you have completed the initial setup and configuration of the Model PT-7000, it is simple to operate and enjoy. Reading the following section will help you receive the maximum pleasure from your new equipment. Make sure the unit is plugged and and the Main Power switch on the rear panel of the PT-7000 is in the On position as outlined in the “System Setup” section.
Owner’s Manual Operation Muting the Volume Surround Data Format Lock Use this control to turn the sound off momentarily, such as when interrupted by a phone call. The PT-7000 will automatically set the surround format based on the signal it receives from the selected source. To avoid the slight delay occasionally encounterd in the Auto Select process, you can choose to override the Auto Data Format detection circuitry by following the procedure below. To mute the main volume: 1.
Owner’s Manual Tuner Operation The PT-7000 Tuner can receive AM, FM and FM stereo broadcasts. Up to 32 stations can be preset and accessed from the front panel or remote. Stations can also be tuned manually. NOTE: Tuner reception cannot take place unless an appropriate AM and/or FM antenna is connected to the rear panel of the PT-7000 as described on page 20. To operate the tuner: 1.
Owner’s Manual Operation Recording a Source Channel Trim You can record from any input source available to the PT-7000 when you have an audio or video recorder properly connected to the appropriate output jacks on the rear panel of the unit as outlined in the section titled “Connecting the Model PT-7000” starting on page 13. You can not monitor the output from the recorder while the recording is in progress.
Owner’s Manual Operation To adjust channel trim using the TRIM function: 1. Press the TRIM button on the front panel or the remote control. The Front Panel Display and the OSD will show the following: CHANNEL TRIM LEFT FRONT : 0dB 2. Use the < and > buttons to adjust the channel trim level. You can adjust the selected channel level in 1dB steps across a range of-15dB to +10dB. 3. When you are finished adjusting the Channel Trim for the selected speaker, press TRIM again to cycle to the next channel.
Owner’s Manual Operation To enter 6 Channel Direct mode: 3. Press the SELECT button to enter the System Configuration menu. 1. Press the 6 CH button on the remote control. The PT-7000 is set to Bypass mode, circumventing any internal surround processing. The Front Panel Display and OSD display will read: The System Configuration menu appears on the Front Panel Display and the OSD (see figure 4 on page 28). The selected menu item should be FRONT DISTANCE. 4.
Owner’s Manual Operation Multizone Operation 7. Press the MULTI button again to view the Volume menu. The PT-7000 allows you to send a stereo signal to a remote second zone. This signal must be amplified by an optional external power amplifier and sent into speakers in the remote zone. You can choose to feed any analog stereo source connected to the inputs of the PT-7000 to the second zone and you can independently control its volume, regardless of what source has been chosen to play on the main system.
Owner’s Manual Remote Control Setup and Operation Remote Control Setup and Operation Battery Installation The PT-7000 remote control is preprogrammed to operate over 1,000 audio and video components. Programming is accomplished by simply punching in a three digit code number that matches your equipment. This remote control uses four AAA 1.5 V batteries (supplied). Please be sure to match the batteries with the (+) and (–) markings inside the battery compartment during installation.
Owner’s Manual Remote Control Setup and Operation 4. Point the remote control toward the device that was turned on in Step 1 and press in the first three-digit setup code number for that device using the number buttons (0-9) on the remote control. Release the CHANNEL UP button as soon as the device turns off. Confirm that you have the correct code by pressing the MUTE button on the remote. You should be able to turn your device on and off with this button.
Owner’s Manual Remote Control Setup and Operation Operation 3. Press the AUD button to enable volume control of the PT-7000. After you have programmed the remote control for your equipment, use the following procedures to operate the components of your home entertainment system: OR To operate a system component that you have programmed: The LED and Source button will blink twice and then go out. 1.
Owner’s Manual Remote Control Setup and Operation Example of Programming a Macro Sequence: To program the M1 button in the AUD mode to turn on the Audio receiver, turn on the TV and turn on the VCR. 1. Press AUD and MUTE buttons simultaneously. 4. Press the button on the source remote control, once again to verify that the new command has been learned correctly. The Status LED will flash green twice and then turn to a steady orange color indicating that the programming was successful.
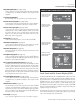
Owner’s Manual Setup Codes Setup Codes TV (continued) The following tables contain the setup codes for most brands of audio and video components.
Owner’s Manual Setup Codes VCR TV (continued) Manufacturer/Brand Setup Code Number Manufacturer/Brand Setup Code Number PIONEER 025 135 004 018 023 176 AIWA 034 161 PORTLAND 004 143 AKAI 043 046 124 142 146 PROSCAN 144 160 161 167 AMPRO 072 PROTON 171 173 004 143 ANAM 031 103 QUASAR 034 056 AUDIO DYNAMICS 012 023 043 RADIO SHACK 004 019 127 143 BROKSONIC 035 037 129 RCA 160 161 065 156 144 001 004 023 024 056 074 152 CANON 028 031 CAPEHART 108 CRAIG 001 040 135 CUIRTIS M
Owner’s Manual Setup Codes VCR (continued) VCR (continued) Manufacturer/Brand Setup Code Number Manufacturer/Brand Setup Code Number NORDMENDE 043 WESTINGHOUSE 005 OPTONICA 053 054 YAMAHA 012 034 043 PANASONIC 031 070 133 140 ZENITH 072 034 048 056 058 080 101 153 PENTAX 004 020 031 063 PHILCO 031 034 067 PHILIPS 031 067 034 054 101 PILOT 101 PIONEER 004 021 048 PORTLAND 108 PULSAR 072 QUARTZ 014 RADIO SHACK 101 123 RCA 144 147 107 109 031 004 020 034 040 041 140 158 RE
Owner’s Manual Care and Maintenance Care and Maintenance CD Manufacturer/Brand Setup Code Number ADCOM 062 AIWA 187 170 089 AKAI 202 AUDIO TECHNICA 046 CARVER 167 041 135 138 139 050 203 DENON 205 226 FISHER 016 H/K 047 033 208 046 JVC 136 163 004 KENWOOD 007 055 023 137 016 MARANTZ 044 041 MONDIAL 147 NAD 215 005 178 NAKAMICHI 218 NIKKO 046 ONKYO 038 168 030 062 169 PANASONIC 068 172 PHILIPS 041 PIONEER 010 020 174 RCA 017 021 REALISTIC 187 SANSUI 171 SHARP
Owner’s Manual Troubleshooting System Reset In rare cases the PT-7000’s internal processor may freeze or lock-up causing abnormal operation. This is common to all micro-processor controlled devices when the unit is subject to excessive static discharge, AC line noise, or power spikes. In most cases it is easy to solve this problem by simply unplugging the Model PT-7000 from its AC power source for about five minutes. After waiting, reconnect the power cord and turn the unit on.
Owner’s Manual Specifications Model PT-7000 Specifications FM Tuner Section Se Preamplifier Analog Section I I eda ce O I 26KΩ eda ce (Ma -RCA) <600Ω Ra ed I Ma I (100 Ω ad) Ra ed O IHF 10dB . 50dB S/N 13dB . S/N Ra 2.0V M 75dB . 3.0V See 69dB . 1.5V D M L ad 5Ω M 0.2% . Ma O 6.3V See 0.3% . S e e Se a a 40dB . V e Ra ge Ma -80dB +10.0 dB (1dB e ) Ad ace Cha e Se ec 70dB 400 H Z e -80dB +10.