
User manual


Page 5
SR-8100: User Manual
Controls and Connectors
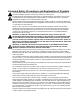
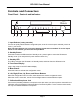
Front Panel - Controls and Indicators
1 9872 3 654
1. Input Selector (rotary encoder)
Turn this to quickly select between congured inputs; once the correct input is selected, press it to
“lock in” your choice.
Note: The Input Selector can only select between inputs that are enabled. To access inputs
which are not enabled, you must use the Input Menu.
2. Standby Button
Press this to switch the SR-8100 from Standby to On; press it again to return the SR-8100 to
Standby mode. (The rear panel AC power switch must be On.)
3. Standby LED
This LED is red when the SR-8100 is in Standby mode, and blue when the SR-8100 is On.
4. Front Panel Display
Large, clear, easy to read VFD status display.
5. Menu Button
Press this button to activate the conguration menu.
6. Left, Right, Enter, Up, Down, and Return Buttons
When the conguration menu is active, these buttons are used to navigate the menu.
When the menu is not active, use the Left and Right buttons to select between inputs.
7. Calibration Microphone Jack
Connect the (included) calibration microphone to this jack when you wish to perform automatic room
calibration using the Sherbourn Advanced Room Correction System. For the most accurate results,
use only the included calibration microphone.