
Using a model mill instructions
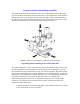
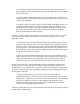

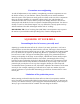
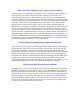
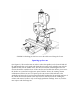
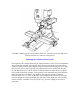
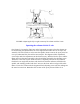
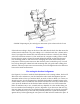

FIGURE 5-Squaring the fore and aft pivot movement of the column with the Y-axis
Example:
If the indicator reading is larger at the front of the table than the back, then that means the
column must be tilted back. Say your reading is "0" at the back and .010" (.25mm) at the
front. If you tipped the column back until the indicator read zero at the front, the reading
at the back would not remain at "0" but would now be a negative reading. This is caused
because the pivot point is located far enough behind the spindle so that both front and
rear measuring points are still in front of it. Swinging the column back actually raises
both points. The front point raises more than the back point, but both do go up. You will
have to keep tilting the column back and measuring until you get the same reading front
and back. This may require more movement that you first thought based on the difference
between the initial measurements.
Fine tuning the headstock alignment
(See Figure 6.) It is time to make the final adjustments to the rotating column, but first I'll
add a little more confusion to your life. Remember when I said that alignment pins are
somewhat useless to line up a machine? Well, as much as I hate to admit it, in a sense we
already have one. It is the alignment key that holds the headstock assembly square to the
column saddle, which is mounted on the column bed. Removal of this key is what allows
you to pivot the headstock on the Sherline lathes and mills. It is one of the features that
make our machines easy to use, versatile and very adaptable. It is also another thing you
have to consider when searching for "perfect" alignment. If you have more than one key,
don't mix them up because they are matched during assembly to fit as closely as possible.
I have found the best way to deal with this potential problem is to push the head square
against the key before tightening the cone point screw that locks the headstock in place. If