
Using a model mill instructions


Using the multidirectional milling capabilities
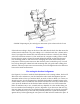
The design of the 8-direction mill allows you to do everything that could be done with
previous models of the Sherline mill plus much more. Now angled holes can be drilled or
milling operations can be completed from almost any angle on parts mounted square to
the table. The increased swing and movement of the column allows larger surfaces to be
machined, eliminating the need for the horizontal milling conversion.
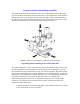
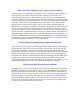
FIGURE 1-The axes of movement of a Sherline 8-direction mill.
Unpacking and assembling a new 8-direction mill
The major components of your new 8-direction mill are preassembled at the factory and
are then packaged for efficient shipping. After unpacking your shipping box, you will
then assemble the major components to ready your mill for operation. The mill XY base
must be removed from the piece of plywood that locates it during shipment. To make any
adjustments to the handwheels, backlash, gibs and so on, see the instruction manual that
is included with the mill. Instructions are also found there for assembly of the
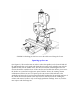
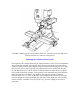
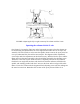
headstock/motor/speed control unit. To assemble the multi-direction column, make
reference to the exploded view provided on the last page of these instructions and
complete the steps that follow:
1. Attach the round column base (P/N 5666) to the mill base with the two 1/4-20 x
1-1/2" socket head cap screws provided.