
Using a model mill instructions


The mill is now ready to be positioned for use if you will be doing angled operations or
ready to be squared up if you will be milling square parts. The following instructions will
explain the steps used to "indicate in" the head of the mill so it will be square to the table.
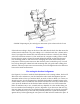
Lubrication, and when NOT to lubricate certain surfaces
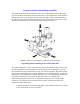
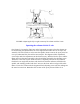
The mating surfaces of the arm, the column and the column cap are to be kept free from
lubrication. Tightening the column bolt causes friction between these surfaces to resist
movement of the arm during the forces and vibration of machining. If these smooth
surfaces are lubricated, the arm or the column could move during machining even if the
bolt is securely tightened. Clean these surfaces periodically with mild detergent or
bathroom spray cleaner to keep a good "bite" between surfaces. The same goes for the
surfaces between the "knuckle" and the ends of the swing arm. These surfaces are smooth
enough that adjustment is easily accomplished with the nut loosened even without
lubrication. They should be free of dirt and chips, but please resist your natural
inclination to lubricate them, as they do their intended job better when dry.
Lubrication of the moving components such as dovetails, handwheels and leadscrews is
discussed in the appropriate portion of the setup instructions or the instruction manual
that comes with your machine.
The additional challenges of dealing with so many adjustments
Having so many adjustable components offers you many more possibilities, but it also
brings with it additional challenges. You must make sure each of the adjustments is
securely tightened before beginning your cut. Large clamping surfaces are provided
which offer plenty of frictional area, so it is not necessary to overtighten the locking nuts
and screws. Also, as you adjust your machine closer to the extremes of its movement, it is
suggested that you take lighter cuts to reduce the possibility of flexing or vibration. Let
common sense and experience be your guide here.
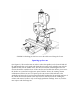
Obviously, the additional movements provided by an 8-direction mill column also mean
more will be involved in returning the spindle to a square position in relation to the table.
This is the same procedure that must be used on full sized machines that offer similar
movements. Being able to square up a mill is one of the skills that must be developed by
any machinist. Using the laser engraved markings and the adjustment block provided
with your Sherline mill will allow you to bring it back to a location very close to square.
From there you will use dial indicators to "indicate in" the head the final few thousandths
of an inch. The first few times you do it will probably take some time. The more often
you do it, the faster it will go. Remember that alignment for small parts is less critical
than if your cut will be traversing a longer distance. How accurately you must indicate in
the head will be dictated by the parts you will be making.
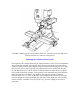
NOTE: Before installing the adjustment block squaring fixture onto the swing arm, make
sure there are no chips or debris in the pocket of the arm mount or on the end of the
adjustment screw.