Introduction ENGLISH UNPACKING AND Congratulations on Your Purchase! Your new high fidelity Compact Disc Player is designed to deliver maximum enjoyment and years of trouble free service. Please take a few moments to read this manual thoroughly. It will explain the features and operation of your unit and help ensure a trouble free installation. Please unpack your unit carefully. We recommend that you save the carton and packing material.
FOR U.S.A. AND CANADA ......................................120 V FOR OTHER COUNTRIES ........................... 115 V/230 V FOR YOUR SAFETY FOR YOUR SAFETY Units shipped to the U.S.A. and Canada are designed for operation on 120 V AC only. Units shipped to countries other than the above countries are equipped with an AC voltage selector switch on the rear panel. Refer to the following paragraph for the proper setting of this switch. Safety precaution with use of a polarized AC plug.
ENGLISH CONTENTS Introduction UNPACKING AND INSTALLATION ....................................................................................................... 2 READ THIS BEFORE OPERATING YOUR UNIT.................................................................................. 3 Rear Panel Connections ................................................................................................................................ 5 Front Panel & Remote Controls ..........................................
• Do not plug the AC input cord into the AC outlet when plugging and unplugging connection cords. • Be sure to connect the white plugs to the L(Left) and the red plugs to the R(Right) jacks when making connections with the supplied cords. • Refer to the connecting diagram in the operating instructions of AMPLIFIER/RECEIVER. OUTPUT JACKS Connect these jacks to the CD(or AUX) input jacks of your amplifier or receiver.
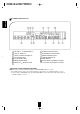
ENGLISH Front Panel & Remote Controls FRONT PANEL CONTROLS REMOTE CONTROLS (ONLY FOR CDC-5090R) 6
DISC SKIP BUTTON For loading or unloading discs, press this button to rotate clockwise to the next disc position. DISC TRAY Press this button to display the elapsed or remaining playing time of the current track or remaining playing time of the disc. DISC SELECTOR BUTTONS Use these buttons to select the disc to be played. TIME BUTTON Load a compact disc on the disc tray. OPEN/CLOSE BUTTON( ) Press this button to open or close the disc tray.
ENGLISH FLUORESCENT DISPLAY TRACK No. and TIME DISPLAY DISC No. DISPLAY MUSIC CALENDAR DISPLAY PLAY INDICATOR PAUSE INDICATOR REPEAT INDICATOR REPEAT A< >B INDICATOR INTROSCAN INDICATOR RANDOM PLAY INDICATOR PROGRAM INDICATOR DELETE INDICATOR EDIT DISPLAY INDICATORS FOR REPEAT, INTRO SCAN AND RANDOM PLAY MODE DIGI LINK SYSTEM REMOTE CONTROL This unit can be remotely controlled with Sherwood DIGI LINK III amplifier or receiver.
ENGLISH REMOTE CONTROL OPERATION RANGE (ONLY FOR CDC-5090R) • Use the remote control unit within a range of about 7 meters (23 feet) and angles of up to 30 degrees aiming at the remote sensor. LOADING BATTERIES (ONLY FOR CDC-5090R) 1 Remove the cover. 2 Load two batteries(“AAA” size) matching the polarity. • Remove the batteries when they are not used for a long time. • Do not use the rechargeable batteries(Ni-Cd type).
Before Operation Notes • Do not expose discs to direct sunlight, high humidity or high temperature for a long time. • When loading or unloading a disc in the disc tray, always place it with the printed side up. ENGLISH • Only compact discs bearing this mark can be reproduced. • In handling a disc, hold it carefully with the edges. • Do not stick paper or write anything on the printed surface.
Operations Load the disc(s) and close the disc tray. Turn the power on. 1 2 " " indicator lights up when the number of tracks is more than 14. For loading discs on other trays each, press the DISC SKIP button. 8cm(3 inches) CDs can be loaded on the inside circle of the tray, too. Note Do not open or close the tray by force. Doing so may damage it. Each time the POWER switch is pressed, this unit is turned on or off. Start play. To interrupt play temporarily. 3 4 “ ” indicator lights up.
ENGLISH CHANGING DISCS DURING Change the desired discs. Open the disc tray. 1 2 During playing the disc , the discs and can be changed. After changing the discs, press the OPEN/CLOSE button to close the disc tray. When changing the disc or , press the “DISC SKIP” button and rotate the disc tray. SKIP AND SEARCH PLAY Selecting a disc Searching for a passage during play Press the corresponding button to start play from the desired disc. Example) When selecting the disc 4.
1 disc random play ENGLISH PLAYING TRACKS IN RANDOM SEQUENCE All discs random play In the 1 disc random play mode, press “RANDOM” button again. The unit automatically selects a disc among five discs and a track on that disc in random sequence and plays it. After that track has been played, the unit continues to select another disc and a track on that disc in random sequence and plays it. Press again to cancel the random play. “RANDOM” indicator lights up.
ENGLISH REPEAT PLAY Repeating a single track during play Press this button after selecting the desired track. Each time this button is pressed, the repeat mode changes as follows: REPEAT 1 REPEAT 1 DISC REPEAT ALL DISCS Repeating a disc during play Repeating all discs during play After selecting the desired disc, press again in the 1 track repeat mode. Press again in the 1disc repeat mode. OFF Press again to cancel the repeat play.
ENGLISH PLAYING TRACKS IN ANY SEQUENCE Up to 32 selections can be programmed to play in any desired sequence. The track number greater than 99 can not be memorized. Programming the tracks on the CDs 2 In the stop mode, enter the program mode. Select the desired disc. Example) When selecting the disc 1. 1 If the PROGRAM/REVIEW button is pressed without selecting a track, the selected disc is programmed as a selection. 3 Select the desired track. Example) When selecting the track 4.
ENGLISH Repeat the above steps 2, 3 and 4 until the desired program is completed. 5 Start the programmed play. 6 During the programmed play, when you want normal play without clearing your programmed selections, select the desired disc with the DISC SELECTOR or DISC SKIP button or the desired track on the current disc with the NUMERIC buttons, then normal play will start from that disc or that track.
Select the track 7. ENGLISH 3 Store the selected track in the memory. 4 When selecting a track with the NUMERIC buttons, the selected track is stored automatically without the PROGRAM/REVIEW button. Clearing the programmed selections To clear one by one Each time this button is pressed in the program mode, the programmed selections are cleared one by one in the opposite sequence. To clear all programmed selections Press this button for more than 4 seconds in the program mode.
ENGLISH EDITING FOR RECORDING Up to 30 tracks for auto edit or 32 tracks for manual edit can be edited according to the tape length. It is possible only on the current disc. Making auto edit 1 In the stop mode, select the auto edit mode.
1 3 2 In the stop mode, select the manual edit mode. Press the PROGRAM/REVIEW button to manually edit the tracks to be recorded. 4 Select the tape length as you do in “Making auto edit” procedure. Edit the tracks for the side A repeating steps 3 and 4 in “PLAYING TRACKS IN ANY SEQUENCE (PROGRAMMED PLAY)” procedure on page 15. Notes During manual edit, if the "-" indicator in the time display disappears and “ ” flickers, it means that the total time of the edited tracks exceeds the tape length.
ENGLISH Checking the edited tracks In the edit mode, check as you do the programmed tracks. (refer to “Checking the programmed selections” on page 16) Clearing all edited tracks In the edit mode, press the STOP/CLEAR button for more than 4 seconds or open the tray. In the manual edit mode only, you can clear or rectify the edited tracks as you do in “Rectifying any wrong programmed selection” or “Cleaning the programmed selections” on page 16 and 17.
When there are the undesired discs or tracks, you can delete up to 32 selections. Deleting the undesired discs or tracks 2 In the stop mode, enter the delete mode. Select the desired disc. Example) When selecting the disc 1. 1 If the DELETE/REVIEW button is pressed without selecting a track, the selected disc is deleted as a selection. 3 Select the desired track. Example) When selecting the track 4. Delete the selected track.
ENGLISH Checking the deleted selections Each time the DELETE/REVIEW button is pressed in the delete mode (meaning “DELETE” lights up in the stop mode), the deleted selections will appear in the deleted sequence. Recovering the deleted selections To recover one by one Each time this button is pressed in the delete mode, the deleted selections are recovered one by one in the opposite sequence. To recover all deleted selections Press this button for more than 4 seconds in the delete mode.
Each time this button is pressed during play, time display changes as follows: During random or programmed play, etc., the remaining playing time of the disc may show "- -- : --". When a track of which number is greater than 30 is programmed, edited or being played, the time display may show "- -- : --". USING THE HEADPHONES For private listening, insert a plug of the headphone into “PHONES” jack.
ENGLISH Troubleshooting Guide If your unit should not perform as expected, consult the table below to see if the problem can be corrected before seeking help from your dealer or our service organization. PROBLEM No power REMEDY POSSIBLE CAUSE The AC input cord is disconnected. Connect the cord securely. The POWER switch is not pressed Press the POWER button to ON. correctly. No play The disc is loaded upside down. Reload the disc with the printed side up. No sound Dirty disc. Clean the disc.
Specifications TYPICAL AUDIO PERFORMANCES Number of channels ................................................................................................................................................................ 2 Frequency response, 20~20,000 Hz ........................................................................................................................... 0.5 dB Signal to noise ratio, A Wtd. .............................................................................................