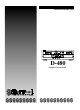
OPERATING INSTRUCTIONS DOUBLE CASSETTE DECK D-480 RESET COUNTER A/B MODE BC HIGH NORM CD SYN M MPX MIN RELAY P TAPE SIZE SEC RELAY PLAY L dB -00 MEMORY NR B/C/OFF REC REC -20 -10 -6 -3 0 +3 REVERSE +6 R AUTO REVERSE EJECT DUBBING NORMAL PLAY/AUTO TAPE SELECTOR / POWER CD SYN REC AUTO REVERSE EJECT HIGH AMS B AMS PHONES REC LEVEL A HX-PRO RECORD & PLAY/AUTO TAPE SELECTOR REC BALANCE ON/OFF 0 10 L R D-480 Double Cassette Deck
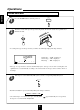
Unpacking and installation ENGLISH Congratulations on your purchase! Your new high fidelity Integrated Cassette Deck is designed to deliver maximum enjoyment and years of trouble free service. Please take a few moments to read this manual thoroughly. It will explain the features and operation of your Unit and help a trouble free installation. Please unpack your Cassette Deck carefully. We recommend that you save the carton and packing material.
Read this Before Operating Your Unit FOR YOUR SAFETY FOR YOUR SAFETY Units shipped to the U.S.A. and Canada are designed for operation on 120 V AC only. Units shipped to Australia are designed for operation on 240 V AC only. To ensure safe operation the three-pin plug supplied must be inserted only into a standard three-pin power point which is effectively earthed through the normal household wiring.
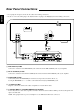
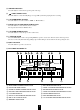
Rear Panel Connections ENGLISH Do not plug the AC input cord into the AC outlet when making connections. Be sure to connect the white plugs to the L(Left) and the red plugs to the R(Right) jacks when making connections. 4 AC INPUT ~120V / 60Hz MODEL NO.
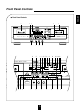
ENGLISH Front Panel Controls Front Panel Controls 23 24 25 24 23 DOUBLE CASSETTE DECK D-480 RESET COUNTER A/B MODE BC HIGH NORM CD SYN M MPX MIN RELAY P TAPE SIZE SEC RELAY PLAY L dB MEMORY NR B/C/OFF REC REC - -20 -10 -6 -3 0 +3 REVERSE +6 R AUTO REVERSE DUBBING EJECT NORMAL AMS B PLAY/AUTO TAPE SELECTOR / POWER ON/OFF REC LEVEL 0 23 A HX-PRO RECORD & PLAY/AUTO TAPE SELECTOR REC BALANCE 10 2 14 AUTO REVERSE EJECT AMS PHONES 1 CD SYN REC HIGH L 12
① POWER SWITCH Press this switch to turn the power on and press again to turn the power off. For system operation, plug the AC input cord into the switched AC outlet on amplifier or receiver, keep the POWER switch ON and control power ON/OFF with the main POWER switch on the amplifier or receiver. ENGLISH ② HEADPHONE JACK Stereo headphones with a standard 1/4 inch plug can be plugged into this jack for private listening.
⒕ MEMORY BUTTON Press this button to memorize the specific point on the tape. ⒖ NR B/C/OFF BUTTON ENGLISH Press this button to select the Dolby B type or C type NR system when playing back or recording. ⒗ COUNTER RESET BUTTON Press this button to reset the counter to “0000” or “00 min. 00 sec.”. (21) DECK A/B COUNTER SELECTOR BUTTON Press this button to select which deck to be counted. The tape detection indicator blinks 4 times.
Operations PLAYING BACK TAPES ENGLISH 1 2 POWER ON/OFF Press the POWER switch to turn the power on. Insert the cassette with exposed tape side facing down. To close the cassette door, push the door until it locks shut. EJECT According to the type of the tape loaded, you will see the following display(Auto Tape Selector). BC HIGH NORM CD SYN M MPX MIN Normal tape :“NOR”is displayed. Chrome tape : “CR” is displayed. Metal tape : “ME” is displayed.
ENGLISH 4 Select your desired reverse mode. REVERSE Each time REVERSE MODE button is pressed, mode changes as follows; : One side play or recording. (Side A→STOP, Side B→STOP) : Side A→Side B→STOP Side B→Side A→STOP : Continuous Auto Reverse Mode (Side A→Side B→Side A ...) To use relay play, load the cassette tapes into DECK A and B and press the RELAY PLAY button. RELAY PLAY The relay patterns are different according to the reverse mode. Refer to the followings.
MUSIC SEARCH PROGRAMMING ENGLISH The automatic music search function automatically skips other programs, finds and starts playback from the desired program. Up to 20th program before or after the present program can be searched quickly. During playback, press the button the desired number of times. Example : When listening to the second program before or after the present program.
4 Select the program source to be recorded. ENGLISH 3 When recording with DOLBY NR system, select the desired DOLBY NR system. NR B/C/OFF 5 Press the RECORD/RECORD MUTING button to enter the recording pause mode. 6 Adjust the recording level with the REC LEVEL control. (see page 10) / REC LEVEL 0 10 ◀ ▶ : Recordable on both sides ◀ ▶ : Recordable on front side : Recordable on back side ◀ 7 Adjust the balance of the right and left recording level with the REC BALANCE control.
RECORDING LEVEL ADJUSTMENT ENGLISH The most important factor for good recording result is the recording level adjustment. If the recording level is set at maximum, the signal-to-noise ratio (S/N) and the dynamic range (range of sound volume) will improve, but if it is set too high, the sound quality will deteriorate. On the contrary when the recording level is set too low in order to avoid distortion, tape hiss noise becomes too evident.
When this unit is connected to a Sherwood DIGI LINK Ⅲ CD player controlled remotely by the DIGI LINK system, the CD Synchro record function can be operated. Before starting CD synchro recording, adjust the recording level and the balance. 1 3 Repeat steps 1,2,3 and 4 of “RECORDING” Procedure. According to the tape length, edit the tracks to be recorded on the CD player referring to the operating instructions of that. 2 Start CD syncro recording.
ENGLISH 3 Press the DUBBING MODE button to select the normal or high speed(1.5 times normal speed) dubbing. To stop dubbing. 4 High quality sound will be obtained in the nomal speed dubbing mode. DUBBING NORMAL HIGH Then dubbing will start. NOTE During dubbing, the Dolby NR is automatically set to OFF and the recorded tape can be dubbed as it is. During dubbing, do not change the speed. If so, tape click noise may be recorded.
ENGLISH SELECTING A TAPE LENGTH Select the corresponding tape length according to the loaded tape. TAPE SIZE BC Example : In case of 60 minute tape.
DOLBY HX PROFESSIONAL HEAD ROOM EXTENSION(DOLBY HX PRO) 250µW/M --0 Level (dB) --5 --10 Dolby-HX-PRO ON --15 Dolby-HX-PRO OFF --20 10 100 1k 10k Frequency (dB) PRINCIPLE OF DOLBY NR SYSTEM The Dolby NR system functions so that it automatically increases recording levels of medium and high frequencies when the recording signal level is lower than the specified level (encoding), and automatically reduces the output level to the normal level during playback (decoding).
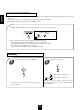
NOTES ON CASSETTE TAPE Before loading a cassette tape, take up the slack in the tape to prevent it from becoming entangled around the capstan. After the recording has been finished, remove the tab to prevent the recorded contents from being erased or recored on accidently. For side B For side A To rerecord after tabs have been removed, cover with adhesive tape. Do not store the tapes in direct sunlight or near equipment that generates heat. Keep the tapes away from any magnetic fields.
ENGLISH Troubleshooting Guide If your unit does not perform as expected, consult the table below to see if the problem can be corrected before seeking help from your dealer or our service organization. PROBLEM POSSIBLE CAUSE REMEDY No power • The AC input cord is disconnected. • The POWER switch is not pressed completely. • Connect the cord securely. • Press the POWER switch to ON. No sound • Unrecorded tape is loaded. • Incorrect connections. • Incorrect operation of the amplifier.
Specifications Note: Specifications and design subject to change without notice for improvements. 19 ENGLISH GENERAL Power Requirement.................................................................................................................................................. 120 V, 60 Hz Power Consumption............................................................................................................................................................... 16 W Dimensions(W × H × D)...........
5707-04683-004-0 (9007018996)