SD-871
Introduction READ THIS BEFORE OPERATING YOUR UNIT This symbol is intended to alert the user to the presence of uninsulated "dangerous voltage" within the product's enclosure that may be of sufficient magnitude to constitute a risk of electric shock to persons. CAUTION : TO REDUCE THE RISK OF ELECTRIC SHOCK, DO NOT REMOVE COVER (OR BACK). NO USER-SERVICEABLE PARTS INSIDE. REFER SERVICING TO QUALIFIED SERVICE PERSONNEL.
SAFETY INSTRUCTIONS 1. Read Instructions - All the safety and operating instructions should be read before the product is operated. 2. Retain instructions - The safety and operating instructions should be retained for future reference. 3. Heed Warnings - All warnings on the product and in the operating instructions should be adhered to. 4. Follow Instructions - All operating and use instructions should be followed. 5. Cleaning - Unplug this product from the wall outlet before cleaning.
FOR YOUR SAFETY Units shipped to the U.S.A and Canada are designed for operation on 120 V AC only. Safety precaution with use of a polarized AC plug. However, some products may be supplied with a nonpolarized plug. U.S.A and CANADA 120 V CAUTION : To prevent electric shock, match wide blade of plug to wide slot, fully insert. ATTENTION : Pour éviter chocs électriques, introduire la lame la plus large de la fiche dans la borne correspondante de la prise et pousser jusqu’ au fond.
CONTENTS • Introduction READ THIS BEFORE OPERATING YOUR UNIT | 2 • System Connections CONNECTING TO A/V AMPLIFIER OR RECEIVER | 6 CONNECTING TO TV WITH HDMI INPUT CONNECTOR | 9 CONNECTING TO TV WITH AUDIO AND VIDEO INS | 11 CONNECTING TO TV WITH SCART CONNECTOR(Regional Option) • Front Panel & Remote Controls | 12 REMOTE CONTROL OPERATION RANGE LOADING BATTERIES | 13 | 13 • Preliminary Knowledge About Discs PLAYABLE DISC TYPES | 14 REGION CODE | 14 NOTES ON COPYRIGHT | 14 SYMBOL ABOUT INVALID OPERATIO
System Connections • Do not connect the AC input cord into the AC outlet when plugging and unplugging connection cords. • Since different components often have different terminal names, carefully read the operating instructions of the component connected. • Be sure to observe the color coding when connecting audio and video cords. • The supplied cords are a (stereo) audio cord, a composite video cord, a system control cord and a power cord. Other cords are commercially-available cords.
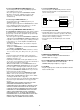
1. Connecting 5.1CH AUDIO OUTPUTs • To fully enjoy the multi-channel audio of DVD Audio and SACD as well as Dolby Digital and DTS soundtracks of DVD Video, etc., connect these jacks to the corresponding channel input jacks of your A/V amplifier/receiver. 3. Connecting DIGITAL OUTPUTs • To enhance the sound quality, connect either the OPTICAL or the COAXIAL DIGITAL OUTPUT jack to the corresponding DIGITAL INPUT jack of your amplifier/ receiver with built-in Dolby Digital or DTS decoder.
4. Connecting COMPOSITE VIDEO OUTPUTs 1, 2 • Connect this jack to the (composite)VIDEO input jack of your amplifier/receiver or TV. • The same signal is output from COMPOSITE VIDEO OUTPUT 1 and 2 jacks, enabling connection to two devices(e, g., an A/V amplifier and additional TV) simultaneously. 7. Connecting DIGI-LINK jack • Connect this jack to the DIGI LINK jack of the external Sherwood component that uses the DIGI LINK II or III remote control system.
CONNECTING TO TV WITH HDMI INPUT CONNECTOR • If you have a HDMI INPUT connector equipped TV or projector, etc., connect it to the HDMI OUTPUT connector of this unit using a commercially available HDMI cord. The HDMI connection can carry uncompressed digital video and multi-channel digital audio signals. • Among the HDMI INPUT connector equipped TV or projector, etc., some do not support audio output(for examples, projectors). In such a case, make an audio connection between this unit and A/V receiver.
Audio output from the unit’s HDMI OUTPUT and 5.1CH / 2CH AUDIO OUTPUTs • Depending on the AUDIO OUT setting, the following table shows the audio signals to be output from the HDMI OUTPUT connector and 5.1CH / 2CH AUDIO OUTPUTs.(For details, refer to “When selecting the AUDIO OUT” on page 42.) Disc type Audio recording format Dolby Digital DVD Video DTS Linear PCM Linear PCM or packed PCM MULTI CH STEREO HDMI Dolby Digital *1 Multi-channel PCM 2 channel PCM Lt/Rt *6 - 5.
CONNECTING TO TV WITH AUDIO AND VIDEO INS • You can enjoy DVD Videos by simply connecting this unit to a TV. To hear improved audio sound quality, connect the 2CH AUDIO OUTPUTs to the AUDIO INs of DVD(, AUX, CD, etc.) of your amplifier/receiver. • To connect these jacks correctly, refer to “Connecting 2CH AUDIO OUTPUTs” on page 7, “Connecting COMPOSITE VIDEO OUTPUTs 1, 2” and so forth on page 8.
Front Panel & Remote Controls Front Panel Controls 1. POWER switch 2. STANDBY indicator 3. FORWARD/BACKWARD SKIP (▶▶ / ◀◀) buttons 4. STOP( ) button 5. PAUSE/STEP( ) button 6. PLAY(▶) button 7. OPEN/CLOSE(▲) button 8. DISC TRAY 9. HDMI ON indicator 10. HD(High Definition) indicator 11. PURE AUDIO indicator 12. REMOTE SENSOR 13. FLUORESCENT DISPLAY • For details, see next page. Remote Controls 1. POWER ON button 2. STANDBY button 3. OPEN/CLOSE(▲) button 4. DIMMER button 5. DISPLAY button 6.
Fluorescent Display PLAY Indicator DISC TYPE indicators SOUND RECORDING SYSTEM indicators PROGRESSIVE indicator PURE AUDIO indicators VIDEO FILE TYPE indicators SOUND RECORDING SYSTEM indicators PAUSE indicator REMAIN indicator ANGLE indicator REPEAT indicators Group/title number, SOUND RECORDING SYSTEM indicator track/chapter number, playing time, operating PROGRAM information, etc.
Preliminary Knowledge About Discs PLAYABLE DISC TYPES REGION CODE This unit supports the following discs. Disc Logo Format or file type DVD Video DVD Video DVD Audio DVD Audio SACD DVD-R • DVD players and DVD Videos have their own Region Code numbers which are assigned to each country or area as shown below. DVD players are set to your Region Code number at the factory.
AUDIO AND VIDEO FILES CARE AND HANDLING OF DISCS • Folder and file names are displayed up to 11 characters. • Characters except “A~Z”, “0~9”, “ - ” may be not displayed. • The playback order of folders and files shown in the menu may differ from the order shown in a PC. • This unit supports multi-session discs. Some multi-session discs may take a long time to load and some may not be loaded at all. • In handling a disc, hold it carefully with edges.
Operations Before starting playback • Make the initial settings to suit your usage conditions the very first time this unit is turned on.(For details, refer to “Initial Settings” on page 32) • For explanation purposes, this instructions explains the OSD(On-Screen Display) language displayed on TV in English. • Usable discs for each operation/ function are referred to by the icons; BASIC PLAYBACK Preparations • Turn on the TV and select the video input source connected to the unit.
• When you load a MP3, WMA, JPEG, DivX disc or a DVD that contains a menu, the menu display may appear on the TV screen. In this case, see “To start playback from the menu of DVD” below or “To start playback from the menu of MP3, WMA, JPEG or DivX disc” on the next page.
To start playback from the menu of MP3, WMA, JPEG or DivX disc 1 2 In the stop mode, press the CURSOR ◀/▶ buttons to select the folder and file menu. RC Press the CURSOR ▲/▼ buttons to select the preferred folder or file then press the ENTER button. RC RC • When selecting the preferred file, playback starts from the selected file. • When selecting the preferred folder, the file menu screen of the selected folder is displayed.
To stop playback Main unit • When playback of a DVD is stopped, the unit memorizes the point where the STOP( ) button was pressed(RESUME function: DVD only). (“RESUME” is displayed on the unit’s display when this function is activated.) • Press the PLAY(▶) button again, and playback will resume from this point. When the STOP( ) button is pressed again, the RESUME function will be canceled and it enters stop mode.(“STOP” is displayed.
To skip ahead or back during playback • To skip ahead Main unit • Each time the button is pressed, a chapter/track/file is skipped. • In case of DVD, SACD and CD, when the BACKWARD SKIP button is pressed once midway through a chapter/track, playback returns to the beginning of that chapter/track. When it is pressed again, a chapter/ track is skipped. • You can select a chapter/track/file directly with pressing the NUMERIC buttons on the remote control.
Bonus group playback • Some DVD Audios contain an extra bonus group that requires a 4-digit password to access.(For details on 4-digit password, see the disc’s sleeve notes.) During playback, select the bonus group. 1 • Then password input screen is displayed. • Depending on DVD Audios, you can select the bonus group on the title or DVD menu, too. • Depending on the disc, the bonus group operation may vary. RC BONUS GROUP INPUT PW: 2 Input the 4-digit password with pressing the NUMERIC buttons.
DISPLAYING DISC INFORMATION DURING PLAYBACK • The unit features the on-screen display function showing disc information. • Press the DISPLAY button. RC • Then the disc information is displayed on the TV screen.
PLAYING THE DESIRED SECTION OF DISC 1 During playback, press the SEARCH button. • Then the search mode is displayed on the TV screen.
PLAYING A SPECIFIC ITEM When using a title menu • If some DVDs which contain more than one title may have the menu like as a list of the titles, the TOP MENU button can be used to select the desired title. (The details of operation differ depending on the disc used.) During playback, press the TOP MENU button. 1 RC Example) • Then a list of titles on the disc is displayed on TV screen. • If the disc does not have the menu such as a list of titles, this function does not work.
REPEAT PLAYBACK • You can play a current title, group, chapter, folder, track, file, disc or part repeatedly. Note : • Repeat playback may not work correctly with some discs. Repeating a chapter/track, title/group During playback of the desired chapter/track or title/group, press the REPEAT( ) button. RC • Then the selected repeat mode is displayed on the TV screen.
Continued Repeating the desired part 1 During playback at the beginning of the part you want to repeat, press the REPEAT A/B button. RC • Then “A TO B SET A” is displayed on the TV screen. 2 At the end of the part, press the REPEAT A/B button again. • Then “A TO B REPEAT ON” or “A TO B SET B” is displayed on the TV screen, and the part between points A and B is played back repeatedly. • To return to normal playback, press the REPEAT A/B button repeatedly until “A TO B CANCELLED” is displayed.
PLAYING TRACKS IN DESIRED ORDER • Up to 25 tracks can be programmed to be played in any desired order. In the stop mode, press the PROGRAM button. 1 RC • Then the program mode is displayed on the TV screen. • When the PROGRAM button is pressed again, the program mode is canceled. PROGRAM P 00:00 2 Select the desired track with pressing the NUMERIC buttons on the remote control. Example) When the track 5 and 12 are programmed.
BOOKMARK PLAYBACK • The bookmark function allows you to mark the desired scene/point that you can go to quickly. Up to 14 bookmarks can be stored in the memory. Storing a bookmark in the memory During playback, press the MARKER button. 1 Mark mode RC • Then the bookmark menu is displayed on the TV screen. • When the MARKER button is pressed again, the bookmark menu disappears.
CHANGING THE AUDIO LANGUAGE • It is possible to change the audio language to a different language from the one selected at the initial settings. (For details, refer to “SETTING THE LANGUAGE SETUP” on page 44.) This operation works only with DVDs on which multiple audio languages are recorded. • During playback, press the AUDIO button. RC • Then the audio language menu is displayed on the TV screen for several seconds.
CHANGING THE CAMERA ANGLE • Some DVDs contain scenes which have been shot simultaneously from multiple camera angles. For these discs, the same scene can be viewed from each of these different angles. • The recorded angles differ depending on the disc used. • During playback at the scene recorded from multiple camera angles, press the ANGLE button. RC • During playback at the scene recorded from multiple camera angles, the angle symbol( ) is displayed on the TV screen only when the ANGLE MARK is set to ON.
CHANGING THE VIDEO SIGNAL FORMAT • Depending on the countries, this unit conforms to either the NTSC color system for U.S.A, Canada, etc., or the PAL for Europe, Australia, China, etc. If the color system of this unit is different from that of your TV monitor and the discs to be played, the screen may be somewhat hard to see or the picture quality may be poor. Only in this case, change the video signal format to another.
Initial Settings The initial settings of the unit at the factory can be modified as desired later. Even after the power of the unit is switched to the standby mode, the initial settings are stored in memory until it is changed the next time. 1 In the stop mode(“STOP” is displayed on the unit’s display, not “RESUME”), press the SETUP button to enter the setup mode.
SETTING THE VIDEO SETUP • HDMI OUTPUT : When outputting signals from the HDMI OUTPUT connector VIDEO SETUP or not. HDMI OUTPUT OFF HDMI FORMAT ON • HDMI FORMAT : When outputting either the component or the RGB video signals from the HDMI OUTPUT connector. VIDEO OUTPUT • VIDEO OUTPUT : When outputting the video signals in the desired resolution SCAN TYPE P-SCAN MODE from the HDMI OUTPUT connector.
Continued When selecting the VIDEO OUTPUT • You can select the resolution of video signals to be output from the HDMI OUTPUT connector depending on the TV connected to this unit.(For details on the resolution compatible with your TV, refer to the operating instructions of that.) • When the HDMI OUTPUT connector is connected to an HDMI-compatible TV, the TV reports to this unit what resolutions it supports.
Continued When selecting the TV SYSTEM • Depending on the countries, this unit conforms to either the NTSC color system for U.S.A, Canada, etc., or the PAL for Europe, Australia, China, etc. If the color system of this unit is different from that of your TV monitor and the discs to be played, the screen may be somewhat hard to see or the picture quality may be poor. Only in this case, change the video signal format to another.
Continued 2 Press the CURSOR ▶ button to select the setting menu. RC • Each time the CURSOR ▶ or ◀ button is pressed, the setting menu or the item menu is selected. 3 Press the CURSOR ▲/▼ buttons to select the preferred, then press the ENTER button. RC RC • The selected setting is colored. 4 Press the CURSOR ◀ button to select the item menu. RC • Each time the CURSOR ◀ or ▶button is pressed, the item menu or the setting menu is selected. 5 Set other setups to your preference.
SETTING THE AUDIO SETUP • The speaker size, distance and level settings are valid the 5.1CH AUDIO OUTPUTs are connected to the multichannel audio inputs of your amplifier/receiver.(For details, refer to “Connecting 5.1CH AUDIO OUTPUTs” on page 7.) • To obtain the best possible surround sound, set the size of speakers you have connected and their distances from your listening position. Then use the test tone to adjust the volume of the speakers to the same level. Note : • When the 5.
Continued 4 Press the CURSOR ▲/▼ buttons to select the preferred setting, then press the ENTER button. RC RC • The selected setting is colored. About speaker size • Depending on your speaker type, you can select one of these following speaker types. * YES/NO : Select the desired depending on whether a subwoofer is connected or not. * LARGE : Select this when connecting speakers that can fully reproduce sounds below crossover frequency.
Continued When selecting the DISTANCE SETUP 1 Press the CURSOR ▲/▼ buttons to select the DISTANCE SETUP, then press the ENTER button. RC RC DISTANCE SETUP UNIT METERS FRONT L FEET Setting menu CENTER FRONT R Item menu SURROUND R SURROUND L EXIT 2 Press the CURSOR ▲/▼ buttons to select the preferred item. RC • Then the setting menu of the selected item is displayed. 3 Press the CURSOR ▶ button to select the setting menu.
Continued When selecting the LEVEL SETUP 1 Press the CURSOR ▲/▼ buttons to select the LEVEL SETUP, then press the ENTER button. RC RC LEVEL SETUP TEST TONE ON FRONT L OFF CENTER FRONT R SURROUND R SURROUND L SUBWOOFER Item menu 2 Setting menu Press the CURSOR ▲/▼ buttons to select the TEST TONE, then press the CURSOR ▶ button to select its setting menu. RC RC • Each time the CURSOR ▶ or ◀ button is pressed, the setting menu or the item menu is selected.
Continued 6 Press the CURSOR ▲/▼ buttons to adjust the volume of the selected speaker as preferred until the sound level of each speaker is heard to be equally loud. RC • You can adjust the volume within the range of -10~0 dB. 7 Press the CURSOR ◀ button to select the item menu. RC • Each time the CURSOR ◀ or ▶ button is pressed, the item menu or the setting menu is selected. 8 9 Set other speakers to preferred levels. After the speakers are all adjusted as preferred, cancel the test tone function.
Continued When selecting the AUDIO OUTPUT 1 Press the CURSOR ▲/▼ buttons to select the AUDIO OUTPUT, then press the ENTER button. RC RC AUDIO OUTPUT Item menu AUDIO OUT HDMI AUTO LATE NIGHT MULTI CH DVD AUDIO AREA STEREO SACD AREA Lt/Rt Setting menu EXIT 2 Press the CURSOR ▲/▼ buttons to select the preferred item. RC • Then the setting menu of the selected item is displayed.
Continued When selecting the LATE NIGHT • This function compresses the dynamic range of previously specified parts of the Dolby Digital sound track(with extremely high volume) to minimize the difference in volume between the specified and non-specified parts. This makes it easy to hear all of the sound track when watching movies at night at low levels. • This function can be activated while playing the Dolby Digital program sources only.
Continued Set other setups to your preference. 6 To return to the audio setup menu screen • Press the CURSOR ◀ button to select the item menu, press the CURSOR ▲/▼ buttons to select “EXIT” and press the ENTER button. Then the audio setup menu screen will be displayed. • When the RETURN button is pressed, the audio setup menu screen will be displayed, too. Set other setups to your preference.
Continued 3 Press the CURSOR ▲/▼ buttons to select the preferred language, then press the ENTER button. RC RC • The selected language is colored. • You can select one of languages listed in the language menu. • When you want to select a language other than languages listed in the language menu, select “OTHERS”. • To turn off the display of subtitle language, select “OFF” on the subtitle language menu. When selecting “OTHERS” INPUT LANGUAGE CODE NEW LANG.
SETTING THE OTHER SETUP OTHER SETUP CAPTIONS ON ANGLE MARK OFF SCREEN SAVER PARENTAL PASSWORD MOMENTARY OSD BACKGROUND DIVX VOD Item menu Setting menu YES RESTORE DEFAULT? • CAPTIONS : When turning on or off the display of the closed captions recorded on DVD. • ANGLE MARK : When displaying the angle symbol on the TV screen during playback at the scene recorded from multiple camera angles. • SCREEN SAVER : When turning on or off the screen saver function.
Continued When selecting the MOMENTARY OSD • When a SACD contains the information on track, album and artist, etc., the corresponding information will be displayed momentarily or not depending on the MOMENTARY OSD setting. MOMENTARY OSD ON BACKGROUND OFF • ON : When turning on the OSD(On-Screen Display) which shows operation status or disc information, etc. • OFF : When turning it off.
Continued When selecting the PARENTAL CONTROL 1 Press the CURSOR ▲/▼ buttons to select the PARENTAL CONTROL. OTHER SETUP RC CAPTIONS 1G ANGLE MARK 2 SCREEN SAVER 3 PG PARENTAL 4 PG 13 PASSWORD 5 MOMENTARY OSD 6 PG-R BACKGROUND 7 NC-17 DIVX VOD 8 ADULT • Level 1G : Select this to play only DVD Videos for children. Adult and general audience DVD Videos cannot be played. • Level 2~7 NC-17 : Select this to play DVD Videos for general audiences and children. Adult DVD Videos cannot be played.
Continued 6 Set other setups to your preference. To return to the main menu screen • Press the CURSOR ◀ button to select the item menu, press the CURSOR ▲/▼ buttons to select “EXIT” and press the ENTER button. Then the main menu screen will be displayed. • When the RETURN button is pressed, the main menu screen will be displayed, too. When selecting the PASSWORD 1 Press the CURSOR ▲/▼ buttons to select the PASSWORD.
Continued 5 Set other setups to your preference. To return to the main menu screen • Press the CURSOR ◀ button to select the item menu, press the CURSOR ▲/▼ button to select “EXIT” and press the ENTER button. Then the main menu screen will be displayed. • When the RETURN button is pressed, the main menu screen will be displayed, too.
Continued When selecting the RESTORE DEFAULT? 1 Press the CURSOR ▲/▼ buttons to select the RESTORE DEFAULT?. RC DIVX VOD YES RESTORE DEFAULT? 2 • YES : When resetting all the settings in the setup menu except the rating level, the password and the registration code to the default settings. Press the CURSOR ▶ button to select the setting menu, then press the ENTER button. RC RC • Each time the CURSOR ▶ or ◀ button is pressed, the setting menu or the item menu is selected.
SETTING THE ADVANCED VIDEO SETUP • You can select the desired of 5 presets (4 factory presets and your own preset) to obtain the picture quality you want. • CUSTOM VIDEO SETUP : When adjusting different elements of the picture to ADVANCED VIDEO SETUP your preference and storing them into USER's memory. CUSTOM VIDEO SETUP • PRESET SELECT : When selecting a preferred picture quality settings.
Continued When selecting the CCS(Cross Color Suppression) • You can remove the color signal component for images in which the color signal component is mixed with the brightness signal. • Set the CCS to your preference: * OFF : When turning off the CCS function. * AUTO : When removing the color signal component automatically. * 1~3 : When removing it as desired. When selecting the CHROMA LEVEL • You can adjust the density of the color within the range of -6~+6.
Continued 6 Set other items to your preference. To return to the ADVANCED VIDEO SETUP menu screen • Press the CURSOR ◀ button to select the item menu, press the CURSOR ▲/▼ buttons to select “EXIT” and press the ENTER button. Then the advanced video setup menu screen will be displayed. • When the RETURN button is pressed, the advanced video setup menu screen will be displayed, too. 7 Set other setups to your preference.
Continued 4 Press the CURSOR ◀ button to select the item menu. RC • Each time the CURSOR ◀ or ▶button is pressed, the item menu or the setting menu is selected. 5 Set other setups to your preference. To return to the ADVANCED VIDEO SETUP menu screen • Press the CURSOR ◀ button to select the item menu, press the CURSOR ▲/▼ buttons to select “EXIT” and press the ENTER button. Then the advanced video setup menu screen will be displayed.
Definition Of Terms DVD Video DVD Video structure The format for storing MPEG-2 video on DVD, with interactive menus, multiple soundtracks, subtitles, camera angles, and so on. DVD Video discs typically contain one or more titles, which may be subdivided into chapters. Title 1 DVD Audio Chapter 1 The DVD format for storing up to six(5.1) channels of 24 bit/96 kHz digital audio or two channels of 24 bit /192 kHz digital audio.
HDMI Dolby Digital HDMI(High Definition Multimedia Interface) is a new connection format that supports both video and audio on a single digital connection. The HDMI connection carries uncompressed, standard or high definition digital video signals and multi-channel audio signals to AV components such as HDMI equipped TVs, in digital form without degradation.
Troubleshooting Guide If a fault occurs, run through the table below before taking your unit for repair. If the fault persists, attempt to solve it by switching the unit off and on again. If this fails to resolve the situation, consult your dealer. Under no circumstances should you repair the unit yourself as this will invalidate the guarantee! PROBLEM POSSIBLE CAUSE REMEDY No power • The AC input cord is disconnected. • Poor connection at AC wall outlet or the outlet is inactive.
Continued HDMI troubleshooting • This unit has been designed to be compliant with HDMI(High Definition Multimedia Interface) version 1.0. Depending on the component you have connected, unreliable signal transfers may result. In addition, some functions of this unit may be limited. (For details, refer to the operating instructions of the connected TV, etc.) PROBLEM No picture and sound No picture or abnormal picture POSSIBLE CAUSE REMEDY • The HDMI cord (or HDMI-DVI converter cord) is disconnected.
Specifications • TYPE System | DVD Video / Audio & SACD player Laser | Semiconductor laser • AUDIO SECTION Frequency response Sampling frequency : 192 kHz, DVD Audio | 4 Hz ~ 88 kHz Sampling frequency : 96 kHz, DVD | 4 Hz ~ 44 kHz Sampling frequency : 48 kHz, DVD | 4 Hz ~ 22 kHz Sampling frequency : 44.
DVD Language Code List Code Language Code Language Code Language Code Language 1027 Afar 1186 Scots Gaelic 1350 Malayalam 1513 Siswati 1028 Abkhazian 1194 Galician 1352 Mongolian 1514 Sesotho 1032 Afrikaans 1196 Guarani 1353 Moldavian 1515 Sundanese 1039 Amharic 1203 Gujarati 1356 Marathi 1516 Swedish 1044 Arabic 1209 Hausa 1357 Malayalam 1517 Swahili 1045 Assamese 1217 Hindi 1358 Maltese 1521 Tamil 1051 Aymara 1226 Croatian 1363 Burmese 1525 Te
SD-871 DVD-VIDEO / AUDIO & SACD PLAYER 5707-04736-012-0S