Introduction READ THIS BEFORE OPERATING YOUR UNIT This symbol is intended to alert the user to the presence of uninsulated "dangerous voltage" within the product's enclosure that may be of sufficient magnitude to constitute a risk of electric shock to persons. CAUTION WARNING : TO REDUCE THE RISK OF ELECTRIC SHOCK, DO NOT REMOVE COVER (OR BACK). NO USER-SERVICEABLE PARTS INSIDE. REFER SERVICING TO QUALIFIED SERVICE PERSONNEL.
SAFETY INSTRUCTION 1. Read Instructions - All the safety and operating instructions should be read before the product is operated. 2. Retain instructions - The safety and operating instructions should be retained for future reference. 3. Heed Warnings - All warnings on the product and in the operating instructions should be adhered to. 4. Follow Instructions - All operating and use instructions should be followed. 5. Cleaning - Unplug this product from the wall outlet before cleaning.
ENGLISH CONTENTS • Introduction READ THIS BEFORE OPERATING YOUR UNIT SAFETY INSTRUCTION | 3 • System Connections | 2 | 6 • Controls & Displays FRONT PANEL CONTROLS(VR-670) | 9 UNIVERSAL REMOTE CONTROLS | 10 ENTERING A SETUP CODE | 11 OPERATING COMPONENTS WITH REMOTE CONTROL REMOTE CONTROL OPERATION RANGE | 12 LOADING BATTERIES | 13 ACTIVE SUBWOOFER CONTROLS(ASW-670) | 13 OPERATION OF ACTIVE SUBWOOFER | 14 • Basic Operation LISTENING TO A PROGRAM SOURCE | 12 | 15 • Operation of DVD player PRELIMINARY
• Troubleshooting Guide • Specifications | 53 • DVD Language Code List • Setup Code Table | 51 | 55 | 56 5 ENGLISH • Operation of Other Functions RECORDING WITH TAPE DECK | 45 DIGITAL AUDIO RECORDING WITH MD RECORDER | 45 SETTING THE CLOCK | 46 OPERATING THE SLEEP TIMER | 47 OPERATING THE TIMER | 47 ADJUSTING THE BRIGHTNESS OF THE DISPLAY | 50
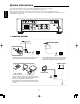
ENGLISH System Connections • Do not plug the AC input cord into the wall AC outlet until all connections are completed. • Be sure to observe the color coding when connecting audio and video cords. • Make connections firmly and correctly. If not, it can cause loss of sound, noise or damage to the unit. • The supplied cords are a audio cord for subwoofer, a composite video cord and speaker cables only. Other cords are commercially-available cords. 2 1 2 5 4 4 3 1.
ENGLISH 2. CONNECTING AUDIO/VIDEO COMPONENTs • The AUX IN jacks may be connected to an additional audio component such as a CD player, a tape deck, etc. • The AUDIO OUT jacks may be connected to an additional amplifier or receiver.
ENGLISH continued Notes : • To output the digital audio signals, you should set the SPDIF Output to “(SPDIF/) RAW” or “(SPDIF/) PCM” (Refer to “When selecting the SPDIF Output” on page 35.) • When the DIGITAL OUT of the unit is connected to the DIGITAL IN of an amplifier which does not contain the Dolby Digital or DTS decoder, etc.(which processes the bitstream digital), you should set the SPDIF Output to “(SPDIF/)PCM”.
Controls & DIsplays ENGLISH FRONT PANEL CONTROLS(VR-670) PHONES 1. POWER button 2. FUNCTION SELECT button 3. VOLUME UP/DOWN (+/-) buttons 4. TONE/BALANCE SELECT button 5. PRESET TUNING UP/DOWN, FORWARD/BACKWARD SKIP( / buttons 6. PLAY/PAUSE( / ) button 7. STOP( ) button 8. OPEN/CLOSE( ) button 9. PHONES jack 10. STANDBY indicator 11. DISC TRAY 12. REMOTE SENSOR 13. FLUORESCENT DISPLAY • For details, see below.
ENGLISH UNIVERSAL REMOTE CONTROLS This universal remote control can operate not only this unit but also most popular brands of video components such as TVs, VCRs, cable boxes, satellite receivers, etc. • To operate 4 components other than this unit, you should enter the setup code for each component. (For details, refer to “ENTERING A SETUP CODE” on page 11.) • The numbered buttons on the remote control have different functions in other device modes.
ENGLISH FUNCTION TABLE of the NUMBERED BUTTONS Notes: • Some functions for each component may not be available or may work differently. • Depending on other kinds of components that are available for each DEVICE button, some functions may not be available or may work differently, too. • For details about functions, refer to the operating instructions of each component. ENTERING A SETUP CODE • This remote control can control up to 4 different components.
ENGLISH OPERATING COMPONENTS WITH REMOTE CONTROL 1 Enter the setup code for each component other than this unit you wish to control. For details, refer to “ENTERING A SETUP CODE” on page 11. 2 Turn on the component you want to operate. 3 Press the DEVICE button on the remote control corresponding to the component you wish to operate. 4 Aim the remote control at the REMOTE SENSOR of the component you wish to control and press the button corresponding to the operation you want.
• When the remote control does not operate, the old batteries should be replaced. In this case, load new batteries within several minutes after removing old batteries. • If the batteries are removed or have been exhausted for a longer period of time, memorized contents will be cleared. Should this happen, you should memorize them again. 1 Remove the cover. 2 Load two batteries (“AAA” size, 1.5V) matching the polarity. • Remove the batteries when they are not used for a long time.
OPERATION OF ACTIVE SUBWOOFER ENGLISH • Before operation of main unit, first set the active subwoofer as desired for optimum performance. Enter the standby mode. 1 2 • The SIGNAL IN indicator lights up in amber. This means that the subwoofer is not disconnected from the AC mains and a small amount of current is retained to support the operation readiness. • To switch the power off, push the POWER switch again. Then power is cut off and the SIGNAL IN indicator goes off.
Before operation • Before operating this unit with the supplied remote control, refer to "UNIVERSAL REMOTE CONTROLS" on page 10 for details about operation. LISTENING TO A PROGRAM SOURCE Turn the power on. 1 • Each time the POWER button is pressed, the unit is turned on to enter the operating mode(the STANDBY indicator lights up in blue)or off to enter the standby mode(the STANDBY indicator lights up in amber).
Adjusting the tone(bass and treble) and balance • You can adjust the tone(bass and treble) and the sound volume balance between the left and right speakers as desired. • Each time this button is pressed, the mode changes and is displayed for several seconds as follows : TRBL BASS BAL ENGLISH Select the desired mode 8 (Treble) (Balance) • When the mode display disappears, press this button again.
Operation of DVD player Playable disc types This unit can play not only the discs bearing any of the following marks but also CD-R/CD-RW discs recorded with Audio CD or MP3 format and DVD-R discs recorded with DVD-Video format. Markings on the DVD Videos Mark Description Indicates the region code where the disc can be played.
ABOUT MP3 DISCS CARE AND HANDLING OF DISCS ENGLISH This unit can play back MP3 files on a private CD-R/CD-RW disc or commercial CD. • In handling a disc, hold it carefully with edges. Notes: • Some discs may not be played back because of the disc characteristics or recording condition, etc. • Folder and file names are displayed up to 14 characters. • Characters except “A~Z”, “0~9”, “ - ” may be not displayed correctly. • The order shown in the menu may not be the same to the order shown in a PC.
Component video Video signals with three channels of separate information that makes up the picture. There are some types of component video, such as Y/CB(Pb)/CR(Pr) and R/G/B. DVD Video This refers to a high-density optical disc on which highquality pictures and sound have been recorded by means of digital signals. Incorporating a new video compression technology (MPEG-2) and high-density recording technology.
Before starting playback ENGLISH For your convenience, the OSD(On-Screen-Display) language of this unit may be set to English as initial setting. If you want to change the OSD language to French, Italian, German, etc., please refer to “When selecting the OSD Language” on page 35. BASIC PLAYBACK Preparations • Turn on the TV and select the video input source connected to the unit. • Set the TV screen type and the COMPONENT VIDEO OUTPUT SIGNAL correctly to match your TV.
To start playback from the menu of MP3 disc 1 • Each time this button is pressed, the list mode changes as follows: Folder list mode : It displays the folder/file structure as they were recorded. File list mode : It displays all the files on a disc, ignoring the folders in which they belong. • Example of folder list mode Press the CURSOR • Example of file list mode / buttons to select the preferred folder or file, then press the ENTER button.
To pause playback ENGLISH • DVD Video : The unit will be in the still picture mode. • CD/MP3 disc : The unit will be in the pause mode. • To return to normal playback, press the PLAY/PAUSE( ) button. Frame advance playback [DVD Video only] • During playback or in the still picture mode. ) button is pressed, the disc is • Each time the STEP( advanced by one frame. • To return to normal playback, press the PLAY/PAUSE( ) button.
Rapid playback during playback (normal playback) • To return to normal playback, press the PLAY/PAUSE ) button. ( Slow playback during playback[DVD Video only] • Each time the button is pressed, the disc is advanced or reversed slowly at 4 step speed. SF X 1/2 SF X 1/4 SF X 1/8 SF X 1/16 SR X 1/16 SR X 1/8 SR X 1/4 SR X 1/2 Off (normal playback) * SF: Slow advance playback, SR : Slow reverse playback • To return to normal playback, press the PLAY/PAUSE ( ) button.
PLAYING THE DESIRED SECTION OF DISC ENGLISH In case of DVD Video During playback, press the SEARCH button. 1 2 • Then the search menu is displayed on the TV screen for several seconds. • To cancel the search function, press the SEARCH button. While displaying the search menu, press the CURSOR button to select its setting menu.
Continued When selecting a setting mode / buttons to select the preferred setting, then press the ENTER button. ENGLISH Press the CURSOR 3 In case of CD or MP3 disc During playback, press the SEARCH button. 1 • Then the search mode is displayed on the TV screen for several seconds depending on the kinds of discs. • Each time the SEARCH button is pressed, the search mode change as follows : Select the section to be played with the NUMERIC buttons.
PLAYING A SPECIFIC ITEM [DVD Video only] ENGLISH When using a title menu • If some DVD Videos which contain more than one title may have the menu like as a list of the titles, the TITLE button can be used to select the desired title. (The details of operation differ depending on the disc used.) During playback, press the TOP MENU button. 1 • Then a list of titles on the disc is displayed on TV screen. • If the disc does not have the menu such as a list of titles, this function does not work.
REPEAT PLAYBACK Note : • The repeat playback may not work correctly on some DVD Videos and MP3 discs. Repeating a disc, title, chapter, folder, track or file • During playback of the desired title, chapter, folder, track or file, press the REPEAT button. • Then the selected repeat mode is displayed on the TV screen.
PLAYING TRACKS IN RANDOM ORDER[CD only] During playback, press the RANDOM PLAY button. ENGLISH • “RANDOM” indicator and “R-” light up and the tracks are played in random order. • To return to normal playback, press the RANDOM PLAY button again. • After all the tracks have been played, it enters stop mode and the random play mode is canceled. PLAYING TRACKS IN DESIRED ORDER [CD only] • Up to 20 tracks can be programmed to be played in any desired order. Press the PROGRAM button.
Continued Rectifying any wrong programmed tracks. buttons to select the wrong programmed tracks, then select the • The new track will be programmed in its place. Clearing the programmed tracks [To clear one by one] • During programming, press the CURSOR button. / / / buttons to select the tracks to be cleared, then press the CLEAR • Then the selected track is cleared.
ENGLISH CHANGING THE AUDIO LANGUAGE [DVD Video only] • It is possible to change the audio language to a different language from the one selected at the initial settings. (For details, refer to “When selecting the Audio, Subtitle or Disc Menu” on page 38.) This operation works only with DVD Videos on which multiple audio languages are recorded. • During playback, press the AUDIO button. • Then the audio language menu is displayed on the TV screen for several seconds.
• Some DVD Videos contain scenes which have been shot simultaneously from multiple camera angles. For these discs, the same scene can be viewed from each of these different angles. • The recorded angles differ depending on the disc used. • During playback at the scene recorded from multiple camera angles, press the ANGLE button. • During playback at the scene recorded from multiple camera angles, the angle symbol( ) is displayed on the TV screen only when the ANGLE MARK is set to ON.
ENGLISH CHANGING THE VIDEO SIGNAL FORMAT • Depending on the countries, this DVD player conforms to either the NTSC color system for U.S.A, Canada, etc., or the PAL for Europe, Australia, China, etc. If the color system of this DVD player is different from that of your TV monitor and the discs to be played, the screen may be somewhat hard to see or the picture quality may be poor. Only in this case, change the video signal format to another.
The initial settings of the unit at the factory can be modified as desired later. Even after the power of the unit is switched to the standby mode, the initial settings are stored in memory until it is changed the next time. In the stop mode, press the SETUP button to enter the setup mode. 1 • The general setup menu appears on the TV screen. • To exit from the setup mode, press the SETUP button, or press the CURSOR / buttons to select “Exit Setup Menu” and press the ENTER button.
ENGLISH SETTING THE GENERAL SETUP Press the CURSOR / buttons to select the preferred item. 1 • Then the setting menu of the selected item is displayed. When selecting the TV Type • Depending on the countries, this DVD player conforms to either the NTSC color system for U.S.A, Canada, etc., or the PAL for Europe, Australia, China, etc.
Continued • You can select the OSD(On-Screen Display) language to be displayed. • You can select the desired of ENGLISH, FRENCH, ITALIAN, GERMAN, SPANISH, PORTUGUESE and DUTCH. When selecting the SPDIF Output Notes : • This unit can output a preferred digital signal format or no digital signal to the OPTICAL DIGITAL OUT jack. Therefore, you should set the SPDIF Output to either OFF or corresponding setting(RAW or PCM) according to system connections, etc.
Continued ENGLISH When selecting the Last Memory • If the Last Memory is set to ON, the unit can memorize the point where an input source other than DVD is selected or the power is turned off during playback of DVD Video. When DVD is selected as an input source again or the power is turned on, playback will resume from that point. Press the CURSOR button to select the setting menu. 2 • Each time the CURSOR or button is pressed, the setting menu or the item menu is selected.
ENGLISH SETTING THE AUDIO SETUP Press the CURSOR / buttons to select the Dynamic Range Compression. 1 • This function can be activated while playing the Dolby Digital program sources only. Press the CURSOR button to select the setting menu. 2 • Each time the CURSOR or button is pressed, the setting menu or the item menu is selected. Press the CURSOR / buttons to select the preferred setting, then press the ENTER button. 3 • The selected setting is colored.
ENGLISH SETTING THE PREFERENCE When selecting the Audio, Subtitle or Disc Menu Note : • If the selected language is not recorded in the DVD Video, one of the recorded languages is automatically selected. Press the CURSOR / buttons to select the preferred item. 1 Example) When selecting the Audio • Then the language menu of the selected item is displayed. Press the CURSOR button to select the language menu.
Continued • Then 4-digit language code input screen is displayed. • Refer to “DVD Language Code List” on page 55 to find the 4-digit language code for the preferred language and input it with pressing the NUMERIC buttons, then press the ENTER button. Example) When inputting “8076” • When the 4-digit code is input correctly, the previous menu screen is displayed.
Continued ENGLISH Press the CURSOR button to select the level menu. 2 • Each time the CURSOR or button is pressed, the level menu or the item menu is selected. Press the CURSOR / buttons to select the preferred level, then press the ENTER button. 3 • Then password input screen is displayed. Input a 4-digit password with pressing the NUMERIC buttons, then press the ENTER button.
Continued Press the CURSOR / buttons to select the Password. Press the CURSOR buttons to select the Change, then press the ENTER button. 1 2 3 Input 4-digit passwords in sequence for old password, new password and confirmation, then press the ENTER button. • When each password is input correctly, new password is memorized and the previous menu screen is displayed. • If you input a wrong password, you cannot change the password to the desired. In this case, input the password again.
Continued ENGLISH When selecting the Default Press the CURSOR / buttons to select the Default. Press the CURSOR button to select the setting menu, then press the ENTER button. 1 2 or button is pressed, the • Each time the CURSOR setting menu or the item menu is selected. • Then the settings are reset to initial settings and the setup mode is canceled. Set other setups to your preference.
Operation of Tuner ENGLISH LISTENING TO RADIO BROADCASTS Auto tuning Select the desired band. 1 • Press the button repeatedly to select FM or AM band. Press the TUNING UP( ) or DOWN( ) button for more than 0.5 second. 2 • Then “AUTO” in indicator lights up on the display. • The tuner will now search until a station of sufficient strength has been found. The display shows the tuned frequency and “TUNED”. • If the station found is not the desired one, simply repeat this operation.
Continued ENGLISH Select the desired preset number(1~30) and press the PROGRAM button. 3 • When using the NUMERIC buttons on the remote control. Examples) For “3” : For “21” : For “30” : • The stations has now been stored in the memory. • When using the NUMERIC buttons, the station is stored automatically without pressing the PROGRAM button. • A stored frequency is erased from the memory by storing another frequency in its place. Repeat the above steps 1 to 3 to memorize other stations.
Operation of Other Functions • The volume, tone(bass, treble) settings, etc. have no effect on the recording signals. • While playing a disc in a Dolby Virtual Speaker or Dolby Headphone mode, the selected mode has effect on the recording signals. Select the desired input as recording source except TAPE. 1 Start recording on the component connected to TAPE. 2 Start play on the desired input.
SETTING THE CLOCK ENGLISH Press the TIME ADJUST button. 1 Example) When setting to 2:20 PM • Each time this button is pressed, the time or the current operation status is displayed. • When the time has not been set yet, or the time is cleared due to the electricity failure, etc. the time display flickers. Press the CURSOR / buttons to set the hour and press the CURSOR / buttons to set the minute. 2 Press the ENTER button to memorize.
OPERATING THE SLEEP TIMER ENGLISH • The sleep timer allows the unit to continue to operate for a specified period of time before automatically shutting off. • While displaying the time, you cannot operate the sleep timer. Press the SLEEP/TIMER button. 1 • Then “SLP OFF” is displayed for several seconds. Press the CURSOR / button to select the desired sleep time.
ENGLISH Continued 3 Press the CURSOR / buttons to set the hour for on time, press the CURSOR and press the SLEEP/TIMER button. / buttons to set the minute / buttons to set the minute • Then is enters the off time setting mode. 4 Press the CURSOR / buttons to set the hour for off time, press the CURSOR and press the SLEEP/TIMER button. • Then it enters the input setting mode. Note : • If the on time and the off time are the same, when the SLEEP/TIMER button is pressed, “ERROR” is displayed.
Continued 8 When selecting “DVD” When selecting “FM” or “AM” 1. Load a CD or DVD Video • Tune in the desired station • If you do not specify the station, the station you listened to last will be tuned in. 2. In case of DVD Video, set the Last Memory to ON.(Refer to “When selecting the Last Memory” on page 36.) 3. Play back a DVD Video. Notes : • In case of most DVD videos that have menu structures, you should perform the above steps 2 and 3. • Timer function cannot play back MP3 discs.
Continued ENGLISH When canceling the TIMER Press the SLEEP/TIMER button for more than 2 seconds to enter the timer setting mode. 1 • “TMR ON”(or “TMR OFF”) is displayed. • To cancel the timer setting mode, press this button for more than 2 seconds again. Select the timer off mode. 2 • Each time the ENTER button is pressed, the timer mode changes as follows : “TMR ON” : Timer on mode(“ “TMR OFF” : Timer off mode(“ ” lights up.) ” goes off.
If a fault occurs, run through the table below before taking your system for repair. If the fault persists, attempt to solve it by switching the unit off and on again. If this fails to resolve the situation, consult your dealer. Under no circumstances should you attempt to repair the unit yourself. This could void the warranty. REMOTE CONTROL UNIT PROBLEM No operation POSSIBLE CAUSE • Batteries are not loaded or exhausted. • The remote sensor is obstructed. REMEDY • Replace the batteries.
[TUNER SECTION] ENGLISH PROBLEM POSSIBLE CAUSE REMEDY Stations cannot be received • No antenna is connected. • The desired station frequency is not tuned in. • The antenna is in wrong position. • Connect an antenna. • Tune in the desired station frequency. • Move the antenna and retry tuning. Preset stations cannot be received • An incorrect station frequency has been memorized. • The memorized stations are cleared. • Memorize the correct station frequency. • No antenna is connected.
Specifications [AMPLIFIER SECTION] • Power output, stereo mode, 6 Ω, THD 0.5 %, 20 Hz~20 kHz | 2 25 W • Total harmonic distortion, 6 Ω, 25 W, 1 kHz | 0.09 % • Intermodulation distortion 60 Hz : 7 kHz=4:1 SMPTE, 6 Ω, 25 W | 0.05 % • Signal to noise ratio, IHF “A” weighted, Line (AUX, TAPE) | 90 dB • Frequency response Line(AUX, TYPE), 20 Hz~60 kHz | ±3 dB • Output level TAPE REC, 2.
ENGLISH [AM TUNER SECTION] • Tuning frequency range | 520~1710 kHz • Usable sensitivity | 500 µV/m • Signal to noise ratio | 40 dB • Selectivity | 25 dB [GENERAL] • Power supply | 120 V~60 Hz • Power consumption | 95 W • Dimensions(W H D) | 360 102 • Weight(Net) | 5.4 kg(11.
DVD Language Code List Language Code 6566 Abchazian 7176 6565 Afar 6570 Afrikaans 8381 Albanian 6577 Amharic 6582 7289 6583 Assamese 6583 6590 Language Code Language Code Language Galician 7773 Maori 8476 6869 German 7565 Georgian 7782 Marathi 8471 Tajik 7779 Moldavian 8465 Tamil 6976 Greek 7576 Greenlandic 7778 Mongolian 8484 Tatar 8469 Telugu Arabic 7178 Guarani 7865 Nauru 8472 Thai Armenian 7185 Gujarati 7869 Nepali 6679 Tibetan 7879 Norwegian
Setup Code Table ENGLISH TV AOC Admiral Aiko Akai Alaron Ambassador America Action Ampro Anam Audiovox Baysonic Belcor Bell & Howell Bradford Brockwood Broksonic CXC Candle Carnivale Carver Celebrity Cineral Citizen Concerto Contec Craig Crosley Crown Curtis Mathes Daewoo Daytron Denon Dumont Dwin Electroband Emerson Envision Fisher Fujitsu Funai Futuretech GE Gibralter Goldstar 005 041 014 005 026 024 027 043 027 030 027 003 019 027 003 028 027 005 005 010 050 030 012 011 027 027 010 027 007 012 022 030
Radio Shack Realistic Runco SSS Sampo Samsung Samsux Sansei Sansui Sanyo Scimitsu Scotch Scott Sears Semivox Semp Sharp Sherwood Shogun Signature Sony Soundesign Squareview Starlite Supreme Sylvania Symphonic TMK Tandy Technics Technoi Ace Techwood Teknika Telefunken Toshiba Totevision Vector Research Victor Vidikron Vidtech Wards White Westinghouse Yamaha Zenith 007 025 002 008 007 037 007 003 019 011 002 027 005 012 006 030 031 019 003 025 028 007 011 027 020 041 000 003 001 050 027 023 027 050 010 023 0
ENGLISH Kodak LXI Lloyd’s Logik MEI MGA MGN Technology MTC Magnasonic Magnavox Magnin Marantz Marta Matsushita Memorex Minolta Mitsubishi Motorola Multitech NEC Nikko Noblex Olympus Opimus Orion Panasonic Penny Pentax Philco Philips Pilot Pioneer Profitronic Proscan Protec Pulsar Quarter Quartz Quasar RCA Radio Shack Radix Randex Realistic Runco STS Samsung Sanky Sansui Sanyo 004 005 000 015 004 023 023 023 025 004 023 004 005 004 004 000 008 027 004 000 017 005 023 004 005 031 020 004 004 008 004 004 005
Sansui Sanyo Sear Sharp Sony Symphonic Zenith 004 (TV use 008) 028 (TV use 042) 013 (TV use 012) 004 (TV use 008) 027 (TV use 041) 000 023 000 005 027 (TV use 041) 002 (TV use 000) 000 000 CBL ABC Allegro Archer Bell&Howell Century Citizen Comtronics Contec Easten Emerson Everquest Focus Garrard Gemini General Instrument GoldStar Goodmind Hamlin Hitachi Hytex Jasco Jerrold Memolex Movie Time NSC Oak Optimus Panasonic Paragon Philips Pioneer Popular Mechanics Pulsar Quasar RCA Radio Shack Recoton 002 007