
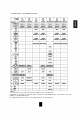
Operating instructions
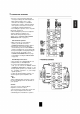
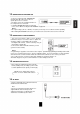
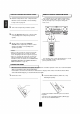

SETUP MIC JACK
• To use Auto Setup function, connect the supplied
microphone to the SETUP MIC jack.(For details, refer
to "When selecting the AUTO SETUP" on page 61.)
Notes:
• Because the microphone for Auto Setup is designed
for use with this receiver, do not use a microphone
other than the one supplied with this receiver.
• After you have completed the auto setup procedure,
disconnect the microphone.
AUX IN JACK
• The AUX IN jack can be connected to an additional
audio component such as an MP3 player, etc.
Note :
• When connecting this jack to an MP3 player, etc., you
should use the stereo mini cord, not a mono mini cord.
VIDEO 4 IN JACKS
• The VIDEO 4 input jacks may be also connected When not using
to an additional video component such as a the VIDEO 4 IN
camcorder, a video game player, etc. jacks, cover these
• If the OPTICAL IN 4 is connected to the jacks with the
component connected to VIDEO 4, it is easier to supplied cap.
do so following the default settings.(For details,
refer to "Digital input default settings" on page 10.)
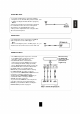
• If the OPTICAL IN 4 connection is different from
the default settings, you should assign the
DIGITAL INs you used with the "When selecting
the AUDIO ASSIGN" procedure on page 57.
• If you connect the COMPONENT VIDEO INs on the
rear panel to your video component, you
should assign the COMPONENT VIDEO INs you
used with the "When selecting the VIDEO
ASSIGN" procedure on page 57.
• If you connect the HDMI INs on the rear panel to
your video component, you should assign the
HDMI INs you used with the "When selecting the
HDMI ASSIGN" procedure on page 57.
17