VR-652(G) 2008.3.
VR-652(G) 2008.3.6 5:34 PM 페이지 2 Introduction READ THIS BEFORE OPERATING YOUR UNIT ENGLISH This symbol is intended to alert the user to the presence of uninsulated "dangerous voltage" within the product's enclosure that may be of sufficient magnitude to constitute a risk of electric shock to persons. CAUTION : TO REDUCE THE RISK OF ELECTRIC SHOCK, DO NOT REMOVE COVER (OR BACK). NO USER-SERVICEABLE PARTS INSIDE. REFER SERVICING TO QUALIFIED SERVICE PERSONNEL.
VR-652(G) 2008.3.6 5:34 PM 페이지 3 U.K. AUSTRALIA To ensure safe operation, the three-pin plug supplied must be inserted only into a standard three-pin power point which is effectively earthed through the normal household wiring. Extension cords used with the equipment must be three-core and be correctly wired to provide connection to earth. Improper extension cords are a major cause of fatalities.
VR-652(G) 2008.3.
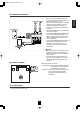
• Do not plug the AC input cord into the wall AC outlet until all connections are completed. • Be sure to observe the color coding when connecting audio and video cords. • Make connections firmly and correctly. If not, it can cause loss of sound, noise or damage to the unit. 1. CONNECTING ANTENNAS • Change the position of the FM indoor antenna until you get the best reception of your favorite FM stations. • A 75Ω outdoor FM antenna may be used to further improve the reception.
VR-652(G) 2008.3.6 5:34 PM 페이지 6 2. CONNECTING AUDIO COMPONENT ENGLISH • The AUX 1 jacks can be connected to an audio component such as a CD player, tape deck, etc. 3. CONNECTING VIDEO COMPONENT • The analog audio IN/OUT jacks may also be connected to audio recording equipment such as a tape deck, an MD recorder, etc. Note : • Commercial DVD Video discs are copy-protected, and any recordings made from these discs will be distorted.
VR-652(G) 2008.3.6 5:34 PM 페이지 7 • There are three types of MONITOR OUTs (COMPONENT, S-VIDEO, ((composite) VIDEO). Connect them to the corresponding video jacks of your TV according to their capability. • For your reference, the excellence in picture quality is as follows : "COMPONENT" > "S-VIDEO" > (composite) "VIDEO"). • When making COMPONENT VIDEO connections, connect "Y" to "Y", "Pb" to "Pb"(or "B-Y", "CB") and "Pr" to "Pr"(or "R-Y", "CR").
VR-652(G) 2008.3.6 5:34 PM 페이지 8 ENGLISH 5. CONNECTING TO TV WITH SCART CONNECTOR (Regional Option) • For some countries like Europe, the unit incorporates the A/V SCART OUT connector. • You can connect the unit to TV easily using the SCART connections without other cumbersome audio and video connections. • During operation of the unit, this connector can deliver the composite(regular) video signals and RGB video signals as well as the audio L and R signals.
VR-652(G) 2008.3.6 5:34 PM 페이지 9 • Be sure to connect speakers firmly and correctly according to the channel (left and right) and the polarity (+ and -). If the connections are faulty, no sound will be heard from the speakers, and if the polarity of the speaker connection is incorrect, the sound will be unnatural and lack bass. • Depending on the type of your subwoofer, connect it as follows. • Connect the SUBWOOFER PREOUT jack to the active (powered) subwoofer.
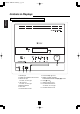
VR-652(G) 2008.3.6 5:34 PM 페이지 10 Controls & DIsplays ENGLISH FRONT PANEL CONTROLS 1. PHONES jack 2. POWER ON/STANDBY button/indicator 3. FRONT AUX jack For details, see next page. 4. USB connector For details, see next page. 5. REMOTE SENSOR 6. DISC TRAY 7. SOURCE SELECT button 8. PLAY/PAUSE(▶/ ) button 9. PRESET TUNING UP/DOWN, FORWARD/BACKWARD SKIP(▶▶ / ◀◀) buttons 10. STOP( ) button 11. OPEN/CLOSE(▲) button 12. FLUORESCENT DISPLAY • For details, see next page. 13.
VR-652(G) 2008.3.6 5:34 PM 페이지 11 ENGLISH FLUORESCENT DISPLAY 1. PARENTAL CONTROL indicator 2. TIMER indicator 3. USB indicator 4. DVD indicator 5. CD indicator 6. DTS SIGNAL indicator 7. DOLBY DIGITAL SIGNAL indicator 8. SURROUND MODE indicators 9. MEMORY indicator 10. MULTI-INFORMATION display 11. RANDOM PLAY indicator 12. REPEAT indicators 13. TUNED indicator 14. PROGRESSIVE indicator 15. STEREO indicator 16.
VR-652(G) 2008.3.6 5:34 PM 페이지 12 ENGLISH UNIVERSAL REMOTE CONTROLS This universal remote control can operate not only this unit but also most popular brands of video components such as TVs, VCRs, cable boxes, satellite receivers, etc. • To operate 4 components other than this unit, you should enter the setup code for each component. (For details, refer to "ENTERING A SETUP CODE" on page 13.) • The numbered buttons on the remote control have different functions in other device modes.
VR-652(G) 2008.3.6 5:34 PM 페이지 13 ENGLISH FUNCTION TABLE of the NUMBERED BUTTONS Notes : • Some functions for each component may not be available or may work differently. • Depending on other kinds of components that are available for each DEVICE button, some functions may not be available or may work differently, too. • For details about functions, refer to the operating instructions of each component. ENTERING A SETUP CODE • This remote control can control up to 4 different components.
VR-652(G) 2008.3.6 5:34 PM 페이지 14 ENGLISH OPERATING COMPONENTS WITH REMOTE CONTROL REMOTE CONTROL OPERATION RANGE • Use the remote control unit within a range of about 5 meters (16 feet) and angles of up to 30 degrees aiming at the remote sensor. 1. Enter the setup code for each component other than this unit you wish to control. (For details, refer to "ENTERING A SETUP CODE" on page 13.) 2. Turn on the component you want to operate. 3.
VR-652(G) 2008.3.6 5:35 PM 페이지 15 Before operation • Before operating this unit with the supplied remote control, refer to "UNIVERSAL REMOTE CONTROLS" on page 12 for details about operation. LISTENING TO A PROGRAM SOURCE 3. Turn on the source component for playback. 1. Turn the power on. • In case of connecting the active subwoofer, turn on the active subwoofer. 4. Operate the selected component for playback. 5. Adjust the(overall) volume to a comfortable listening level.
VR-652(G) 2008.3.6 5:35 PM 페이지 16 Adjusting the channel level(/setting the FM mode) ENGLISH • The volume level of each channel can be adjusted as desired. 8. Press and hold down the SETUP button for 10. Adjust the level of the selected channel or set more than 2 seconds. the FM mode as desired. • Then "Lch" is displayed for several seconds. • When the mode display ("Lch", etc.) disappears, press the button again. • The channel levels can be adjusted within the range of -10 ~ +10 dB.
VR-652(G) 2008.3.6 5:35 PM 페이지 17 Operation of DVD player Playable disc types Region code This unit supports the following discs. • DVD players and DVD Videos have their own Region Code numbers which are assigned to each country or area as shown below. DVD players are set to your Region Code number at the factory. As a result, if the region code number of this DVD player is different from that of the DVD Video, playback of the DVD Video will not be allowed by the DVD player.
VR-652(G) 2008.3.6 5:35 PM 페이지 18 ENGLISH AUDIO AND VIDEO FILES CARE AND HANDLING OF DISCS • Folder and file names are displayed up to 8 characters. • A total of 512 folders and maximum of 2048 files can be supported. • Characters except "A~Z", "0~9", " - " may be not displayed. • The playback order of folders and files shown in the menu may differ from the order shown in a PC. • This unit supports multi-session discs.
VR-652(G) 2008.3.6 5:35 PM 페이지 19 DVD Video DVD Video structure The format for storing MPEG-2 video on DVD, with interactive menus, multiple soundtracks, subtitles, camera angles, and so on. DVD Video discs typically contain one or more titles, which may be subdivided into chapters. MPEG(Moving Picture Expert Group) It is regarded as an international standard for compressing and restoring digital video and audio signal. "MPEG" standards include MPEG-1, MPEG-2 and MPEG-4.
ENGLISH VR-652(G) 2008.3.6 5:35 PM 페이지 20 Interlaced scan Dolby Digital In the conventional video system, a picture is shown on the screen in two halves. The interlaced scanning system places lines of the second half of the picture in-between lines of the first half of the picture. Dolby Digital provides multichannel surround sound in cinemas from 35 mm film and in the home from laser discs, DVD Videos, and digital broadcast television, cable, and satellite systems.
VR-652(G) 2008.3.6 5:35 PM 페이지 21 ENGLISH Before starting playback • Make the initial settings to suit your usage conditions the very first time this unit is turned on.(For details, refer to "Initial Settings" on page 36.) • For explanation purposes, this instructions explains the OSD(On-Screen Display) language displayed on TV in English.
VR-652(G) 2008.3.6 5:35 PM 페이지 22 Continued ) button to start play. ENGLISH 3. In case of CD, press the PLAY/PAUSE (▶/ To start playback from the menu of DVD Video Press the CURSOR ▲/▼/◀/▶ buttons to select the preferred item and press the ENTER button (or PLAY /PAUSE (▶/ ) button). In case of use of the NUMERIC buttons on the remote control : • When selecting "3" : • When selecting "10" : • Playback of the selected item starts.
VR-652(G) 2008.3.6 5:35 PM 페이지 23 To play files from USB mass storage device Compatible USB mass storage device : • USB flash memory (USB 2.0 or USB 1.1) • USB flash players (USB 2.0 or USB 1.1) • Memory cards (requires an additional card reader to work with this unit.) Supported formats : • USB or memory file format FTA 16 or FTA 32. Notes: • It is not possible to connect this unit to a PC for USB playback.
VR-652(G) 2008.3.6 5:35 PM 페이지 24 To stop playback ENGLISH • When playback of a DVD Video is stopped, the unit memorizes the point where the STOP( ) button was pressed (RESUME function: DVD Video only). ("Press PLAY to continue" is displayed on the TV screen for a moment when this function is activated.) • Press the PLAY/PAUSE(▶/ ) button again, and playback will resume from this point. When the STOP( ) button is pressed again, the RESUME function will be canceled and it enters the stop mode.
VR-652(G) 2008.3.6 5:35 PM 페이지 25 • You can play back discs at various speeds. • Each time the button is pressed, the disc is advanced or reversed fast at up to 4 step speeds depending on the disc types. → 2X → 4X → 6X → 8X 2X → 4X → 6X → 8X → Off(normal playback) 2X → 4X → 8X → 16X → Off(normal playback) • To return to normal playback, press the PLAY/PAUSE (▶/ ) button. Slow playback during playback • Each time the button is pressed, the disc is advanced slowly at 3 step speed.
VR-652(G) 2008.3.6 5:35 PM 페이지 26 PLAYING A SPECIFIC ITEM ENGLISH When using a title menu • If some DVD Videos which contain more than one title may have the menu like as a list of the titles, the TITLE button can be used to select the desired title. (The details of operation differ depending on the disc used.) 1. During playback, press the TOP MENU button. • Then a list of titles on the disc is displayed on TV screen.
VR-652(G) 2008.3.6 5:35 PM 페이지 27 REPEAT PLAYBACK Note: • Repeat playback may not work correctly with some discs. Repeating a disc, title, chapter, folder, track or file During playback of the desired title, chapter, folder, track or file, press the REPEAT button. • Then the selected repeat mode is displayed on the TV screen.
VR-652(G) 2008.3.6 5:35 PM 페이지 28 RANDOM PLAYBACK ENGLISH 1. In the stop mode, press the RANDOM PLAY button. • Each time this button is pressed, the playback mode changes as follows : Random on : Random playback Tracks on the disc or files in the current folder are played back in random order. Random off : Normal playback 2. Start the random playback. • Then tracks on the disc or files in the current folder are played back in random order.
VR-652(G) 2008.3.6 5:35 PM 페이지 29 Continued 3. Press the CURSOR ◀/▶ buttons to select the program menu and press the CURSOR ▲/▼ buttons to • Then the selected track is programmed. 4. Repeat the above steps 2 and 3 until the desired tracks are programmed. 5. To start programmed playback, press the CURSOR ◀/▶ buttons to select the program menu and press the CURSOR ▲/▼ buttons to select PLAY, then press the ENTER button. • Then the tracks are played back in the programmed order.
VR-652(G) 2008.3.6 5:35 PM 페이지 30 Continued 3. Press the CURSOR ◀/▶ buttons to select the program menu and press the CURSOR ▲/▼ buttons to ENGLISH select INSERT, then press the ENTER button. Clearing the programmed tracks [To clear one by one] 1. When displaying the program menu, press the CURSOR ◀/▶ buttons to select the track list, then press the CURSOR ▲/▼ buttons to select the track to be cleared. 2.
VR-652(G) 2008.3.6 5:35 PM 페이지 31 Continued 2. Press the CURSOR ▲/▼ buttons to select the desired file, then press the DISPLAY button to enter the ENGLISH program mode. • Then the program menu is displayed. • Each time the DISPLAY button is pressed, the program mode is canceled or the program menu is displayed. 3. Press the CURSOR ▲/▼ buttons to select ADD TO PLT, then press the ENTER button. • Then the selected file is programmed. When selecting PROPERTIES in the program menu.
VR-652(G) 2008.3.6 5:35 PM 페이지 32 Continued Clearing the programmed files [To clear one by one] ENGLISH 1. When displaying the PROGRAM LIST, press the CURSOR ▲/▼ buttons to select the file to be cleared, then press the DISPLAY button to enter the program mode. • Then the program menu is displayed. 2. Press the CURSOR ▲/▼ buttons to select DELETE, then press the ENTER button. • Then the selected file is cleared.
VR-652(G) 2008.3.6 5:35 PM 페이지 33 • It is possible to change the audio language to a different language from the one selected at the initial settings. (For details, refer to "SETTING THE LANGUAGE SETUP" on page 37.) This operation works only with DVD Videos on which multiple audio languages are recorded. During playback, press the AUDIO button. • Then the audio language menu is displayed on the TV screen for several seconds.
VR-652(G) 2008.3.6 5:35 PM 페이지 34 ENGLISH CHANGING THE CAMERA ANGLE • Some DVD Videos contain scenes which have been shot simultaneously from multiple camera angles. For these discs, the same scene can be viewed from each of these different angles. • The recorded angles differ depending on the disc used. During playback at the scene recorded from multiple camera angles, press the ANGLE button.
VR-652(G) 2008.3.6 5:35 PM 페이지 35 • Depending on the countries, this unit conforms to either the NTSC color system for U.S.A, Canada, etc., or the PAL for Europe, Australia, China, etc. If the color system of this unit is different from that of your TV monitor and the discs to be played, the screen may be somewhat hard to see or the picture quality may be poor. Only in this case, change the video signal format to another.
VR-652(G) 2008.3.6 5:35 PM 페이지 36 ENGLISH Initial Settings The initial settings of the unit at the factory can be modified as desired later. Even after the power of the unit is switched to the standby mode, the initial settings are stored in memory until it is changed the next time. 1. In the stop mode, press the SETUP button to enter the setup mode. • To exit the setup mode, press the SETUP button, or press the CURSOR ▲/▼ buttons to select "EXIT SETUP" on the main setup menu and press the ENTER button.
VR-652(G) 2008.3.6 5:35 PM 페이지 37 • AUDIO : When selecting a preferred audio language to be heard from those included on the DVD Video. • SUBTITLE : When selecting a preferred subtitle language to be displayed from those included on the DVD Video. • DISC MENU : When selecting a preferred menu language to be displayed from those included on the DVD Video. • OSD LANGUAGE : When selecting a preferred OSD (On-Screen Display) language to be displayed.
VR-652(G) 2008.3.6 5:35 PM 페이지 38 ENGLISH SETTING THE VIDEO SETUP Item menu Setting menu • VIDEO OUTPUT : When selecting the desired video signals depending on whether outputting the component video signals from the COMPONENT MONITOR OUTs or the RGB signals from the AV SCART OUT.(Reginonal option for Europe, etc. only) • TV DISPLAY : When selecting a picture size according to the aspect ratio of your TV's screen.
VR-652(G) 2008.3.6 5:35 PM 페이지 39 Continued • Depending on the countries, this unit conforms to either the NTSC color system for U.S.A, Canada, etc., or the PAL for Europe, Australia, China, etc. If the color system of this unit is different from that of your TV monitor and the discs to be played, the screen may be somewhat hard to see or the picture quality may be poor. Only in this case, change the video signal format to another.
VR-652(G) 2008.3.6 5:35 PM 페이지 40 Continued button to select the item menu. ENGLISH 4. Press the CURSOR ◀ 5. Set other setups to your preference. To return to the main setup menu screen • Press the CURSOR ◀ button to select the item menu, press the CURSOR ▲/▼ buttons to select "MAIN PAGE" and press the ENTER button. Then the main setup menu screen will be displayed. • When the RETURN button is pressed, the main setup menu screen will be displayed, too.
VR-652(G) 2008.3.6 5:35 PM 페이지 41 • You can adjust the dynamic range compression that makes faint sound easier to hear at low volume levels. • When playing the Dolby Digital program sources only, this setting is valid. • ON: When adjusting the dynamic range compression. • OFF : When turning off the dynamic range compression. Note: • In some Dolby Digital softwares, this function cannot be available. Item menu 1. Press the CURSOR ▶ Setting menu button to select the setting menu.
VR-652(G) 2008.3.6 5:35 PM 페이지 42 ENGLISH SETTING THE OTHER SETUP Setting menu Item menu • CAPTIONS : When turning on or off the display of the closed captions recorded on DVD Video. • ANGLE MARK : When displaying the angle symbol on the TV screen during playback at the scene recorded from multiple camera angles. • SCREEN SAVER : When turning on or off the screen saver function.
VR-652(G) 2008.3.6 5:35 PM 페이지 43 Continued 2. Press the CURSOR ▶ button to select the setting menu. ENGLISH • Each time the CURSOR ▶ or ◀ button is pressed, the setting menu or the item menu is selected. 3. Press the CURSOR ▲/▼ buttons to select the preferred setting, then press the ENTER button. • The selected setting is colored. 4. Press the CURSOR ◀ button to select the item menu. 5. Set other setups to your preference.
VR-652(G) 2008.3.6 5:35 PM 페이지 44 Continued 2. Press the CURSOR ▶ button to select the level menu. ENGLISH • Each time the CURSOR ▶ or ◀ button is pressed, the level menu or the item menu is selected. 3. Press the CURSOR ▲/▼ buttons to select the preferred level, then press the ENTER button. 4. Input a 4-digit password with pressing the NUMERIC buttons, then press the ENTER button.
VR-652(G) 2008.3.6 5:35 PM 페이지 45 Continued When selecting the PASSWORD buttons to select the PASSWORD. ENGLISH 1. Press the CURSOR ▲/▼ 2. Press the CURSOR ▶ buttons to select the CHANGE, then press the ENTER button. 3. Input 4-digit passwords in sequence for old password, new password and confirmation, then press the ENTER button. • When each password is input correctly, the previous menu screen is displayed.
VR-652(G) 2008.3.6 5:35 PM 페이지 46 Continued When selecting the DEFAULTS buttons to select the DEFAULTS. ENGLISH 1. Press the CURSOR ▲/▼ • YES(RESET) : When resetting all the settings in the setup menu except the rating level and the password to the default settings. 2. Press the CURSOR ▶ button to select the setting menu, then press the ENTER button. • Each time the CURSOR ▶ or ◀ button is pressed, the setting menu or the item menu is selected. • Then the settings are reset to initial settings. 3.
VR-652(G) 2008.3.6 5:35 PM 페이지 47 Operation of Tuner Note : • When selecting the FM, if FM stereo broadcasts are poor because of weak broadcast signals, you can set the FM mode to FM MONO to reduce the noise. (For details, refer to "Adjusting the channel level(/setting the FM mode)" on page 16.) Auto tuning 1. Select the tuner. 2. Select the desired band. • Each time the FM/AM button on the remote control is pressed, the band changes as follows : "F" (FM) ↔ "A" (AM) 3.
VR-652(G) 2008.3.6 5:35 PM 페이지 48 Presetting radio stations ENGLISH • You can store up to 40 preferred stations in the memory. 1. Tune in the desired station with auto or manual tuning. 2. Press the PROGRAM button. • Then "MEM" indicator lights up and the preset number ("01",etc.) is flickering for several seconds. • If flickering the preset number stops, press the PROGRAM button again. 3. Select the desired preset number (01~40) and press the PROGRAM button.
VR-652(G) 2008.3.6 5:35 PM 페이지 49 RDS Tuner(Regional Option for some countries in Europe, etc.) RDS(Radio Data System) is a method for sending information signals together with the transmitter signals. Your tuner is capable of translating these signals and putting the information on the display. These codes contain the following information. Program Service name(PS), A list of Program Types(PTY), Traffic Announcement(TA), Clock Time(CT), Radio Text(RT).
VR-652(G) 2008.3.6 5:35 PM 페이지 50 PTY search ENGLISH • Use this function to automatically search and receive the stations broadcasting the desired program type. 1. In the FM mode, select the PTY search mode. • "PTY SRCH" is displayed. 2. While displaying "PTY SRCH", select the desired program type. • Each time these buttons are pressed, one of 32 different types of programs is selected.
VR-652(G) 2008.3.6 5:35 PM 페이지 51 Operation of Other Functions • Depending on whether the video recording equipment or the audio recording equipment is connected to the VIDEO jacks, you can record the video and audio signals or the audio signals only. (For details, refer to "CONNECTING VIDEO COMPONENT" on page 6.) Notes : • The volume settings, etc. have no effect on the recording signals. • Commercial DVD Video discs are copy-protected, and any recordings made from these discs will be distorted. 1.
VR-652(G) 2008.3.6 5:35 PM 페이지 52 ENGLISH SETTING THE CLOCK • In case of setting the clock for the first time, perform the setting procedure from the step 2. • In the standby mode, you can set the clock, too. In this case, perform it from the step 2. Note : • If the electricity fails or the AC input cord is unplugged, the current time will be cleared. Should this happen, set the clock again, performing it from the step 2. 1. To check the time, press the CLOCK/SLEEP button for more than 2 seconds.
VR-652(G) 2008.3.6 5:35 PM 페이지 53 OPERATING THE TIMER • Once the timer is set to on, it will operate at the preset time once or everyday. Note : • If the electricity fails or the AC input cord is unplugged, the current time and the timer setting will be cleared. Should this happen, set the clock and the timer again. 1. Press the TIMER button for more than 2 seconds to enter the timer setting mode. • Then it enters the on time setting mode and the hour digit is flickering for several seconds.
VR-652(G) 2008.3.6 5:35 PM 페이지 54 Continued 5. While flickering the input source, press the CURSOR UP/DOWN (▲/▼) buttons to select the desired input source and press the ENTER button. ENGLISH Example ) When selecting DVD or • Each time the CURSOR UP/DOWN (▲/▼) buttons are pressed, DVD or TUNER is selected. • Depending on whether DVD or TUNER is selected, it enters the volume setting mode or the preset station setting mode and corresponding display is flickering for several seconds.
VR-652(G) 2008.3.6 5:35 PM 페이지 55 Continued When selecting DVD as an input source ① Load a DVD Video or a CD. ② In case of a DVD Video, start playback. Notes : • Timer function cannot play back MP3, WMA, JPEG disc or USB mass storage device. • In case of DVD Videos, you should play back a DVD Video until the desired scene is reached to. If not, it will not play back a DVD Video. • When a disc is not loaded, the timer function will automatically tune in the preset station. 8.
VR-652(G) 2008.3.6 5:35 PM 페이지 56 ENGLISH Troubleshooting Guide If a fault occurs, run through the table below before taking your system for repair. If the fault persists, attempt to solve it by switching the unit off and on again. If this fails to resolve the situation, consult your dealer. Under no circumstances should you attempt to repair the unit yourself. This could void the warranty. REMOTE CONTROL UNIT PROBLEM No operation POSSIBLE CAUSE • Batteries are not loaded or exhausted.
VR-652(G) 2008.3.6 5:35 PM 페이지 57 [TUNER SECTION] POSSIBLE CAUSE REMEDY Stations cannot be received • No antenna is connected. • The desired station frequency is not tuned in. • The antenna is in wrong position. • Connect an antenna. • Tune in the desired station frequency. • Move the antenna and retry tuning. Preset stations cannot be received • An incorrect station frequency has been memorized. • The memorized stations are cleared. • Memorize the correct station frequency.
VR-652(G) 2008.3.6 5:35 PM 페이지 58 Specifications ENGLISH [AMPLIFIER SECTION] • Front power output, stereo mode, 6 Ω, THD 0.7 %, 20 Hz~20 kHz | 2×25 W • Subwoofer power output, 4 Ω, THD 10 %, 20 Hz~200 Hz | 50 W • Total harmonic distortion, 6 Ω, 25 W, 1 kHz | 0.09 % • Intermodulation distortion 60 Hz : 7 kHz=4:1 SMPTE, 6 Ω, 25 W | 0.05 % • Signal to noise ratio, IHF "A" weighted, DVD | 85 dB • Frequency response Line(AUX, VIDEO, DVD), 20 Hz~20 kHz | ±3 dB • Output level VIDEO OUT, 2.
VR-652(G) 2008.3.6 5:35 PM 페이지 59 [AM TUNER SECTION] ENGLISH • Tuning frequency range | 522~1611 kHz • Usable sensitivity | 562 µV/m • Signal to noise ratio | 40 dB • Selectivity | 25 dB [GENERAL] • Power supply | 100 V-240 V~50/60 Hz • Power consumption | 50 W • Dimensions(W×H×D, including protruding parts) • Weight(Net) | 3.1 kg(6.8 lbs) | 347×102×270 mm(13-5/8×4×10-5/8 inches) Note: Design and specifications are subject to change without notice for improvements.
VR-652(G) 2008.3.
VR-652(G) 2008.3.
VR-652(G) 2008.3.
VR-652(G) 2008.3.
VR-652(G) 2008.3.
VR-652(G) 2008.3.6 5:35 PM 페이지 65 SAT ALBA AMSTRAD ARCON ARISTONA ASTRA BLAUPUNKT BUSH CH.
VR-652(G) 2008.3.