Gcube Series Receipt Printer User Guide All specifications are subject to change without notice.
Warning - U.S. This equipment has been tested and founded to comply with the limits for a Class A digital device pursuant to Part 15 of the FCC Rules. These limits are designed to provide reasonable protection against harmful interference when the equipment is operated in a commercial environment. This equipment generates uses, and can radiate radio frequency energy and, if not installed and used in accordance with the instruction manual, may cause harmful interference to radio communications.
which can be determined by turning the equipment off and on, the user is encouraged to try to correct the interference by one or more of the following measures: - Reorient or relocate the receiving antenna. - Increase the separation between the equipment and receiver. - Connect the equipment into an outlet on a circuit different from that to which the receiver is connected. - Consult the dealer or an experienced radio/TV technician for help.
. Characters can be scaled up to 64 times compared to it’s original size. 6. The data buffer allows the unit to receive print data even during printing. 7. Bar code printing is possible by using a bar code command. 8. Peripheral units drive circuit enables control of external devices such as cash drawer. 9. 2-dimensional bar code(QR code, PDF-417) and Two color printing. Please be sure to read the instruction in this manual carefully before using Gcube Series.
Contents Chapter 1. Setting Up the Printer······························7 1.1. Unpacking································································· 7 1.2. Connecting the Cables ············································· 8 1.3. Connecting the host device······································ 9 1.4. Connecting the Drawer············································ 9 1.5. Connecting the Power Supply ································ 10 1.6. Installing options & Replacing the Paper Roll········· 11 1.6.
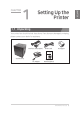
1 Setting Up the Printer 1.1. Unpacking Your printer box should include these items. If any items are damaged or missing, please contact your dealer for assistance. Interface cable(option) Power-cord Roll paper Gcube Series Receipt Printer User Guide All specifications are subject to change without notice.
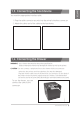
1.2. Connecting the Cables You can connect up to three cables to the printer.
CHAPTER 1 1.3. Connecting the host device You need the appropriate interface cable. 1. Plug the cable connector securely into the printer’s interface connector. 2. Attach the other end of the cable to the host device. 1.4. Connecting the Drawer WARNING : Use a drawer that matches the printer specification. Using an improper drawer may damage the drawer as well as the printer.
1.5. Connecting the Power Supply WARNING : Make sure that you use the power supply provided with the printer or equivalent. CAUTION : When connecting or disconnecting the power supply from the printer, make sure that the power supply is not plugged into an electrical outlet. Otherwise you may damage the power supply or the printer. If the power supply’s rated voltage and your outlet’s voltage do not match, contact your dealer for assistance. Do not plug in the power cord.
1.6.1. Wall Mount Installation 1. Using the bracket, mark it on the wall where you want to install the printer. 2. Make 3 holes in the marked places. 3. Install the wall mount bracket with screws as in picture 3. 4. Align the wall bracket and the printer and slide down the printer to fit in. ➊ ➋ 80mm 40mm ➌ ➍ OPERATOR’S Manual 11 CHAPTER 1 1.6.
1.6. Installing options & Replacing the Paper Roll 1.6.2. Paper Roll Installation NOTES : Be sure to use paper rolls that meet the specifications. Do not use paper rolls that have the paper end glued to the core. 1. Open the paper roll cover by pressing the cover-open button. ➊ ➋ NOTES : To avoid printer damage, do not open the printer cover during printing. 2. Remove the used paper roll core if there is one. 3. Insert the paper roll as shown. 4. Pull out a small amount of paper as shown in picture no.
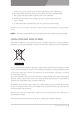
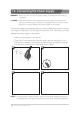
CHAPTER 1 1.7. Adjustments and Settings Printer settings can be changed using NFC APP 1.7.1 How to install APP 1. Configure NFC Function from User’s Smart Phone into Read/Write, P2P Mode. (not workable in a Card Mode) 2. Tag your cellphone horizontally on NFC logo with the cellphone screen unlocked. 3. If NFC is well recognized, Gcube APP Installation Screen from Google Play Store runs automatically. 4. Press the Installation Button on Installation Screen, then it will be installed in User’s smart phone.
1.7. Adjustments and Settings 1.7.2 Change device setting 1. In Device Settings Menu, Run a Config the setting values. 2. Change setting values you wish to change on a Setting screen. After completion of setting, touch the upper screen. 3. If the message “Tag on Gcube” appears in the middle of screen, then tag a smart phone on Printer. 4. When the message “Writing completed” appears while tagging the smart phone on the Printer, then tag the smart phone off Printer. 5.
CHAPTER 1 1.7. Adjustments and Settings 1.7.3 Bluetooth setting 1. Run a Smart BT Linke. 2. If the message “Tag on Gcube” appears in the middle of screen, then tag a smart phone on Printer. 3. Change the Device Address, Device Name, Pin Code and click the Create button. 4. When the message “Tag on Gcube” appears in the middle of screen, then tag a smart phone on Printer. 5. When the setting is well done, printer will print Self-Test Page after reset.
1.8. Using the Printer 1.8.1. Control Panel POWER LINK DATA 1.8.2. Button •POWER • Button Press the POWER button to turn on the printer. "-"is displayed on the FND. •FEED • Button Press the FEED button once to advance paper one line. You can also hold down the FEED button to feed paper continuously. The button can be disabled by the ESC c 5 command. 1.8.3. Panel lights : FND •ERROR • FND This indicates when there is " Power on" error or no receipt paper left/ almost used up.
CHAPTER 1 MEMO OPERATOR’S Manual 17
CHAPTER 2 APPENDIX 2.1. Adjusting the Paper Near-End Sensor Location The sensor has five sensitivity settings. 1. Push the open button and open the printer cover. 2. If you find there is too much paper remaining when the sensor is triggered, set the near end sensor to position #4 or #5. 3. Decrease the setting if the paper runs out before the sensor is triggered. The accuracy of the Near-End sensor depends on the adjustment scale setting and the winding core diameter of the roll paper.
2.2. Printer Head Cleaning Paper dust on the heating elements may lower the printing quality. In this case, clean the printer head as follows: 1. Power off the printer. 2. Open the printer cover. 3. Clean the thermal elements of the printer head using a cotton swab moistened with alcohol solvent (ethanol, methanol, IPA) 4. Insert a paper roll and close the printer cover. OPERATOR’S Manual 19 CHAPTER 2 NOTES : Before cleaning the inside of printer or the head, make sure the power is off.
2.3. Error Status and Error Resolution When the printer error occurs, the alphabet corresponding to the error condition is shown on FND Error Status Indicator includes: ••Cutter Jam When ERROR FND indicates "J", the printer is on Cutter Jam error status. »» Solution While the printer is turned on (the Power LED is on,) press the cover button and open the cover. Then, the cutter will automatically reset.
2.3. Error Status and Error Resolution When the printer error occurs, the alphabet corresponding to the error condition is shown on FND CHAPTER 2 Error Status Indicator includes: •Paper • Out Error The buzzer beeps “ Beep---,Beep---” and When the printer cover open by pressing the cover open button, the buzzer will stop. After this, you may change the paper roll and continue using the printer. •Cover • Open This error occurs when the printer cover is open. Closing the cover will clear the error.
2.4. Specification 2.4.1.
Gcube Series Receipt Printer OPERATOR’S Manual