SHINDAIWA OWNER’S/OPERATOR’S MANUAL Shindaiwa OWNER’S/OPERATOR’S MANUAL MULTIPURPOSE ARTICULATED HEDGE TRIMMER TOOL 65003 WARNING! Minimize the risk of injury to yourself and others! Read this manual and familiarize yourself with the contents. Always wear eye and hearing protection when operating this unit.
Introduction The Shindaiwa Multipurpose Articulated Hedge Trimmer Tool is designed and built to deliver superior performance and reliability without compromise to quality, comfort, safety or durability. As an owner/operator, you’ll soon discover for yourself why Shindaiwa is simply in a class by itself! Contents While every attempt has been made to provide the latest information about your Shindaiwa product, there may be some differences between your attachment and what is described here. ECHO, Inc.
Safety This machine operates at very high speeds and has the potential to do serious damage if misused, abused or mishandled. To reduce the risk of injury, you must maintain control at all times, and observe all safety precautions during operation. Never permit a person without training or instruction to operate this machine! NOTE: For specific maintenance and safety information about your Multipurpose Tool Carrier, consult the owner's manual provided with it.
Operating the Multipurpose Articulated Hedge Trimmer Tool WARNING! To avoid the chance of serious injury or death, follow these safety precautions during operation: Always wear a hard hat to reduce the risk of head injuries during operation of this machine. Always wear eye and hearing protection. Shindaiwa recommends wearing a face shield as additional face and eye protection. Always operate with both hands firmly gripping the machine.
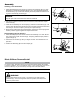
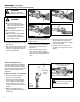
Product Description Using the illustration as a guide, familiarize yourself with your machine and its various components. Understanding your machine helps ensure top performance, long service life and safer operation. A B A - Outer tube B - Adjustment lever C - Gear case D - Cutter assembly D C WARNING! Do not make unauthorized modifications or alterations to your articulated hedge trimmer or its components.
Assembly Installing a Tool Attachment A G 1. Place the Multipurpose Tool Carrier (A) and the Tool Assembly (B) on a clean, flat surface so that both assemblies fit end to end. The powerhead assembly should be facing up, and the tool assembly should be positioned with the locking hole in the tube (C) end facing up. F C CAUTION! Keep the open ends of the tubes clean and free of Debris! M23004 D 3.
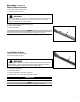
Assembly (continued) Blade Stiffener Removal 1. Move stop switch to stop position. 2. Disconnect spark plug wire. WARNING! Hedge clipper blades are very sharp. Touching them may lead to severe personal injury. Use a socket and extension when removing locknuts in order to keep hands at a safe distance from sharp blades. 3. Remove four (4) blade stiffener locknuts (A). 4. Remove blade stiffener. 5. Install (4) locknuts. NOTE: Use new locknuts every other time blade stiffener is installed or removed.
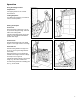
Assembly (continued) Adjusting the Hedge Trimmer Cutter Assembly WARNING! B Never run the engine when adjusting the cutter assembly. WARNING! A ■■The cutter blades are very sharp. Do not grasp the blades with your hands. Always use gloves when working near the cutter assembly. ■■Do not allow the blades to contact your body. ■■Do not touch the cutter blades when the engine is running. The blades can oscillate even if the engine is idling. 1. Position the hedge trimmer on a flat, level surface. 2.
Operation Using the Hedge Trimmer Preparations Use lopping shears to cut out thick branches first. Cutting Sequence If a radial cut is necessary, cut a little at a time in several passes. Cutting Techniques Vertical Cut: Swing the blade up and down in an arc as you move along the hedge. Use both sides of the cutting blade. Cut without standing directly next to the hedge, e.g. with a flower bed between operator and hedge.
Maintenance IMPORTANT! For detailed maintenance information about your Multipurpose Tool Carrier, consult the owner’s manual that was provided with it. If it has been lost or misplaced, contact Shindaiwa for a replacement. WARNING! Before performing any maintenance, repair, or cleaning work on the unit, make sure the engine and cutting attachment are completely stopped. Disconnect the spark plug wire before performing service or maintenance work.
50-Hour Maintenance Every 50 hours of operation (more frequently in dusty or dirty conditions): ■■Lubricate the gearcase. To per- form this operation, first remove the gearcase (A) from the outer tube (B). Do not remove the D-shaped shim washer from the gearcase clamp! The shim washer prevents damage from overtightening the gearcase clamp screw. 1. Loosen the gearcase clamp screw (C). C B CAUTION! 2. Remove the index screw (D) from the gearcase. A D 3. Slide the gearcase out of the tube.
Troubleshooting Guide Symptom Excessive vibration. Cutting attachment will not move. Cutting attachment moves at engine idle. 12 ADDITIONAL PROBLEMS Possible Cause Remedy Warped or damaged attachment. Inspect and replace attachment as required. Loose gearcase. Tighten gearcase securely. Bent main shaft/worn or damaged bushings. Inspect and replace as necessary. Shaft not installed in powerhead or gearcase. Inspect and reinstall as required. Broken shaft.
NOTES 13
NOTES 14
NOTES 15
Servicing Information Parts/Serial Number Genuine Shindaiwa Parts and Assemblies for your Shindaiwa products are available only from an Authorized Shindaiwa Dealer. When you do need to buy parts always have the Model Number, Type and Serial Number of the unit with you. You can find these numbers on the engine. For future reference, write them in the space provided below. Model No. _____________ SN.