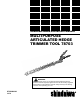
SHINDAIWA OWNER’S/OPERATOR’S MANUAL Shindaiwa OWNER’S/OPERATOR’S MANUAL MULTIPURPOSE ARTICULATED HEDGE TRIMMER TOOL 78703 WARNING! Minimize the risk of injury to yourself and others! Read the Owner's/ Operator's manual originally supplied with the unit that is being upgraded and familiarize yourself with the contents. Always wear eye and hearing protection when operating your unit.
Introduction The Shindaiwa Multipurpose Articulated Hedge Trimmer Tool is designed and built to deliver superior performance and reliability without compromise to quality, comfort, safety or durability. IMPORTANT! The information contained in these instructions describes components available at the time of publication. While every attempt has been made to provide the latest information about your Shindaiwa product, there may be some differences between your attachment and what is described here. Echo, Inc.
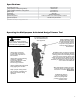
Safety Precautions WARNING! THE ARTICULATED HEDGE TRIMMER IS NOT INSULATED AGAINST ELECTRICAL SHOCK! Approaching or contacting electrical lines with the trimmer could cause death or serious injury. Keep the trimmer at least 33 feet (10 meters) away from electrical lines or branches that contact electrical lines. WARNING! An articulated hedge trimmer has the potential to do serious damage if misused, abused or mishandled.
Safety Labels IMPORTANT! Safety and Operation Information Labels: Make sure all information labels are undamaged and readable. Immediately replace damaged or missing information labels. A new label is provided in this kit and additional labels are available from your local authorized Shindaiwa dealer. Prior to installing the new label, remove old label and clean the outer tube with rubbing alcohol or similar cleaner.
Specifications Dry Weight (Tool only) Length (storage or transporting position) Length Installed extended in cutting position Blade Length Cutter Drive Gear Lubricant Standard Equipment: Optional Equipment. 2.06 kg/4.5 lbs. 840 mm/33 in. 1770 mm/70 in. 567 mm/22.3 in. Spur gear .Lithium-based grease Cutter tool, blade cover, owner’s/operator’s manual Shoulder strap and bracket Specifications are subject to change without notice.
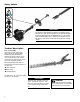
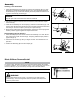
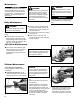
Assembly Installing a Tool Attachment A G 1. Place the Multipurpose Tool Carrier (A) and the Tool Assembly (B) on a clean, flat surface so that both assemblies fit end to end. The powerhead assembly should be facing up, and the tool assembly should be positioned with the locking hole in the tube (C) end facing up. F C CAUTION! Keep the open ends of the tubes clean and free of Debris! M23004 D 3.
Assembly (continued) Blade Stiffener Removal 1. Move stop switch to stop position. 2. Disconnect spark plug wire. WARNING! Hedge clipper blades are very sharp. Touching them may lead to severe personal injury. Use a socket and extension when removing locknuts in order to keep hands at a safe distance from sharp blades. 3. Remove four (4) blade stiffener locknuts (A). 4. Remove blade stiffener. 5. Install (4) locknuts. NOTE: Use new locknuts every other time blade stiffener is installed or removed.
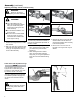
Assembly (continued) Adjusting the Hedge Trimmer Cutter Assembly WARNING! B Never run the engine when adjusting the cutter assembly. WARNING! A ■■The cutter blades are very sharp. Do not grasp the blades with your hands. Always use gloves when working near the cutter assembly. ■■Do not allow the blades to contact your body. ■■Do not touch the cutter blades when the engine is running. The blades can oscillate even if the engine is idling. 1. Position the hedge trimmer on a flat, level surface. 2.
Assembly (continued) Adjusting cutter assembly for storage or transportation 1. With the engine off, install the blade cover onto the blade. 2. Using the procedures described above, rotate the cutter assembly so it is parallel to the tube. Make sure the latch lock and the latch release return securely to a locking position. WARNING! Never run the engine when adjusting the cutter assembly. 3. Make sure the blade cover is in place on the blade before storing or transporting.
Maintenance IMPORTANT! For detailed maintenance information about your Multipurpose Tool Carrier, consult the owner’s manual that was provided with it. If it has been lost or misplaced, contact Shindaiwa for a replacement. WARNING! Before performing any maintenance, repair, or cleaning work on the unit, make sure the engine and cutting attachment are completely stopped. Disconnect the spark plug wire before performing service or maintenance work.
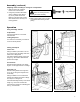
Cutter Blade Adjustment WARNING! The cutter blades are very sharp! Always wear gloves when working around the cutter assembly. 2. Tighten each blade shoulder bolt (B) firmly, and then loosen the shoulder bolts 1/4 to 1/2 turn. CAUTION! Operating the trimmer with worn or improperly adjusted cutters will reduce cutter performance and may also damage your machine. Cutter performance of your machine depends in great measure on the cutter blade clearance.
Servicing Information Parts/Serial Number Genuine Shindaiwa Parts and Assemblies for your Shindaiwa products are available only from an Authorized Shindaiwa Dealer. When you do need to buy parts always have the Model Number, Type and Serial Number of the unit with you. You can find these numbers on the engine. For future reference, write them in the space provided below. Model No. _____________ SN.