
Operator`s manual


11
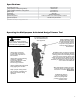
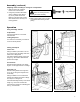
WARNING!
The cutter blades are very sharp!
Always wear gloves when working
around the cutter assembly.
CAUTION!
Operating the trimmer with worn
or improperly adjusted cutters will
reduce cutter performance and may
also damage your machine.
Cutter performance of your machine
depends in great measure on the
cutter blade clearance. Properly ad-
justed blades will oscillate freely yet
help prevent binding of cut material
between blades. Adjust the blades
as follows:
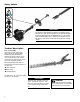
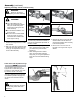
B
Cutter Blade Adjustment
1. Loosen all the blade locknuts (A) at
least one full turn.
2. Tighten each blade shoulder bolt (B)
rmly, and then loosen the shoulder
bolts 1/4 to 1/2 turn.
3. Working from the gearcase end, lock
each bolt in place by rmly tighten-
ing its locknut while preventing the
shoulder bolt from turning.
When shoulder bolt adjustment is cor-
rect, there should be a gap of 0.25–0.50
mm between the cutter blades and the
at washers (C) beneath each bolt head
should turn freely.
A
C
ADDITIONAL PROBLEMS
Symptom
Possible Cause
Remedy
Troubleshooting Guide
Engine idle too high.
Broken clutch spring or worn clutch
spring boss.
Warped or damaged attachment.
Loose gearcase.
Cutting attachment
moves at engine idle.
Excessive vibration.
Cutting attachment will not
move.
Adjust idle. Check Specifi cations page for correct idle
speed.
Replace spring/shoes as required, check idle speed.
Inspect and replace attachment as
required.
Tighten gearcase securely.
Bent main shaft/worn or damaged bushings.
Shaft not installed in powerhead or gearcase.
Broken shaft.
Damaged gearcase.
Inspect and replace as necessary.
Inspect and reinstall as required.
Consult with an authorized Shindaiwa servicing
dealer.