www.shoprider.com.
Introduction Congratulations on the purchase of your SHOPRIDER® scooter SHOPRIDER® owners are a distinguished, growing group of people who care about quality, performance and FUDIWVPDQVKLS %HFDXVH RI WKH ³ 7UDQVD[OH´ engineering SHOPRIDER® scooters are able to navigate a multitude of terrains with comfort and stability other conventional scooters can not provide.
Safety Rules Please use your SHOPRIDER® scooter often and let it expand your horizons. The more mobility your SHOPRIDER brings the happier we will be! But as with all things, observing a few rules will ensure safe scootering. So please take the time to read and fully understand each rule below. Do not ride the SHOPRIDER® scooter without reading this instruction manual. Do not exceed the safe maximum climbing angle of the scooter. Do not exceed the maximum user weight at anytime.
DISCLAIMER SHOPRIDER® is not responsible for any damage or injury incurred due to improper or unsafe use of the SHOPRIDER® scooter. Mechanical or electrical defects will be dealt with on a contingency liability basis. The parts will be replaced but no responsibility for any damage or injury can be implied to SHOPRIDER®.
EMI Warning(Continued) Scooter Electromagnetic Interference (EMI) Because EM energy rapidly becomes more intense as one moves closer to the transmitting antenna (source), the EM fields from hand-held radio sources (transceivers) are of special concern. It is possible to unintentionally bring high levels of EM energy very close to the scooter's control system while using these devices. This can affect scooter movement and raking.
Scooter Tiller Controls Speed Control Dial The speed control dial allow the scooter to set the speed between 1 (minimum) and 10 (maximum). Battery Level Indicator There are two types of battery level indicators available on the models in this manual please refer to the indicator like the model you have. Dial Gauge If your scooter has a battery indicator dial gauge fitted and when fully charged the red pointer will indicate in the green section ³)´.
Scooter Tiller Controls ( Continued ) On/Off Key Switch Insert the key in to the key barrel on the tiller. Turn the key and the Battery indicator gauge pointer will move to the green or LED light bars light up. There will be a short delay before the thumb/finger lever can be operated, while the controller is checking the circuits. Indicator Switch (where fitted) Operates the turn indicators on the scooter.
Operating Your Shoprider® Scooter Mounting the Scooter For your first lesson be sure you and your Shoprider® are on a level surface with plenty of room to test drive the scooter (ensure the key is not in the scooter) Mount the scooter, either by lifting the armrest and sliding on to the seat or rotate the seat by lifting seat swivel lever and then rotate to face the tiller. Make sure the seat locks in place. Adjust the seat so you are comfortable and are able to easily reach the steering tiller.
Maximum User Weight & Incline Angle (continued) WARNING: Exceeding user weight or incline specifications may damage your scooter & void your warranty. WARNING: If fitted Never remove the anti-tip wheels from the scooter. CAUTION: When on any incline or decline never place the scooter in free wheel mode. CAUTION: When driving on an incline never Zigzag or drive at an angle up the incline. Always drive your scooter straight up the incline. This will reduce the possibility of the scooter tipping.
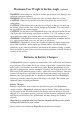
Batteries & Battery Chargers Charging The battery pack can be charged as an independent unit. It does not have to be connected to the scooter (See Diagram below) If your scooter has the round battery charge level indicator it will be in the RED section when the battery is very low.
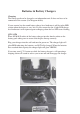
Batteries & Battery Chargers (Continued) GK9 / GK10 To charge the Dual portable battery pack on board the scooter refer to the picture below . To charge the Dual portable battery pack off the scooter refer to the picture below. Place the MALE socket of the battery charger into the female socket on the battery pack taking care to ensure that the pins line up correctly. Plug your charger into the wall and turn the power on. The charger light will glow RED indicating the batteries are NOT fully charged.
Transporting Your Scooter All the scooters in this manual have the ability to be easily transported by following the same basic steps to disassemble then reassemble. 1. Always ensure your scooter is turned OFF on the steering column. 2. Remove your basket by pulling it up gently. 3. Remove your seat by folding the back down and gently pulling up on the seat lever. When the seat lever is up, pull straight up firmly but slowly and the seat will lift off. (As indicated in figure #1) 4.
Transporting Your Scooter (continued) FIGURE #2A BATTERY REMOVAL GK9/GK10 FIGURE #4A TILLER LOCK LEVER GK10
Transporting Your Scooter (continued) Free wheeling Device The scooter can be moved manually by moving the free wheeling lever (as indicated figure #7) This located on the rear section of the scooter and is the Yellow lever. To free wheel the scooter push the Yellow lever towards the front of the scooter. To engage the brake pull the lever towards the back of the scooter.
Care & Maintenance Wheels and Tyres (GK10only) The wheels of your Shoprider® scooter have split rims. This allows any punctures to be repaired easily. To change the wheels remove the center 13 mm bolt and slide the wheel off its axle. Take care not to lose the drive key on the rear wheels. When changing a tyre you must deflate the tyre first. Remove the four bolts to split the rim if required.
Care & Maintenance (continued) Servicing Shoprider® recommends that your scooter be service as a minimum every 12 months for average users and every 6 months for heavy users. This will ensure that your Shoprider® will continue to deliver the outstanding reliability they are known for. Please contact the selling Shoprider® dealer to arrange.
Warranty Terms & Conditions The Warranty Terms and Conditions noted below provide your Shoprider® scooter with excellent coverage against possible defective parts or possible faulty workmanship. If at anytime you have a warranty issue YOU MUST contact the selling Shoprider® dealer as they are required to undertake the diagnosis and labour content of the warranty. Shoprider® will as noted below supply spare parts as required as part of this agreement.
Warranty Terms & Conditions(continued) Exclusions 1. All transportation cost associated with the submission and return of the repair or replacement under warranty (as determined by Shoprider Australia) are the responsibility of the original customer. 2. Normal wear items are not covered under warranty. These items include such items as brushes, tyres, tubes, brake pads, upholstery, seating and armrests. 3. Damage caused by: - Excessive, abusive, misuse, negligence, accident or water.
Technical Specifications Unit Specifications Overall Dimensions L x W x H (I) Number Size of Tyres Maximum User Weight (on flat ground) Total Weight (with batteries Basket & Seat) Heaviest Part Charger Battery Size Output of Motor Maximum Speed (2) Up to on level ground Maximum Climbing Angle @ Maximum weight shown Turning Radius Suspension QT3 QT4 GK9 MM Front Rear 960 x 510 x 850 1/ 200mm 2/ 200mm 1030 x 510 x 850 1/ 200mm 2/ 200mm 1050 x 560 x 880 2 / 225mm 2 / 225mm KG 110 110 136 136 KG 3
You can rely on a Shoprider www.shoprider.com.