
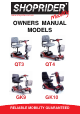
Operation Manual

Scooter Tiller Controls
( Continued )
On/Off Key Switch
Insert the key in to the key barrel on the tiller. Turn the key and the Battery
indicator gauge pointer will move to the green or LED light bars light up. There
will be a short delay before the thumb/finger lever can be operated, while the
controller is
checking the circuits.
Indicator Switch (where fitted)
Operates the turn indicators on the scooter.
Hazard Warning Switch (where fitted)
A red button operates all the indicators on the scooter at one time.
Electromagnetic Brake
All Shoprider® scooters have Electromagnetic brakes fitted. The brake is
automatically operated when the control levers (Wig Wag) are released. There is
a very slight delay when the scooter decelerates ± This allows the scooter to
come to a smooth stop.
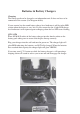
Free Wheel Operation
The free wheel release lever (this may be red or yellow depending on the model
of the scooter) is located inside the Right or Left rear wheel.
To disengage the motor, move the lever in the opposite direction ± The scooter
can now be pushed.
To re-engage the motor return the lever to the original location ± The scooter
should now be unable to be pushed.
WARNING!
Always re-engage the Free Wheeling device after use. Failure to do so may
result in Injury.
Do not release the free wheel lever on any incline.
Anti-Tip Wheels
The anti-tip wheels are located at the rear of the scooter frame. The anti-tip
wheels are removable on some models. The scooter should not be used unless
the ant-tips are fitted.
Shoprider® is not responsible for the damage or injury due to improper or
misuse of the scooter.