
Specifications
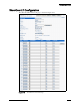


Configuring Switches
ShoreTel 6.1 Administration Guide 6 – 37
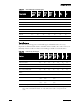
Adding a ShoreGear-E1
To add a switch to the ShoreTel system or edit an existing switch configuration:
Step 1 To add a new switch, select the associated site and pick ShoreGear-E1
from the list and click Go.
Step 2 If you are adding a new switch, enter its name in the Name field. If you
are adding a new switch from a record that you copied, replace the
existing name with a new one.
Step 3 If you are adding a new switch, enter a descriptive name for the switch
in the Description field. If you are adding a new switch from a record
that you copied, replace the existing description with a new one.
Step 4 If your DHCP/ BOOTP server is running, click Find Switches, and
select an IP address from the Find Switch dialog box. This also adds
the switch’s MAC address in the Ethernet Address field.
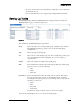
Framing Format The ShoreGear-E1 uses CRC-4 framing format. This is a read-
only parameter.
Line Code The ShoreGear-E1 uses HDB3 line code. This is a read-only
parameter.
Clock Source This is the ShoreGear-E1 switch’s clock source. Depending on the
type of E1 service provided by your telephone company’s CO,
select either Slave or Master. Typically the ShoreGear-E1 is slave
to the central office.
The system default is Slave.
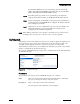
Channel This lets you configure each of the ShoreGear-E1’s channels. Note
that Channel 1 is reserved for framing and Channel 17 for D-
Channel signaling.
• Trunk Group—This drop-down list lets you associate the
channel to a specific trunk group. The ShoreTel system
supports fractional E1 PRI. You only need to configure the
channels you need or have ordered.
• Name/Number—This lets you enter the channel’s telephone
number or extension.
• Jack #—This lets you assign a patch panel jack number to
the channel.
• Tx Gain (db)—This is the amount of gain added to the
received digital signal. The default is +2db and may need to
be changed based on your service.
• Rx Gain (db)—This is the amount of gain added to the
transmitted digital signal. The default is -2db and may need
to be changed based on your service.
The Fill Down button, when clicked, will populate the switch
with the same trunk group, the current name with the channel
number in parentheses.