
Installation guide

Using a Fax Server Planning Applications and Services
8
ShoreTel 14.2 Planning and Installation Guide 143
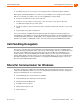
10. In Director, select the user account representing the fax server connection.
11. Click the Personal Options tab.
12. Click the Standard link under Edit Call Handling Modes.
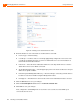
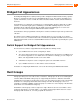
13. Under Call Forward Condition, select the No Answer/Busy radio button as shown in Figure 27.
Figure 27: Configuring Call handling mode for Busy/No Answer failover
14. In the Busy Destination and No Answer Destination radio buttons, select Extension and specify
the analog port where incoming fax calls will be directed if the first fax port is busy.
For example, if you have set up three ports to receive fax calls, you might configure the first port in
this series to redirect to the second port, and the second port would specify the third as a failover.
15. Click Save to store your changes.
This configuration assumes multiple analog ports will be used to connect the switch to the fax
server. If only one fax server port will be used to connect to the fax server, then the call forwarding
must be set to Never. Similarly, if this port is the last one in a chain of ports dedicated to the fax
server, then the call forwarding must be set to Never.
If you are using multiple analog switch ports to connect to the fax server you must specify the first
redirect extension in that chain. This is the site's fax redirect extension.
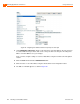
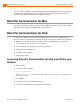
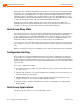
1. Under the Administration link, click Sites.
2. Click the site where the switch and fax server are located, for example either Headquarters or
Remote. The Edit Site page appears as shown in Figure 28.