SL STRIP 400 RGBW LED Luminaires IP20 Rated Models
Showline Offices Dallas 10911 Petal Street Dallas, TX 75238 Tel: +1 214-647-7880 Fax: +1 214-647-8030 Auckland 19-21 Kawana Street Northcote, Auckland 0627 New Zealand Tel: +64 9 481 0100 Fax: +64 9 481 0101 Asia Unit C, 14/F, Roxy Industrial Centre No. 41-49 Kwai Cheong Road Kwai Chung, N.T., Hong Kong Tel: +852 2796 9786 Fax: +852 2798 6545 Europe Rondweg zuid 85 Winterswijk 7102 JD The Netherlands Tel: +31 (0) 543-542516 www.philips.
SL STRIP 400 RGBW LED Luminaires Installation & User’s Manual IMPORTANT INFORMATION Warnings and Notices When using electrical equipment, basic safety precautions should always be followed including the following: a. READ AND FOLLOW ALL SAFETY INSTRUCTIONS. b. Do not use outdoors. c. Do not mount near gas or electric heaters. d. Equipment should be mounted in locations and at heights where it will not readily be subjected to tampering by unauthorized personnel. e.
Installation & User’s Manual SL STRIP 400 RGBW LED Luminaires TABLE OF CONTENTS Showline Offices..................................................................................................................................... Inside Front Cover IMPORTANT INFORMATION Warnings and Notices......................................................................................................................................................... 1 Additional Resources for DMX512................................
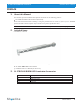
SL STRIP 400 RGBW LED Luminaires Installation & User’s Manual PREFACE 1. About this Manual The document provides installation and operation instructions for the following products: SL STRIP 400 RGBW LED Luminaire (IP20 rated) Please read all instructions before installing or using this product.Retain this manual for future reference. Additional product information and descriptions may be found on the product specification sheet.
SL STRIP 400 RGBW LED Luminaires Installation & User's Manual SL STRIP 400 RGBW LED LUMINAIRE OVERVIEW 1.
Installation & User’s Manual
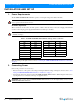
SL STRIP 400 RGBW LED Luminaires Installation & User’s Manual INSTALLATION AND SET UP 1. Power Requirements The SL STRIP 400 RGBW LED Luminaire operates on AC input voltages from 100 to 240 VAC. WARNING! This unit does not contain an ON/OFF switch. Always disconnect power input cable to completely remove power from unit when not in use. AC Power Operation When connected to an AC source, the unit operates on 100 to 240 volts AC (+/- 10%, auto-ranging). The luminaire contains an auto-ranging power supply.
SL STRIP 400 RGBW LED Luminaires Installation & User’s Manual Connecting SL STRIP 400 RGBW LED Luminaires to AC Power The unit is supplied with an AC input cable without an input connector. Input connector is a user-supplied accessory to fit your application. Table 2 describes how to connect power to your SL STRI P 400 RGBW LED Luminaire. Field wiring of the SL STRIP 400 RGBW LED Luminaire is straight forward. A total of 3 wires/conductors is supplied from the unit.
SL STRIP 400 RGBW LED Luminaires Installation & User’s Manual 3. Connecting to the DMX512 Network Basic DMX512 installation consists of connecting multiple SL STRIP 400 RGBW LED Luminaires together (up to 32 luminaires) in "daisy-chain" fashion. A cable runs from the control console (or DMX512 control source) to the DMX connector on the first SL STRIP 400 RGBW LED Luminaire.
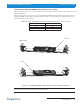
SL STRIP 400 RGBW LED Luminaires Installation & User’s Manual 4. Mounting Luminaire The SL STRIP 400 RGBW LED Luminaire is provided with two mounts and multiple safety cable anchor points (as described in "Major Luminaire Components" on page 4 and Figure 7 on page 10.) The two mounts are easily removed and reversed as required (as illustrated in Figure 6). These mounts are designed to accept a variety of mounting hooks, clamps, etc.
SL STRIP 400 RGBW LED Luminaires Installation & User’s Manual Note: Mounting hooks, clamps, etc. are sold separately or by others. For available mounting accessories refer to "SL STRIP 400 RGBW LED Luminaire Accessories" on page 3. Hooks / Clamps (sold separately) Note: Mounting hole size is M10. Mount Mount SAFETY CABLE: Is sold separately and recommended for all hanging installation and may be required by national and local codes. Use safety cable anchor points for this fixture.
SL STRIP 400 RGBW LED Luminaires Installation & User’s Manual 3. Quick Selection Buttons When in Manual Mode, the SL STRIP 400 RGBW LED Luminaire’s features can be accessed via the on-board LCD menu system or via three quick select buttons: • Edit a Preset Button • Edit a Chase Button • DMX Address Button Edit a Preset Button Edit a Preset To edit and save a preset: Step 1. Press Edit a Preset button. Current preset will be shown. Edit a Preset H S I C Step 2.
SL STRIP 400 RGBW LED Luminaires Installation & User’s Manual 4. Dimming Curve Selection Through the menu, you are able to select one of four dimming curves: • Linear Curve • PL_Curve • S_Curve • Square Curve Lumen Output PL_Curve * Lumen Output Linear Curve 0 DMX Value 0 DMX Value *Same dimming response curve of certain Philips Selecon and Philips Vari-Lite luminaires.
SL STRIP 400 RGBW LED Luminaires Installation & User’s Manual 5. Master / Slave Operational Mode The Master / Slave Operational Mode allows one SL STRIP 400 RGBW LED Luminaire to act as the "Master" unit and all other connected units are controlled by this unit. When a unit is set to "Slave" mode, it will only listen to and follow any commands sent from a "Master" unit. Only one "Master" unit is allowed in this type of operation. To setup a master / slave network: Step 1.
3
4 5 6 7 8
2
2 3 4
Installation & User’s Manual 5 6
Installation & User’s Manual
SL STRIP 400 RGBW LED Luminaires Installation & User’s Manual Table 6: SL STRIP 400 RGBW LED Luminaire Timing Channel Detail DMX 7 18 3.6 19 3.8 8 9 10 11 (unless noted) 20 4 21 4.2 22 4.4 23 4.6 24 4.8 25 5 26 5.2 27 5.4 28 5.6 29 5.8 30 6 12 31 6.2 32 6.4 13 33 6.6 34 6.8 35 7.0 14 36 7.2 37 7.4 15 38 7.6 39 7.8 40 8 16 41 8.2 42 8.4 17 43 8.6 44 8.8 45 9 18 46 9.2 47 9.4 19 48 9.6 49 9.
SL STRIP 400 RGBW LED Luminaires Installation & User’s Manual Table 6: SL STRIP 400 RGBW LED Luminaire Timing Channel Detail % Value DMX 27 69 28 29 30 31 32 33 34 35 36 37 38 39 40 14 71 14.2 72 14.4 73 14.6 74 14.8 75 15 76 15.2 77 15.4 78 15.6 79 15.8 80 16 81 16.2 82 16.4 83 16.6 84 16.8 85 17 86 17.2 87 17.4 88 17.6 89 17.8 90 18 91 18.2 92 18.4 93 18.6 94 18.8 95 19 96 19.2 97 19.4 98 19.6 99 19.
SL STRIP 400 RGBW LED Luminaires Installation & User’s Manual Table 6: SL STRIP 400 RGBW LED Luminaire Timing Channel Detail % Value DMX 47 100 48 49 40 121 41 122 42 123 43 124 44 125 45 126 46 127 47 50 128 48 129 49 51 130 50 131 51 132 52 52 133 53 134 54 53 135 55 136 56 137 57 54 138 58 139 59 55 140 60 141 61 142 62 56 143 63 144 64 57 145 65 146 66 147 67 58 148 68 149 69 59 150 70 151 71 60 Sh wline = Seconds (unless
SL STRIP 400 RGBW LED Luminaires Installation & User’s Manual Table 6: SL STRIP 400 RGBW LED Luminaire Timing Channel Detail % Value DMX 67 171 68 69 92 173 93 174 94 175 95 176 96 177 97 98 70 179 99 180 100 71 181 101 182 102 183 103 72 184 104 185 105 73 186 106 187 107 188 108 74 189 109 190 110 75 191 111 192 112 193 113 76 194 114 195 115 77 196 116 197 117 198 118 78 199 119 200 100 79 201 121 202 122 203 123 80 204 124
SL STRIP 400 RGBW LED Luminaires Installation & User’s Manual Table 6: SL STRIP 400 RGBW LED Luminaire Timing Channel Detail % Value DMX 87 222 88 89 = Seconds (unless noted) 142 223 143 224 144 225 145 226 146 227 147 228 148 229 149 90 230 150 231 151 91 232 152 233 153 234 154 92 235 155 236 156 93 237 157 238 158 239 159 94 240 160 241 161 95 242 162 243 163 96 97 98 99 100 244 164 245 165 246 5 Minutes 247 15 Minutes 248 30 Minutes
SL STRIP 400 RGBW LED Luminaires Installation & User’s Manual Table 11, “SL STRIP 400 RGBW LED Luminaire RDM Manufacturer Specific PIDs,”on page 30 Table 7: SL STRIP 400 RGBW LED Lu minaire RDM Product Parameters Ids Model ID Manufacturer Model Description Product Category 0x1100 Philips Entertain. Lighting Asia SL STRIP 400 (RGBW) 0x0509 Table 8: SL STRIP 400 RGBW LED Luminaire RDM UID UID MSB of ESTA 50H LSB of ESTA 41H 1st of Unique Seq. 2nd of Unique Seq. 3rd of Unique Seq.
SL STRIP 400 RGBW LED Luminaires Installation & User’s Manual Table 9: SL STRIP 400 RGBW LED Luminaire RDM Parameters IDs Get Allowed Set Allowed ■ RDM Parameter IDs Value BOOT_SOFTWARE_VERSION_LABEL 0x00C2 Comment Implemented Category - DMX512 Setup ■ ■ ■ ■ ■ DMX_PERSONALITY 0x00E0 DMX_PERSONALITY_DESCRIPTION 0x00E1 ■ ■ Required if device uses a DMX Slot ■ DMX_START_ADDRESS 0x00F0 ■ SLOT_INFO 0x0120 ■ ■ SLOT_DESCRIPTION 0x0121 ■ ■ DEFAULT_SLOT_VALUE 0x0122 Category - Sens
SL STRIP 400 RGBW LED Luminaires Installation & User’s Manual Table 10: SL STRIP 400 RGBW LED Luminaire RDM Manufacturer Status IDs Manufacturer Specific messages are in the range of 0x8000 - 0xFFDF. Each Manufacturer-specific Status ID shall have a unique meaning, which shall be consistent across all products having a given Manufacturer ID. See Table B-2, ANSI E1.202010.
SL STRIP 400 RGBW LED Luminaires Installation & User’s Manual CLEANING AND CARE WARNING! All cleaning should be performed with power completely removed from the luminaire. Never remove protective covers when luminaire is powered. Wear appropriate protective eye wear and gloves when cleaning the fixture. All service and maintenance, other than described herein, should be performed by a qualified technician or Authorized Service Center. 1.
SL STRIP 400 RGBW LED Luminaires Installation & User’s Manual TECHNICAL SPECIFICATIONS 1.
SL STRIP 400 RGBW LED Luminaires Installation & User’s Manual Notes Sh wline SL STRIP 400 RGBW LED Luminaire Dimensions 33