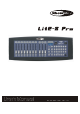
User's Manual No. 24-004-1601 Rev 1.
Welcome Thanks for your purchasing this "Lite-8 Pro" lighting control equipment. This product has the following listed main features: 8 Ch. dimming console with 8 dimming faders, 8 flash buttons and 1 master-fader. Ch9~13 output switches, Ch13 output switch + adjusting knob. 18 original preset chases. Chases are programmable and recordable with up to 99 steps. FULL ON and STAND-BY functions are provided, and user can also define and reset the FULL ON and STAND-BY functions.
General Instruction This is a professional lighting controller with 13 output channels (8 channels with faders & 5 channel-output switches) and 18 preset programs. Each program is editable with up to 99 steps. Lighting effect can be triggered in Manul, Auto, or Audio control mode as your desire. Additionally, this product can receive MIDI signal to realize MIDI control into lighting effect.
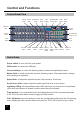
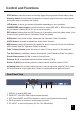
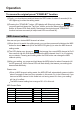
Control and Functions Control Panel View Master Speed Audio sense REC LED RUN ONE/MIX/SEQ USB fader fader fader button Display select button socket button Indicating LED USB LIGHT 1 3 2 5 4 7 6 8 MASTER SPEED 10 10 10 10 10 10 10 10 8 8 8 8 8 8 8 8 8 8 6 6 6 6 6 6 6 6 6 6 4 4 4 4 4 4 4 4 4 4 2 2 2 2 2 2 2 2 2 2 0.
Control and Functions STEP button: press this button to manually trigger the programmed chase step by step. Stand-by button: this will allow the operator to instantly stop all channels' output (press this button again to reactivate the output). LED-display: to show you relevant information depending on your operation. ONE/MIX/SEQ select button: press this button to select ONE, MIX or SEQ running mode as your desire. (related LED is lit if you chose one mode.
Operation Scene/Chase Editing To enter or exit the editing mode Editing entrance: Press and hold down the REC button for about 3 seconds till the REC LED is lit, that means you have already entered the editing mode. Editing exit: After your operation, you can press the RUN button to exit (REC LED goes out). To edit a Scene/Chase (1) Firstly, you should press and hold down the REC button for about 3 seconds (till its LED lights up) to enter the editing mode.
Operation To see over a programmed Scene/Chase Please do as below to see over a programmed scene/chase: (1) Firstly, you should press and hold down the REC button for about 3 seconds (till its LED lights up) to enter the editing mode. (2) When in the editing mode, you should firstly select a programmed scene/chase and press its button, its LED will light up. (The LED-displaly shows you , that means the current scene/chase is preprogrammed.
Operation FULL ON Setting To reset the "FULL ON" function as your desire (1) Firstly, you should press and hold down the REC button for about 3 seconds (till its LED lights up) to enter the editing mode. (2) Pressing the "FULL ON" button, LED-display will flickeringly show you . You can then set a scene by using the channel faders. And then you tap the REC button, all the Scene LEDs will flash briefly, that means your setting has been saved.
Operation To resume the original preset "STAND-BY" function (1) Firstly, you should press and hold down the REC button for about 3 seconds (till its LED lights up) to enter the editing mode. (2) Pressing the "STAND-BY" button, LED-display will flickeringly show you . Then you press and hold down the "Tap Sync" button, and at the same time press the REC button, all Scene LEDs flash briefly, that means the original preset "STAND-BY" function has been resumed (all output and LEDs are turned off).
Operation Scene/Chase Running ONE/MIX/SEQ chasing mode(s) You can press the ONE/MIX/SEQ button to select ONE, MIX or SEQ chasing mode to run the chase(s) as your desire.: (1) ONE: to run the chase singly --- that means you can only run one chase at a time. (2) MIX: to run the chases intermixably --- that means all chases can be respectively run at the same time. (3) SEQ: to run the chases sequentially --- that means the chases will run in a sequence that follows your operation.
Notice Information Maintenance Turn off the power before any cleaning. Keep the unit dry, do not spill water or other liquids into or onto it. There are no user serviceable parts inside, do not dismantle the unit. If your unit fails to work or is somehow damaged, please do not attempt to repair it by yourself. Repairs must be done by qualified personnel. Troubleshooting " If the unit doesn't work at all - check the power supply is connected well, or check the power switch is turned on.
Technical Specifications Power Input ...........................................................................DC9~15V, 500mA Internal Fuse...................................................................500mA 250V, 5x20mm MIDI IN...............................................................................5Pin MIDI connector DMX OUT.....................................................5Pin/3Pin(female) DMX connector SOUND INPUT...........................................................................