
User`s manual

Operation
7
To reset the "FULL ON" function as your desire
FULL ON Setting
To resume the original preset "FULL ON" function
Firstly, you should press and hold down the REC button for about 3 seconds (till its
LED lights up) to enter the editing mode.
(1)
Firstly, you should press and hold down the REC button for about 3 seconds (till its
LED lights up) to enter the editing mode.
(1)
Pressing the "FULL ON" button, LED-display will flickeringly show you . You
can then set a scene by using the channel faders. And then you tap the REC button,
all the Scene LEDs will flash briefly, that means your setting has been saved. (The
above scene that you have set is just your newly defined "FULL ON" function.)
(2)
User can reset the "FULL ON" function as your desire. And you can also resume the
preset FULL ON function in its original definition (really full on in full dim level).
(3)
Pressing the "FULL ON" button, LED-display will flickeringly show you .
Then
you press and hold down the "Tap Sync" button, and at the same time press the REC
button, all Scene LEDs flash briefly, that means the original preset "FULL ON"
function has been resumed (all the channel faders' LEDs light up).
(2)
To reset the "STAND-BY" function as your desire
STAND-BY Setting
Firstly, you should press and hold down the REC button for about 3 seconds (till its
LED lights up) to enter the editing mode.
(1)
Pressing the "STAND-BY" button, LED-display will flickeringly show you . You
can then set a scene by using the channel faders and the Switch buttons . And then
you tap the REC button, all the Scene LEDs will flash briefly, that means your setting
has been saved. (The above scene that you have set is just your newly defined
"STAND-BY" function.)
(2)
User can reset the "STAND-BY" function as your desire. And you can also resume the
preset STAND-BY function in its original definition (
instantly stop all channels' output
when pressing this button).
(3)
Operation
8
To resume the original preset "STAND-BY" function
Firstly, you should press and hold down the REC button for about 3 seconds (till its
LED lights up) to enter the editing mode.
(1)
Pressing the "STAND-BY" button, LED-display will flickeringly show you .
Then
you press and hold down the "Tap Sync" button, and at the same time press the REC
button, all Scene LEDs flash briefly, that means the original preset "STAND-BY"
function has been resumed (all output and LEDs are turned off).
(2)
MIDI channel setting
When the unit is in the editing mode, you can then press and hold down the MIDI
button for about 3 seconds (till its the MIDI LED lights up) to enter the MIDI channel
setting mode.
not
(1)
The LED-display may show you , that means the current MIDI channel is Ch01.
User can then tap the RUN button to adjust the MIDI channel from 01 to 16 circularly
as your desire. Pressing and holding down the RUN button can change the MIDI
channel quickly.
(2)
After your setting, you press and hold down the MIDI button for about 3 seconds (till
its LED goes out), all the Scene LEDs will flash briefly, that means your setting has
been saved effectively.
(3)
Please note:
When in MIDI channel setting mode, the MIDI LED will automatically goes out within
about 5 seconds if there isn't any operation in this mode. So, to be concerned, if you
have set a MIDI channel in this mode but not having saved it in time, your setting
will be of no effect.
The MIDI channel setting has a range of 01~16 in this unit.
MIDI Control Data:
MIDI Note
33
34
35
36
37
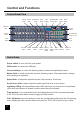
Controls on Lite-4 Pro
Fade To Speed
RUN
STAND-BY
FULL ON
ONE/MIX/SEQ
MIDI Note
0~7
8~11
12
13~30
31
32
Controls on Lite-4 Pro
Flash
Switches
Scenes/Chases 1~18
STEP
Audio
1~8
5~12
Switch 13
User can set your desired MIDI channel as below: