
Product guide


7
Set Up and Operation
Before plugging the unit in, always make sure that the power supply matches the product specification
voltage. Do not attempt to operate a 120V specification product on 230V power, or vice versa.
Remove all packing materials from the Compact Lightset. Check that all foam and plastic padding is
removed.
Always disconnect from electric mains power supply before cleaning or servicing.
Damages caused by non-observance are not subject to warranty.
Control Modes
One Compact Lightset (Built-in Programs, Auto Run, Static Color)
1. Fasten the effect light onto firm trussing. Leave at least 0,5 meter on all sides for air circulation.
2. When the Compact Lightset is not connected by a DMX-cable, it functions as a stand-alone device.
Please see page 12+13 for more information about the built-in programs.
One Compact Lightset (Sound-control)
1.Plug the end of the electric mains power cord into a proper electric power supply socket.
2. Turn on the music. If device is set to (Audio) and you have pressed enter, then the fixture will
react to the beat of the music. Please see page 13 for more information about the sound-control
options.
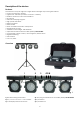
Multiple Compact Lightsets (Master/Slave control)
1. Fasten the effect light onto firm trussing. Leave at least 0,5 meter on all sides for air circulation.
2. Use a 3-p XLR cable to connect the Compact Lightset.
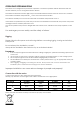
The pins:
1. Earth
2. Signal -
3. Signal +
3. Link the units as shown in (Fig. 2), Connect a DMX signal cable from the first unit's DMX "out"
socket to the second unit's "in" socket. Repeat this process to link the second, third, and fourth units.
You can use the same functions on the master device as described on page 12+13 (Built-in Programs,
Auto Run, Static Color or Music control). This means on the master device you can set your desired
operation Mode and all slave devices will react the same as the master device.
Multiple Compact Lightsets (Master/Slave control)
Fig. 2