
User Manual


Shure Incorporated
2/5
• Do not cover any part of the microphone grille with your hand, as this will adversely affect microphone perfor
mance.
Applications And Placement
The following table lists the most common applications and placement techniques. Keep in mind that microphone
technique is largely a matter of personal taste; there is no one “correct” microphone position.
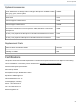
Application Suggested Microphone Placement Tone Quality
Vocals Lips less than 15 cm (6 in.) away or touching the
windscreen, on axis to microphone.
Robust sound, emphasized
bass, maximum isolation from
other sources.
15 to 60 cm (6 in. to 2 ft.) away from mouth, just
above nose height.
Natural sound, reduced bass.
20 to 60 cm (8 in. to 2 ft.) away from mouth,
slightly off to one side.
Natural sound, reduced bass
and minimal “s” sounds.
90 cm to 1.8 m (3 to 6 ft.) away. Thinner, distant sound; notice
able levels of ambient noise.
Avoiding Pickup of Unwanted Sound Sources
Place the microphone so that unwanted sound sources, such as monitors and loudspeakers, are directly behind it.
To minimize feedback and ensure optimum rejection of unwanted sound, always test microphone placement be
fore a performance.
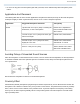
Recommended Loudspeaker Locations for Cardioid Microphones
Proximity Effect
Unidirectional (cardioid) microphones progressively boost bass frequencies by 6 to 10 dB below 100 Hz when the
microphone is at a distance of about 6 mm (1/4 in.) from the sound source. This phenomenon, known as proximity
effect, can be used to create a warmer, more powerful sound. To prevent explosive low frequency sound during
closeup use, the bass response gradually rolls off. This provides greater control and helps the user take advan
tage of proximity effect.