
User's Manual


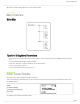
Table Of Contents
- Table of Contents
- AD3 Plug-On Transmitter
- WARNING
- AD3 Axient Digital Plug-On Transmitter
- Included Components
- Optional Accessories
- AD3 Transmitter Overview
- Setup
- Setting the AA Battery Type
- Transmitter Controls
- Menu Overview
- Home Screen Display
- Locking the Interface
- IR Sync
- Setting the Frequency Manually
- Updating Firmware
- RF Mute
- Safe Start
- Input Overload
- Input Overload
- Tone Generator
- Matching Audio Levels with Offset
- Menu Item Descriptions
- Specifications
- Mic Offset Range
- Battery Type
- Battery Runtime
- Dimensions
- Weight
- Housing
- Operating Temperature Range
- Storage Temperature Range
- Audio Input
- Connector
- Configuration
- Impedance
- Maximum Input Level
- Preamplifier Equivalent Input Noise (EIN)
- Phantom Power
- High Pass Filter
- RF Output
- Antenna Type
- Impedance
- Occupied Bandwidth
- Channel-to-Channel Spacing
- Modulation Type
- Power
- Specific Absorption Rate (SAR)
- Frequency Bands and Transmitter RF Power
- LICENSING INFORMATION
- Certifications
- Contact Customer Support

Shure Incorporated
5/23
◦
◦
◦
◦
◦
View menu screens and settings. Press any control button to activate the backlight.
② Infrared (IR) port
Align with the receiver IR port during an IR Sync for automated transmitter tuning and setup.
③ Control buttons
Use to navigate through parameter menus and to change settings.
④ Power switch
Hold the X button to power the unit on or off.
⑤ Enter button
Press to enter menu screens and confirm menu changes.
⑥ Power LED
Green = Unit is powered on
Red = Low battery, or battery error
⑦ Audio LED
Red, yellow, and green LEDs indicate average and peak audio levels.
The LED will turn red when the limiter is engaged.
⑧ USB-C port
Supplies power or charges Shure rechargeable battery. LED indicates charging status when connected to a power supply.
Red = Charging
Green = Full charge
Yellow = Not charging
⑨ Battery compartment
Requires two AA batteries or Shure rechargeable battery.
⑩AA battery adapter
Use to secure AA batteries. Remove when using a Shure rechargeable battery.
⑪ XLR connector
Connection point for wired microphones, cables, and boom poles, among other things.
⑫ Locking ring
To release the XLR connector, turn the ring counterclockwise and push in.
⑬ Pouch
Provides additional grip and protection for the transmitter.
⑭ Belt clip