
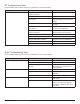
System information


Step 1 (Receiver 2)
The usual indicator of an RF problem is the RF LEDs on the receiver are not on. If the RF LEDs on the receiver are all on,
that usually means the RF link is working.
Check that the receiver 2 is plugged in, and the power switch(s) are ON
The Axient products have two power switches, an AC mains switch on the rear of the unit and a standby switch on the
front.
Check the frequency and band of the receiver against the frequency of the transmitter
Check that the selectable frequency Band setting for the receiver matches the fixed frequency band of the transmitter. If
the Band settings match, make sure that both the receiver and the transmitter are set to the same exact frequency.
Check the noise squelch and tone key settings of the receiver
The default squelch setting for the receiver is 0 and the default setting for the tonekey is ON; these are good starting
points for most applications.
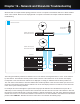
Step 2 (RF Cables)
Check the RF cable connections to the receiver 2
The input cables should be securely plugged into the top BNC input jacks; they should NOT be plugged into either the
bottom BNC cascade jacks or the AES3 word clock jacks.
Check the RF cable connectors
Unplug the cables from both ends and inspect the connector and center pins to ensure they are not missing or damaged.
Check the RF cable connections to the receiver 1
The cables should be securely plugged into the bottom BNC cascade jacks; they should NOT be plugged into either the
top BNC input jacks nor the AES3 word clock jacks.
If all of the above steps are completed with no problems found, proceed to Step 3.
Note: If you’re using the transmitter a long distance from the receiver, lower the squelch control to -8 to -10 for extra range.
Check the ‘link’ icon and channel name on the receiver against the transmitter
The link icon will appear next to the channel name on the receiver LCD and the transmitter and receiver display the same
channel name.
Check the Device IDs in the Receiver 'Linked Devices' List
Select Tx from the receiver menu to view the Devices IDs of linked transmitters.
Check the ‘RF MUTE’ control in the receiver Tx > Adjust menu; should be set to ‘UNMUTE’ if ShowLink is present
The transmitter may be RF MUTED via the ShowLink network; press to UNMUTE the transmitter if it’s MUTED.
If all of the above steps are completed with no problems found, proceed to Step 2.
111
Chapter 18 ‒ RF and Audio Troubleshooting