
User's Manual


FP5
3
1
2
3
PGX1
4
5
PGXD
1
2
1 2
5
3
6
FP1
FP2
FP3
3
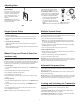
FP5 Receiver
①PowerLED
Green
Poweron
Yellow
Lowbatteryalert
Red
Criticallowbattery,replaceimmediately
Flashingredon
powerup
Batterydead
②RFLED
Illuminateswhensuccessfullysyncedtoatransmitter(ormanually
tunedtoatransmitter'sfrequency)
③PowerButton
Pressandholdtopoweronoroff.
④Infrared(IR)port
Sendsinfraredbeamtosynchronizefrequencies.
⑤TA3MJack
UsewithTA3Fcableforaudioout.
⑥AudioOutputGain
Adjustaudiooutputleveltodevicessuchascamerasorrecorders.
⑦LCDScreen
DisplayscurrentsettingsforGROUPandCHANNELandbatterylife.
⑧ScanButton
Group scan: Pushandhold(3sec.)tofindanopengroupandchannel.
Channel scan: Pushandreleasetofindanopenchannelinthecurrent
group.
⑨Syncbutton
Alignreceiverandtransmitterandpresssync.BlueIRLEDindicates
successfulsync.
Note: Presssyncandscanbuttonstomanuallyentergroupandchan-
nelnumbers
⑩Antennas
Twoantennasfordiversityreception.
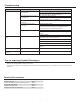
Transmitter Controls and Connectors
①IndicatorLED
Green
Ready
Flashinggreen
Controlslocked
Flashingred
IRtransmissioninprogress
Solidred
Batterypowerlow
Flashingredon
startup
Batteriesdead(transmittercannotbeturned
onuntilbatteriesarechanged)
Rapicflashing
redafter
synchronization
Transmitterandreceiveincompatible;contact
yourShurereseller
②PowerButton
Pressandholdtopoweronoroff.
③Infrared(IR)Port
Receivesinfraredbeamtosynchronizefrequencies.Whenusing
multiplesystems,onlyonetransmitterIRportshouldbeexposedata
time.
④4-PinMicrophoneInputJack
UsewithwithaTA4Fconnectorforalavalierorheadsetmicrophone.
⑤AudioInputGain
Adjustsaudiolevel.
⑥XLRConnection(FP3only)
PlugintoanXLRmicrophoneortheoutputofanaudiodevice.
⑦AudioInputLevelIndicator(FP3only)
Red
Signalclip
Yellow
Nominalpeak
Green
Audiopresent
7