
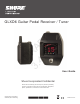
User's Manual


8
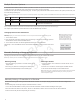
Multiple Receiver Systems
If several channels of wireless audio are needed, up to 8 GLX-D receivers can operate simultaneously in the 2.4 GHz spectrum. For ease of set up,
available frequencies are divided into three groups based on the number of receivers supported.
All receivers in the system must be set to the same group. To select a group, determine the total number of receivers in the system (channel count), and
then select the appropriate group.
Note: To maximize the number of receivers on-air, Group 3 does not offer backup frequencies. Group 3 should only be used in controlled Wi-Fi environments to prevent interference from unexpected Wi-
Fi devices.
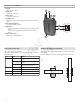
Group Channel Count Backup Frequencies Available? Notes
1 Up to 4 Yes Initial Factory Setting.
2 Up to 5 Yes Best Group to use if you experience interference.
3 Up to 8 No Only use Group 3 in controlled Wi-Fi environments because there are no backup
frequencies to avoid interference.
Note: If you experience interference, reduce transmitter to receiver distance and set all GLX-D systems to group 2, which is the most robust wireless group.
See "Tips to Improve Wireless System Performance" section for additional steps if needed.
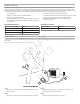
Setting Up Receivers and Transmitters
Note: Before beginning, turn off all receivers and transmitters. Turn on and set up each receiver/transmitter pair individually to prevent
cross-linking.
1. Turn on the first receiver.
2. Press and hold the group button to select a group (if necessary) or if the group is already set, press the
channel button to scan for the best available channel.
3. Turn on the first transmitter. The blue RF light will illuminate when a link is established.
Repeat steps 1-3 for each additional receiver and transmitter. Remember to set each receiver to the same
group.
Manually Selecting a Group and Channel
Specific groups and channels can be assigned to the receiver instead of using the automatic scan function.
Note: Group 3 should only be used in controlled Wi-Fi environments to prevent interference from unexpected Wi-Fi devices.
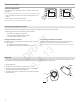
Manually Linking a Transmitter to a Receiver
Use the manual linking option to change the transmitter linked to a receiver. For example, changing the linked transmitter from a bodypack to a
handheld.
Use the following steps to manually change the transmitter linked to a receiver:
1. Turn on the transmitter: Within 5 seconds, press and hold the LINK button until the transmitter LED begins to flash green.
2. Press and hold the link button on the receiver: The blue rf LED will flash, and then remain on when the link has been established.
3. Test the audio to verify the link and adjust the gain if necessary.
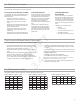
Note: Dashes appearing on the group
and channel display during a channel
scan indicate that frequencies are
not available in the selected group.
Choose a group that supports more
receivers and repeat the set up steps.
Selecting a Group
1. Press and hold the group button for 2 seconds until the group
display flashes.
2. Press the group button to scroll through the available groups.
3. The receiver will automatically save the selected group.
Selecting a Channel
1. Press and hold the channel button for 2 seconds until the channel
display flashes.
2. Press the channel button to scroll through the available channels.
3. The receiver will automatically save the selected channel.
Note: A double dash symbol-- displayed on the receiver screen during a channel scan indicates
that there are no available channels within the selected group. Choose a group with more
channels and repeat set up steps.
DRAFT
3.4.13