
Owner's Manual

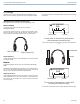
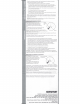
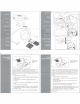


Table Of Contents
- PSM300 User Guide
- PSM300 Stereo Personal Monitor System Online User Guide
- Table of Contents
- PSM300Stereo Personal Monitor System
- Important Product Information
- PSM®300
- PSM®300
- Hardware
- System Applications
- System Setup and Configuration
- Operation
- Troubleshooting
- Specifications
- RF Carrier Range
- Compatible Frequencies
- Tuning Bandwidth
- Operating Range
- Audio Frequency Response
- Signal-To-Noise Ratio
- Total Harmonic Distortion
- Companding
- Spurious Rejection
- Latency
- Frequency Stability
- MPX Pilot Tone
- Modulation
- Operating Temperature
- RF Output Power
- RF Output Impedance
- Net Weight
- Dimensions
- Power Requirement
- Audio Input
- Connector Type
- Polarity
- Configuration
- Impedance
- Nominal Input Level
- Maximum Input Level
- Pin Assignments
- Phantom Power Protection
- Audio Output
- Connector Type
- Configuration
- Impedance
- Active RF Sensitivity
- Image Rejection
- Adjacent Channel Rejection
- Intermodulation Attenuation
- Blocking
- Audio Output Power
- Minimum Load Impedance
- Headphone Output
- Output Impedance
- Net Weight
- Dimensions
- Battery Life
- Frequency Range and Transmitter Output Power
- Optional Accessories and Replacement Parts
- Certifications
- PSM®300 Personal Monitor Wireless System Frequency Supplement
- PSM300 Personal Monitor System Product Info
- P3RA User Guide
- P3RA Professional Bodypack Receiver Safety Information
- SE215 Manual
- Rack Mount Hardware Kit Instruction Sheet
- AA Battery Insertion for Bodybacks
- A Quick Guide to Personal Monitor Systems
- Warranty
- Safety Precautions

Audible click
when
properly
seated
You may need to detach the cable from the earphones to attach
optional components
or
to replace the cable if it becomes
damaged.
To
prevent accidental separation, the connector has a
snug fit. Take special care
to
prevent damage to the earphone and
connector.
Do
not use pliers
or
other tools.
Grasp the connector and the earphone as close as possible to
where they join.
Pull straight
apart-do
not twist. Cable is a snap fit, not
threaded.
Do
not pull on the cable
or
put any pressure on the earphone
nozzle.
Listen for a click when connecting.
When reattaching the cable, match the "L" and "R" markings.
For clear cables and earphones, match the color dots (Red =
Right,
Blue=
Left).
Note:
If you pull
at
an
angle,
the
connector
will
not
detach.
Se
debe escuchar
un
clic cuando
se
asientan
correctamente
Puede ser necesario desconectar el cable
de
los auriculares para
conectar componentes opcionales o para cambiar el cable si este
se daiia. La conexi6n del cable no esta diseiiada para uso diario,
y para evitar la separaci6n accidental, el conector tiene un calce
ceiiido. Tenga cuidado especial para impedir
daiio
al auricular y al
conector.
No utilice pinzas u otras herramientas.
Tome el conector y el audffono lo mas cerca posible del punto
donde
se
juntan.
Tire recto para
separarlos-no
tuerza.
El
cable es
de
calce a
presi6n, no roscado.
No tire del cable ni aplique presi6n en la punta del auricular.
Debe escuchar un clic cuando haga
la
conexi6n.
Cuando reconecte el cable, haga coincidir las marcas "L" y "R".
En el caso
de
cables y auriculares transparentes, haga coincidir
los puntos
de
color (rojo = derecha, azul = izquierda).
Nola: Si
lira
de
la conexi6n en un angulo, el conector
nose
desconectara.