
Installation Instructions

Questions: Contact PLASTIC DEVELOPMENT GROUP at 248-363-5552 or visit us at www.plasticdevelopmentgroup.com
CLEANING: Use garden hose to spray off debris and dirt. For more extensive cleaning, use a soft bristle brush
and mild detergent.
REVERSIBLE SHUTTER INSTALLATION INSTRUCTIONS
USING METAL SHUTTER SCREWS (NOT INCLUDED)
TOOLS REQUIRED: Power Drill, Phillips Head Screwdriver, Tape Measure, Pencil or Marker, 3/16-in. Drill Bit,
1/8-in. Drill Bit.
HARDWARE INCLUDED: 24 ea. 5mm x 9mm screws; 12 plastic shutter spikes.
FASTENERS REQUIRED: 2½-in. Pan Head Screws (6 per shutter), #10 Screw Anchors (6 per shutter)
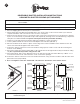
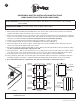
1. Remove Shipping Spacers and recycle as noted if FIG. 1.
2. Shutter ships with reversible panel installed with 2 each, 5mm x 9mm screws inserted. If this style is desired,
complete installation with 4 each 5mm x 9mm screws in each panel.
3. If panel reversal is desired, remove 2 each 5mm x 9mm screws from each panel, turn over insert panel so desired
style is out. Position rmly on panel tab receptor and complete by inserting screws as indicated in Fig 2. Repeat for
each panel as noted below. Do not separate raised panel and rustic panel when installing.
4. Prepare to locate spike holes by laying the shutter face DOWN on a clean, at surface.
5. Locate cylindrical stand-off at each corner and midpoint of the side stile. (SEE FIG. 2)
6. Raise the shutter from the surface or place over the edge of the surface and drill a 3/16-in. diameter hole in the
center of the stand-off through the back of the shutter.
7. Position the shutter on the house next to the window. Using a pencil, marker or nail, mark the mounting hole
locations on the building.
8. Remove the shutter and, where marked, drill a 3/16-in. diameter hole through the Wood, Vinyl or Aluminum siding
only. Do not penetrate beyond the siding into the wall.
9. If the wall is Wood - Drill a 1/8-in. diameter hole, 1½-in. deep into the wall. If the wall is Masonry or Brick – use a
screw anchor for #10 screw. Follow direction on the screw anchor package.
10. Position the shutter on the house next to the window and fasten, using a hand screw driver, with the 2½-in. #10
pan head screws (not provided).
11. Do not overtighten screws into shutter/wall – this will cause deformation of the shutter surface.
FIGURE 2FIGURE 1
Cylindrical
Stand-Off
Cylindrical
Stand-Off
Cylindrical
Stand-Off
Cylindrical
Stand-Off
Cylindrical
Stand-Off
Cylindrical
Stand-Off
FIGURE 3B
(Rustic Panel)
FIGURE 3A
(Raised Panel)
Shipping
Spacer
Panel Tab
Receptor(s)
(6 ea. panel)
Panel Tab
Receptor(s)
(6 ea. panel)
9mm
Panel Tab
Receptors
9mm
Panel Tab
Receptors
9mm
Panel Tab
Receptor
9mm
Panel Tab
Receptor
9mm
Panel Tab
Receptor
9mm
Panel Tab
Receptor
REVSHUTINSTM39434751 REV4
2