SIDE-POWER Stern Thruster Installation Manual Rev 1.7.2 Thruster Systems Installation manual is rd th a p bo ee n K al o u an m ! SLEIPNER MOTOR AS P.O. Box 519 N-1612 Fredrikstad Norway Tel: +47 69 30 00 60 Fax: +47 69 30 00 70 w w w. s i d e - p o w e r. c o m s i d e p o w e r @ s l e i p n e r.
Installation Installation To effect,reliability reliabilityand and durability Sidepower Sternthruster, correct instalToachieve achievemaximum maximum effect, durability fromfrom youryour Sidepower Sternthruster, a correctainstallation is very lation is very important. important. Please follow the instructions carefully, and make sure that all checkpoints are carefully controlled. Please follow the instructions carefully, and make sure that all checkpoints are carefully controlled. 1.
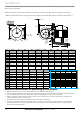
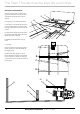
E Bolt ON installation for Composite or GRP tunnels Ø305 3 2a. Once the position for the installation has been decided, hold the tunnel in place in the horizontal position and mark the bolt holes. Remove the tunnel and then it is possible to calculate and mark the centre (see Fig. 1). 3a. It is important that the tunnel flange sits flush on the transom. If not, the fitting area on the transom will have to be adjusted to ensure a perfect fit.
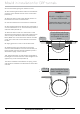
Mould in installation for GRP tunnels MOULD IN INSTALLATION WARNING! 2b.Cut of the bolting flange on the stern-tunnel 2b. Cut of the bolting flange on the stern-tunnel Mould in installation is ONLY WARNING! for stern GRP tunnels. 3b. Grind off the gelcoat both inside and outside theremaining “tube”off atleast 10cm/4” down onand the“tube” 3b. Grind the gelcoat both inside outside the (see FIG. 5). remaining “tube” atleast 10 cm down on the (see FIG.to 5).the desired position on 4b.
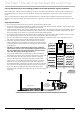
keep getting wet (rust and corriosion). Therefore, the thrusters installation compartment must be kept dry at all electromotor and and solenoid system is not to be considered as waterproof, and will be dammaged if they times. getting wet (rust and corriosion). Therefore, the thrusters installation compartment must be kept dry at all This is more difficult for a sternthruster installation than for a bowthruster installation as the sternthruster has to be s. fitted in the bilge at the stern of the boat.
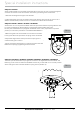
TheSTERN-THRUSTER Stern Thruster must kept DRY dry at times THE MUST be BE KEPT ATall ALL TIMES STERN-THRUSTER MUST BE KEPT AT ALL TIMES THETHE STERN-THRUSTER MUST BE KEPT DRYDRY AT ALL TIMES Description of illustrations: Description of illustrations: Description of illustrations: Description of illustrations: A : All draining holes or other openAll draining holes oropenother F Aings : All draining holes or other openA : AllA: draining holes or other from wet areas into theopenDF ings from wet areas into th
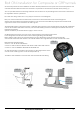
Sidepower SP 55 Si Special installation instructions As the motorbracket are completely inside the stern-tunnel, the oil-pipe must be changed to an elbow SPECIAL INSTRUCTIONS connection so thatINSTALLATION the oil hose will not be bent, preventing from constrictions. Sidepower SPthe 55 Si 1. Remove Sidepower SPstraight 55 Si hose pipe in the bracket. As motorbracket arehose completely inside the stern-tunnel, oil-pipe be changed toto an on elbow 2.
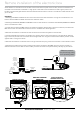
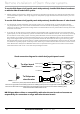
Remote installation of the electronic box As the electronic controlbox and its contact are the most sensitive parts on the thruster, we advice that these are removed from the thruster and fitted in a high place in the boat to secure these from water ingress, even if the thruster compartment gets flooded. Included with the stern-thruster tunnel kit is an extension cable that will allow you to do this. REMOTE INSTALLATION OF THE ELECTRONIC BOX.
Remote installation of Stern thruster systems ELECTRICAL INSTALLATION OF STERNTHRUSTER SYSTEMS PS ! This is additional information especially for sternthruster installations, and the PS ! This is additional information especially for sternthruster installations, and the installation for theyou thruster you aremust installing must be used complementary. manual manual for the thruster are installing be used complementary.
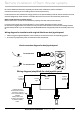
To use the Sidepower dual joystick panel with previously installed Sidepower bowthruster installation with the older 3 lead Remote ofelectric Sternsystem. thruster systems - Please contact your distributor / dealer to purchase an upgrade kit to rebuild your existing bowto the new dual 4 leadjoystick electric system. The wiring diagram on the previous page will then be the To usethruster the Side-Power panel with previously installed Side-Power bowthrustone for your complete system.
Installation checklist INSTALLATION CHECKLIST There is a sturdy additional support under the electric motor, taking the weight/ load of the electromotor There a sturdy additional support under the electric motor, taking the weight/ load of away fromisthe stern-tunnel. the electromotor away from the stern-tunnel.
Worldwide sales and service www.side-power.com SLEIPNER MOTOR AS P.O. Box 519 N-1612 Fredrikstad Norway Tel: +47 69 30 00 60 Fax:+47 69 30 00 70 www.side-power.com sidepower@sleipner.