
User's Manual

COMMUNICATION CERTIFICATION LABORATORY TEST REPORT: 73-6954
FCC ID: L82-242240
Page 105 of 129
Exhibit 8
5.
Plug the AC power adapter into the wall outlet (standard
110/120 VAC).
If you do not have a standard wall plate, mount the base
directly to the wall (mounting screws not included).
Installation Tips
Fully charge the battery pack 12 hours before first using the
phone.
To get the maximum distance and the best sound quality from your
handset,
•
Install the base away from electrical appliances such as
televisions, personal computers, microwave ovens, and other
cordless phones.
•
Install the base in a high, central location with few
obstructions.
•
Operate the handset awayfrom appliances and other cordless
phone base units.
Preparing the Handset
Installing / Replacing the Battery Pack (Diagram)
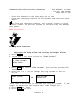
1.
Press in on the battery cover release.
2.
Slide the battery cover off the handset (Diagram).
3.
Plug the plastic connector of Battery Pack into the socket
inside the battery compartment of the handset
(Diagram).
4.
Insert the Battery Pack into the battery compartment.
5.
Slide the battery cover onto the handset; listen for a snap
(Diagram).
Charging the Battery
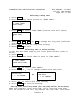
1.
Place the handset in the base for 12 hours before first use
(Diagram).
2.
Place the handset in the base for 8 to 12 hours to recharge.
The battery cannot be overcharged.
The handset may face to the front or back while it is in the
base (Diagram).
Maximizing Battery Performance
A fully charged battery pack lasts for approximately
•
4 hours when using the handset continuously (talk time)
•
7 dayswhen the handset is not in use (stand-by time)
To maximize battery performance