
Installation Instructions


Installation Instructions
Document No. 129-078
March 15, 2022
Free Energy Band
™
TH193 HC
Heating/Cooling Room Thermostat
Item Number 129-078+3, Rev DA Page 1 of 4
Product Description
The TH193 HC thermostats are proportional dual
output, dual setpoint, two-pipe (dual one-pipe, low
air capacity) or three-pipe (dual two-pipe, high air
capacity) temperature controllers. Each TH193 HC
chassis includes a wall plate for thermostat
installation using a variety of rough-in installation
kits.
Prerequisites
• Review all instructions before beginning
installation.
• Verify job drawings are available to reference
specific job site information as needed.
• Verify rough-in installation kits (wall-box or
tubing runs) are pre-installed.
Expected Installation Time
30 Minutes
Required Tools
• Medium flat-blade screwdriver
• Needle nose pliers
• Small level
• Calibration and cover screw wrench or 1/16-
inch Allen wrench (P/N 192-632)
• Needle Probe with 1-1/2 inch diameter, 0 to
30 psig (0 to 200 kPa) test gauge
(P/N 192-633)
Warning/Caution Notations
WARNING
Personal injury or loss of life
may occur if a procedure is not
performed as specified.
CAUTION
Equipment damage or loss of
data may occur if the user
does not follow a procedure as
specified.
Installation
Overview
The TH193 HC thermostat and wall plate mount
vertically to a wall using a variety of rough-in
installation kits (for example, wall box kits or tubing
terminal kits). The ends of the air lines from the
rough-in installation kits have terminal adapters that
snap into the wall plate. Terminal adapters are also
available separately as orderable accessories. See
TB 237 (155-244P25).
NOTE: Certain retrofit applications allow air
connections directly to the thermostat
chassis.
The S, R1, and R2 labels on both the thermostat
chassis and the wall plate identify the air line
connections. The thermostat plugs into the terminal
adapters on the wall plate. See Piping for typical
connections.
Two cover screws plus latch arms on the wall plate
hold the thermostat in place. The cover fits over the
thermostat and the two cover screws fasten it to the
wall plate.
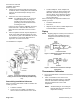
Procedure
The following procedure is for a typical thermostat
installation and assumes the rough-in installation kit
is in place. See Figure 1.
1. The rough-in installation kit provides a supply
(blue) air line and a return air line joined by an
air link. Remove the terminal adapters from the
air link and snap them into the wall plate at their
respective locations.
2. Using the mounting screws supplied with the
thermostat chassis, install the wall plate on the
wall as follows:
a. Guide the screws through the slotted
keyholes on the wall plate and partially insert
them into wall.
b. Orient the wall plate so that it is square and
level.
c. Tighten the mounting screws to secure the
wall plate in place.