
Installation Instructions


Document No. 129-241
Installations Instructions
September 30, 2009
Information in this publication is based on current specifications. The company reserves the right to make changes in specifications and models as
design improvements are introduced. Product or company names mentioned herein may be the trademarks of their respective owners.
© 2009 Siemens Industry, Inc.
Siemens Industry, Inc.
Building Technologies Division
1000 Deerfield Parkway
Buffalo Grove, IL 60089
+ 1 847-215-1000
Your feedback is important to us. If you have
comments about this document, please send them to
sbt_technical.editor.us.sbt@siemens.com
Document No. 129-241
Printed in the U.S.A.
Page 2 of 3
Instructions
Removing an existing actuator from a valve
1. Remove and cap the air line to the actuator.
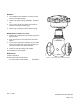
AP0236R1
RETAINING
CLIP
2. If there is a retaining clip on the actuator, unscrew
the actuator from the valve. The retaining clip holds
the lower housing and retaining ring together.
Choose one of the following methods for removing the
actuator if there is no retaining clip present.
Method 1
1. Insert a hex wrench into the small slot in the lower
housing.
AP0235R1
;;
;
1/16 inch
(1.5 mm)
RETAINING
RING
LOWER
HOUSING
VALVE
BONNET
Figure 1. Securing the Retaining Ring before Removing the Actuator
from a Valve.
2. Slowly rotate the lower housing to align the slot with
the hole in the retaining ring. Insert the wrench in the
retaining ring hole.
3. Leaving the wrench in place, unscrew the actuator
from the valve.