
User Manual


3SU18 enclosures
8.1 Enclosures for actuating and signaling elements
SIRIUS ACT 3SU1 pushbuttons and signaling devices
System Manual, 02/2015, A5E03457306020A/RS-AB/002
153
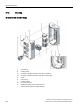
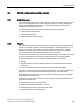
Procedure
1. Undo the screws and remove the enclosure top
2. Insert the actuating or signaling element (C1) from the front through the opening of the
enclosure top (A).
3. Fit the holder (D) from behind onto the actuating or signaling element and lock it into
place.
4. Turn the screw at the holder until the actuating or signaling element is fixed securely and
cannot vibrate or twist (tightening torque 1.0 to 1.2 Nm).
5. Mount an LED module, if necessary. An LED module can only be installed in slot number
3 (e.g. A3, B3, C3 etc.).
6. Mount the contact module(s) into the enclosure lower part (see also Chapter Fitting with
contact modules and LED modules (Page 153)).
7. Mount the enclosure top (see Chapter Mounting of the enclosure upper part (Page 154)
for this).
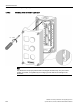
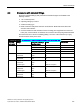
8.1.3.1
Fitting with contact modules and LED modules
The contact modules and LED modules are mounted in the enclosure lower part.
To equip an enclosure, follow these steps:
1. Snap the module
① onto a slot in the enclosure. The narrow snap hook must point in
direction "A" here.
Refer also to the information on fitting in Chapter "Mounting positions (Page 151)".