
Data Sheet for Product


656 Powermite Valve with 3-inch Top Rebuilding Technical Bulletin
Document Number 155-240P25
March 7, 2005
Siemens Industry, Inc. Page 5
Disc Replacement,
Continued
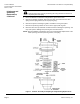
Normally Closed Valves
Model 3
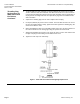
1. Loosen and unscrew the cap from the bottom of the valve body. If the stem
assembly is not easily accessible, put 20 psi (138 kPa) air pressure on the valve
actuator.
2. Use a hex Allen wrench on the bottom of the valve stem to prevent it from turning
while using an open-end wrench to loosen and unscrew the retaining nut from the
stem assembly.
3. Remove the washer, the disc holder, and the disc.
4. Replace the disc in the disc holder. Replace the washer and tighten the retaining nut
onto the stem assembly.
5. If present, replace the O-ring. Apply a small amount of silicone grease to the O-ring.
6. Tighten the valve cap onto the valve body.
Figure 5. Normally Closed Valve Disc Replacement Model 3.
Throttling Plug
Replacement for
Water Mix Flared
End Valves
(See Figure 7 )
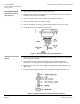
1. Loosen and unscrew the valve cap using a 1-13/16 inch wrench.
2. Use the special seat removal tool (Figure 6) held with a 7/8-inch wrench to unscrew
and remove the valve seat retainer. The lower seat and gasket will drop out.
NOTE: The seat removal tool must be made locally. It is not offered as an orderable
part.
Figure 6. Seat Removal Tool. Dimensions in Inches (Millimeters).