
Data Sheet for Product


656 Powermite Valve with 3-inch Top Rebuilding Technical Bulletin
Document Number 155-240P25
March 7, 2005
Information in this publication is based on current specifications. The company reserves the right to make changes in specifications and models as
design improvements are introduced. Powers is a registered trademark of Siemens Industry, Inc. Product or company names mentioned herein
may be the trademarks of their respective owners. © 2005 Siemens Industry, Inc.
Siemens Industry, Inc.
Building Technologies Division
1000 Deerfield Parkway
Buffalo Grove, IL 60089
+ 1 847-215-1000
Your feedback is important to us. If you have
comments about this document, please send them
to sbt_technical.editor.us.sbt@siemens.com
Document No. 155-240P25
Printed in the USA
Page 7
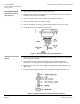
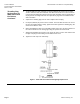
Water Mix Screwed
End Valves
1. Loosen and unscrew the valve seat (bottom port) from the valve body. If the stem
assembly is not easily accessible, put 20 psi (138 kPa) air pressure on the valve
actuator.
2. Use a 3/32-inch hex Allen wrench in the bottom of the valve stem to prevent it from
turning while using a 3/8-inch wrench to loosen and unscrew the disc retaining nut
from the stem assembly.
3. Separate the stem collar and disc holder and both discs from the stem assembly.
4. Remove and replace the discs.
5. Slide the disc holder with the new discs, and stem collar over the stem.
6. Tighten the disc retaining nut to the stem assembly.
7. Replace the O-ring if damaged. Apply a small amount of silicone grease to the
O-ring.
8. Tighten the valve bottom port to the valve body.
Figure 8. Water Mix Screwed-end Valve Disc Replacement.