
User Manual


Programming LOGO!
3.7 Writing and starting the circuit program
LOGO!
Manual, 06/2014, A5E33039675
89
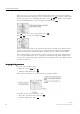
6. Press
OK
in the circuit program window, and the cursor now appears as a solid square.
7. Move the cursor to the Q1 block and then press
OK
.
8. Move the cursor to B2, the input of Q1, and confirm with
OK
.
9. Now set the blank connector at output Q1 instead of block B2:
– Select the blank connector: Press
or
– Apply the blank connector: Press
OK
Result:
LOGO! deletes block B2 and all blocks that connect to B2 (in this case, block B1)
from the circuit.
3.7.10
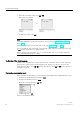
Correcting programming errors
You can easily correct programming errors in LOGO!. Providing that you are still in editing
mode, you can revert one step by pressing
ESC
. If you have already configured all inputs,
simply reconfigure the faulty input:
1. Move the cursor to the faulty position.
2. Change to editing mode: Press
OK
.
3. Enter the correct input circuit.
You can only replace a block with a block that has exactly the same number of inputs.
However, you can delete the old block and then insert a new one. You can choose any new
block.
3.7.11
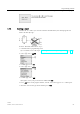
Selecting analog output values for RUN/STOP transition
You can set the behavior of up to eight analog outputs when LOGO! changes from RUN
mode to STOP mode. To set the behavior for analog outputs for a RUN-to-STOP transition,
follow these steps:
1. In the programming menu, move the cursor to "
①": Press or
2. Select "
①": Press
OK
3. Move the cursor to "'
AQ
": Press or
4. Select "
AQ
": Press
OK