
Operating Instructions

PXM10T and PXM10S
Pocket Reference
Overview
The PXM10T and PXM10S modules are available as
an upgrade for use with Compact and Modular
Series field panels to provide additional capabilities.
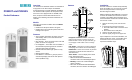
The PXM10 module replaces the field panel covers
with a new cover equipped with an ALARM, INFO,
ESC, turn/push selection button/knob and LCD
display screen allowing interactive feedback at the
controller.
Models
There are two models of PXM10 devices: PXM10S
and PXM10T.
PXM10S has all options listed in this guide.
PXM10T does not include the point monitor and
backlight color options.
Features
View controller information and status, view and
acknowledge alarms, and command/override
local point values.
Plug and Play - Upon connection to the host field
panel, the device is recognized.
Hot Swappable - The module can be installed or
removed without powering down the controller
and interrupting facility operations.
Manual and/or automatic logon option for easy
access.
Multi language support.
Point Monitor – Customize a group of points to
continuously display and refresh with updated
values (PXM10S only).
Buttons
Navigation Turn/Push button – Turn left or
right to go up or down in menus. Press the
button to enter a menu, OK your selection, go
to next page or edit a value. Turn to change
value.
ESC button – Press once to return to previous
menu/page, and to abort current value editing.
INFO button – Press once to return to previous
menu/page or refresh the date and time on
welcome screen.
Alarm button – Press to display active alarm
menu. Alarm button LED:
Off: No alarm/offnormal/fault/failure
conditions and no unacknowledged objects.
Blinking: At least one unacknowledged
object is pending.
On: There are alarm/offnormal/fault/failure
conditions, but have all been acknowledged.
Installation
Firmware 2.8.6/3.2.2 and later will dynamically
detect the PXM10. It is not necessary to power
down the field panel when connecting and
disconnecting the PXM10.
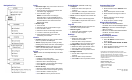
Ribbon Cable PXA-HMI.CABLEP5 is necessary
to mount the PXM10 onto a PXC16 or PXC24
controller. The PXM10 will mount directly onto
the PXC-Modular and PXC36 controllers without
the need for a cable.
1. Remove the factory cover from the field
panel.
2. If mounting onto a PXC16 or PXC24:
a. Attach the ribbon cable to the back of the
PXM10.
b. Attach ribbon to the field panel.
3. Seat the two tabs into the slots.
4. Push the upper prong into the upper slot.
Upon completion of successful installation, the
PXM10 will become active. If the PXM10 does
not become active, remove the device and
repeat the installation steps.
PXM0004R1
U14 U15U8 U9 U10 U11 U12 U13 AO2 AO3AO1U1624V 24V
PXC36 or PXC-M
U14 U15U8 U9 U10 U11 U12 U13 AO2 AO3AO1U1624V 24V
PXM0006R1
OK
ESC
PXM10T
+
-
INFO
PXC16 or PXC24