
Installation Instructions

Installation Instructions
Document No. 545-426
September 20, 2002
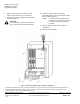
Removal of RPU, RCU, or RCU P2
Internal Components
Item Number: 545-426-02, Rev. 010 Page 1 of 2
Product Description
These installation instructions explain removal of all
existing internal RPU, RCU, or RCU P2 components
(termination strips, card cage, and line cards).
Instructions for tagging wires are also included.
Product Numbers
None
Warning/Caution Notations
WARNING:
Personal injury or property
damage may occur if you
do not follow a procedure
as specified.
CAUTION:
Equipment damage or loss
of data may occur if you do
not follow a procedure as
specified.
Required Tools
• Medium flat-blade screwdriver
• 9/16-inch nutdriver
• Voltmeter
Expected Removal Time
6 hours
Prerequisites
• System software is upgraded to a P2
database.
• RPU, RCU, or RCU P2 point definition report
is available to aid in designing the new system
in Commissioning Tool and tagging the wires.
• Job drawing and MBC/MEC layout sheet are
available.
• Appropriate personnel are notified of a power-
down. Equipment is placed in proper manual
override mode or the equipment disconnect
switch is removed.
CAUTION:
Failure to place equipment into proper
manual override mode or remove the
equipment disconnect switch may result
in equipment damage or loss of critical
building control functions.
Removal
WARNING:
Turn off AC power to the panel and
each motor control circuit at the circuit
breaker.
1. Verify the AC power from the circuit breaker
panel to the RCU is off.
2. Unplug the power supply from the outlet.
CAUTION:
Before removing the wires, use a
voltmeter to ensure no power is running
through the DO wiring.
3. Disconnect one set of wires associated with a
point from the termination strip.
4. Write the MBC/MEC address from the layout
sheet on the tag, and wrap the tag around the
bundle of wires associated with the point.
Tag the wires as close to the point of entry into
the cabinet as possible.
5. Write the wire designation (NO, NC, COM, SIG,
GND) from the picket of each wire on the wire
tag. Wrap the tag around each wire.
NOTE: Do not disconnect another set of wires until
you have properly tagged and marked the
wires you just removed.
Continue with steps 3 through 5 until all the wires
are removed from the termination strips and tagged.